Q: "What's the best screen recorder for Mac? I want to record something, but I'm looking for high-quality options. Any recommendations are much appreciated." - From Reddit
In this era of rapid development of electronic devices, the popularity of audio and video has always been high, and screen recording is no longer a function for specific people. Whether you are a professional video producer or an amateur computer player, there will always be times when you need to screen record on Mac, such as reporting the most common computer problems, saving hot videos from YouTube, keeping in-game highlights, etc. Don't be stuck with recording issues on your Mac. Just take a look at some of the simplest and most useful ways here.
- Part 1. What Benefits Can You Get When Screen Record on Mac?
- Part 2. 9 Ways to Record Screen on Mac
- Part 3. Comparison: Which Mac Screen Recording Solution to Select?
- Part 4. How to Troubleshoot Recording Issues on Mac
- Part 5. FAQs about Screen Recording on Mac
- Part 6. Final Words
Part 1. What Benefits Can You Get When Screen Record on Mac?
Recording screen on Mac is actually quite handy for various reasons. It makes the things in life that can't be described in a single sentence easier than ever. Before creating a recording file on Mac, let's first know what benefits it brings to us.
- Demonstrate what a particular piece of software can do for you, often with amazing features
- Preserve and share important moments, like gameplay highlights, interaction in a video call, etc.
- Report technical bugs or issues that suddenly happen to you
- Create how-to tutorials, vivid video instructions
- Capture streaming video or music from online websites, social media, or other platforms
- Record important matters discussed in the meeting to better take the minutes
- Record the main points of knowledge in online courseware, which is convenient to review later
- Show others ongoing activity on the computer screen without lengthy explanation, especially for remote collaboration
Part 2. How to Screen Record on Mac
Though there is a rich variety of Mac screen recorders in the current market, you might still have a hard time deciding. Here are some best ways to help you record whatever happens on Mac. Now keep pace with us to see what they are.
#1 Joyoshare VidiKit [Top Recommendation]
What we'd like to first recommend is a professional and efficient tool called Joyoshare VidiKit. It can record any on-screen video and audio activities in high quality, including live chats, meetings, streaming movies, class lectures and gameplay, etc. Its outstanding audio capturing technology also allows you to grab not only system sound but also microphone voice. Utilizing this competitive program, you can flexibly save finished recordings in any format and portable device like MP4, MOV, AVI, MKV, etc. Based on your preferences, you can customize recording area, create scheduled tasks, highlight cursor movements, take screenshots, cut recordings, etc.

- Record screen with audio on Mac and Windows
- Grab video with no watermark, no time limit and no lag at all
- Record webcam, video, and audio together
- Output screen video in 1080p/4K at up to 240fps
- Support nearly all formats and allow parameter customization
Valid until Dec 31, 2025
Copy the coupon and paste it at checkout.
Step 1 Fit out Mac with Joyoshare VidiKit
Firstly, you should equip your Mac with Joyoshare VidiKit. Simply download it from official website. Once the installation is completed, it will run automatically on your Mac computer and you can go for Recorder functionality section to open "Screen Recorder".
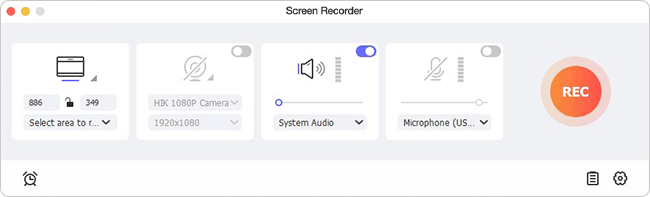
Don't forget to turn on System Audio and/or Microphone Audio in the middle of the main screen and adjust the volume before recording. If you'd like to record video with webcam, turn "Camera On" and set it as you wish.
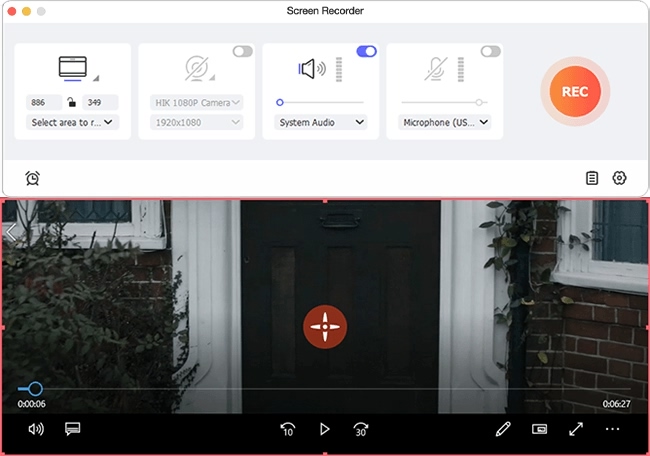
Step 2 Choose the Area You Want to Capture
Go ahead to the left section and click "Select area to record". You can directly personalize a specific recording size by customizing the adjustable pop-up window. Or straightly hit the drop-down list and pick up a preset standard ratio, such as 1280x720, full screen, etc.
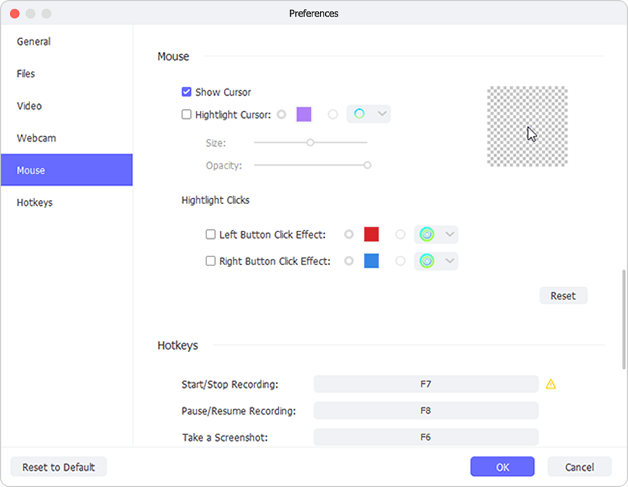
Step 3Confirm Recording Preferences
Here you are supposed to click on the little gear "Preferences" icon at the lower-right corner of the user interface to call out the settings panel. Under Video, you are free to customize your output format and change parameters. You are also able to show and highlight cursor, change shortcut keys, etc. in the way you prefer.
Step 4Begin to Record Mac Screen
Having done all of settings as per your needs, you ought to click the "REC" button to initiate the recording process. During the process, you have the right to take screenshots and cut recordings.

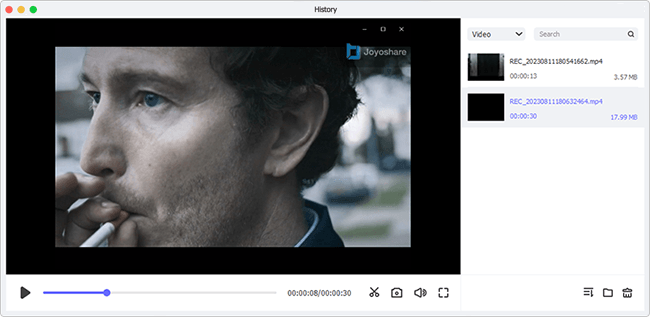
Step 5Edit Finished Recording
When you accomplish a recording task by clicking the Stop button, the "History" window will be opened automatically so that you can preview your captured video. Just click them one by one to let Joyoshare VidiKit play for you. Then it's available to delete unwanted files and keep satisfying one. You can even right-click on each file to choose the "Edit" option and trim video to remove unnecessary segments.
#2 QuickTime Player - Default Way without Downloading
One of the free ways to screen record on Mac is to use its built-in recording tool called QuickTime Player, so you don't have to install any other third-party software. Using QuickTime screen recording only needs a few quick steps as follows.
- Step 1: Run QuickTime program from Application folder and go to "File" → "New Screen Recording" option to create a new screen recording task.
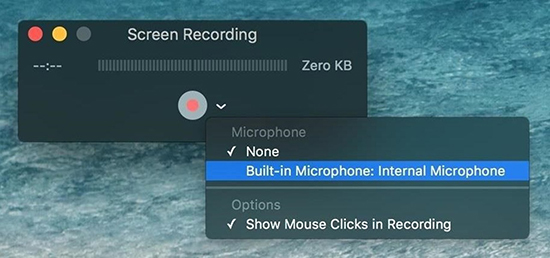
- Step 2: Click the triangle button in the pop-up screen recording window to customize the settings according to your needs, such as choosing to record screen without sound or capture microphone sound at the same time.
- Step 3: Next click the red "Record" button and start recording your Mac computer; drag to choose a specific recording area on screen or hit anywhere on the desktop to record in full screen, and then press the "Start Recording" to capture screen.
- Step 4: To finish screen recording, you can simply click the "Stop" button and then you're able to preview and save the recorded video.
#3 Screenshot Toolbar - Quick Solution
The desktop activities on your Mac computer can also be recorded using the Screenshot Toolbar. To view it, you need to press Shift + Command + 5 together. After that, you are able to record either the entire screen or a selected portion of the screen. You can also utilize this utility to capture a still image of your Mac screen.

- Step 1: Click the
 icon in the onscreen controls, which will change your pointer to a camera icon.
 - Step 2: Next, you are able to either click any screen or tap the "Record" button in the onscreen controls to start recording your Mac screen.
- Step 3: Click the
 icon in the menu bar or press Command + Control + Esc to stop recording; you can use the thumbnail to share, save, trim, or take other actions.
3.1 Record the entire screen:
- Step 1: Tap the
 icon in the onscreen controls to record any portion of your Mac screen.
 - Step 2: Now you are able to drag to choose an area of the screen to record.
- Step 3: Press the "Record" button in the onscreen controls to start recording Mac and the icon to finish recording easily; you can also stop recording by pressing Command + Control + Esc.
3.2 Record a portion of the screen:
#4 Movavi Screen Recorder
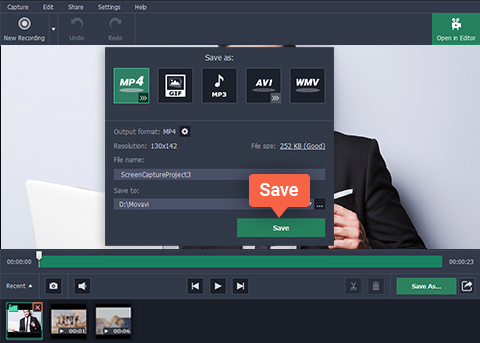
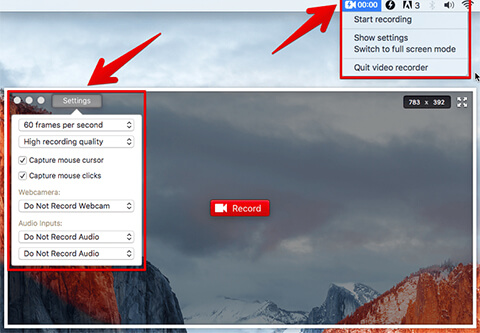
Movavi Screen Recorder can be used to capture online video calls, record webinars, make video tutorials, grab streaming events and music from different websites, etc. It is a powerful yet lightweight screen recording tool for both Windows and Mac. In addition to this, Movavi Screen Recorder comes with an inbuilt video editor. You are allowed to apply a few special effects, stylish filters, etc.
- Step 1: Download and launch Movavi Screen Recorder on your Mac computer.
- Step 2: Tap the camera button on the sidebar or press F10 to activate the screen recording feature.
- Step 3: Click and drag on the screen to select the capturing area you want using the orange markers on the frame or enter the exact size on the panel above.
- Step 4: Choose to turn on/off your webcam and microphone.
- Step 5: When you are ready to begin, you can click the REC button. after a three-second countdown, Movavi Screen Recorder will begin to record screen on Mac easily and quickly.
#5 Camtasia
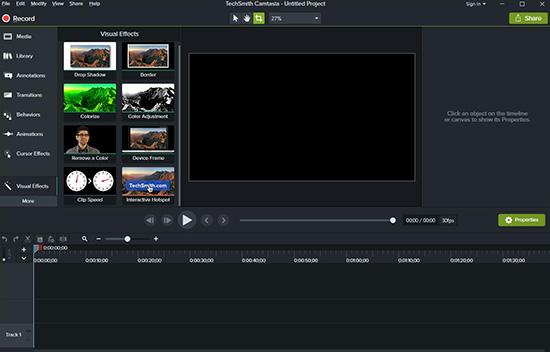
Camtasia makes it pretty simple to record videos on Windows and Mac professionally in an easy manner. It will not pose any limit over the length of video and audio file recording. You are able to use it to record webcam, voice over or any other thing that happens on the desktop of your Mac computer. More surprisingly, Camtasia has a much more powerful inbuilt video editor than other competitors, which will enable you to edit videos and audio separately, add annotations and special effects, create caption, etc.
- Step 1: Double-click the Camtasia app on your Mac and select the "New Recording" option.
- Step 2: You are able to choose to record in full screen or in a selected portion of screen under the "Select area" option.
- Step 3: Under the "Recorded inputs", you will be capable of turning on/off camera and audio according to your actual needs.
- Step 4: After confirming everything related to Mac screen recording, you are free to click the red "REC" button on the right side of the toolbar to start recording Mac screen using Camtasia.
- Step 5: Once you stop recording, your recorded video file will be opened automatically so that you can preview and edit it directly.
You May Also Like: How to fix Camtasia black screen
#6 OBS
Though you may find it difficult to understand how OBS works at first, once you get the hang of it, you will find it powerful and reliable. As one of the most well-known open-source screen recorders for Windows, Mac, and Linux, OBS has strong ability to support audio mixing, live streaming, and video recording. To screen record with OBS, you can follow the below guide.
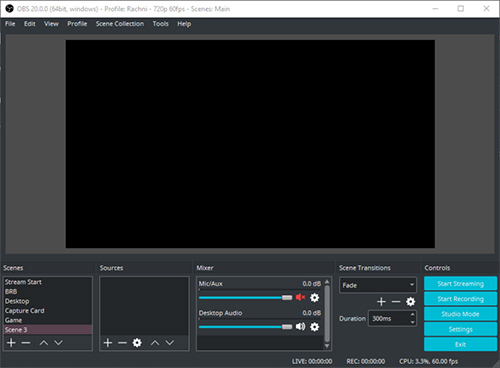
- Step 1: After running the OBS app on your Mac computer, you can click the "Scene Collection" from the top menu bar to choose the "New" option to create a new scene.
- Step 2: Next, click the "+" button located under the "Sources" section at the bottom of the main screen to select the "Display Capture" on the list.
- Step 3: Now you are able to click on the blue "Start Recording" button on the right side of the main screen to begin to record Mac computer screen; later, you are free to click the "Stop Recording" button to finish recording.
#7 VLC
It is so amazing that you can record screen with VLC on Mac. If you plan to record Mac screen activities but there is no more enough space to install a third-party screen recording tool, you can totally rely on VLC, a versatile media player, to record videos with audio in a few clicks only. Your recording will be saved in MP4 format in the destination folder.

- Step 1: Launch VLC on your Mac and then navigate to File → Open Capture Device to select the "Capture" tab in the "Open Source" dialog.
- Step 2: Click on the "Input Devices" and choose "Screen" and set your desired frame rate in the "Frame per Second" box.
- Step 3: Next, click the "Open" button to get a loop of VLC player windows.
- Step 4: Now, go back to the "Playback" menu and choose "Record" from the dropdown list, which will make VLC start recording your Mac screen. When you are done recording, you need to go back to the "Playback" menu from the top bar of VLC and uncheck "Record".
#8 ActivePresenter
ActivePresenter is an all-in-one eLearning Authoring software, video editor as well as screen recorder that has outstanding performance. Generally speaking, you can take advantage of ActivePresenter to record Mac computer screen to create a video demo so that you can show what your service or products look like. This software will help capture almost all live actions on the screen along with keyboard and mouse actions.
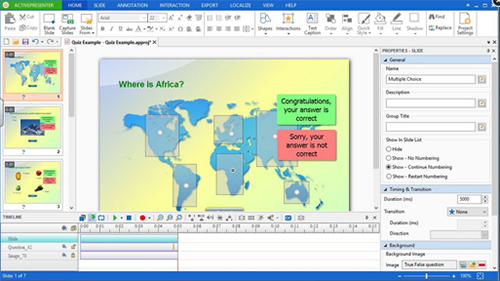
- Step 1: Click on the "Record Video" on the "Start Page", select the "ActivePresenter" button and click "Record Video" in the open project window.
- Step 2: Now you can begin to set up every aspect related to Mac screen recording such as grabbing recording area, enabling webcam recording, turning on audio, etc.
- Step 3: Next, click the "REC" button on the right side of the main screen so that you can start to use ActivePresenter to record screen on Mac.
#9 Monosnap
You may have heard about Monosnap more or less as it can take screenshots in one simple click. However, it can also be used to record videos and GIFs as well as make annotations and highlights at the same time. It has both a free version, which can only be used for non-commercial purposes and paid subscription plans. After recording, you can upload your video file to YouTube straightforwardly.
- Step 1: Run Monosnap and open the main menu to select the "Record video" option.
- Step 2: Before recording, you are able to adjust general recording settings, such as "Webcam" recording, "Audio/Sound" recording, "Fullscreen" or "Area" recording, etc.
- Step 3: After that, click the "Record" button to start; you can click the "Stop" button in the sidebar to quit recording Mac computer screen.
- Step 4: The video preview window with the recorded video will be opened after recording; here you can play and rename video, save and upload video to YouTube or the cloud storage, and so forth.
Part 3. Comparison: Which Mac Screen Recording Solution to Select?
You may be a little confused about the different tools and methods you use for recording on Mac. Here to give you a relatively clear understanding of all of them in a short period, without testing, we've compiled this comparison table below.
| Joyoshare VidiKit | QuickTime Player | Screenshot Toolbar | Movavi Screen Recorder | Camtasia | OBS | VLC | ActivePresenter 8 | Monosnap | |
|---|---|---|---|---|---|---|---|---|---|
| Time Limit | × | × | 30 seconds | × | × | × | × | × | × |
| Price | $15.95 | Free | Free | $42.95-$85.95 | $179.88-$299.99 | Free | Free | $199-$399 | $0-$10 per month |
| System Sound Recording | √ | × | √ | √ | √ | √ | √ | √ | √ |
| Microphone Sound Recording | √ | √ | √ | √ | √ | √ | √ | √ | √ |
| Webcam | √ | √ | √ | √ | √ | √ | √ | √ | √ |
| Make Annotation | √ | × | × | √ | √ | √ | × | √ | × |
| Video Uploading | × | × | × | √ | √ | √ | × | √ | √ |
| Trimming | √ | √ | × | √ | √ | √ | √ | √ | √ |
| Supported OS | Windows, Mac | Mac | Mac | Windows, Mac | Windows, Mac | Windows, Mac and Linux | Windows, Linux and Mac | Windows, Mac | Windows, Mac |
| Parameter Customization | √ | √ | × | √ | √ | √ | √ | √ | √ |
| Resolution and Frame Rate | √ | √ | × | √ | √ | √ | √ | √ | √ |
| Task Screenshots | √ | √ | √ | √ | √ | √ | √ | √ | √ |
| No Watermark | √ | √ | √ | √ | √ | √ | √ | √ | √ |
Part 4. How to Troubleshoot Recording Issues on Mac
Your recording process can't go smoothly if there's a recording problem. Here are some common issues you possibly experience and we show you corresponding solutions.
- 1. Screen recording is not allowed on Mac
- ☞ Authorize screen recording in security settings. In macOS Ventura, head to Apple menu → System Settings → Privacy & Security. You can choose Screen Recording and allow apps to record the contents of your screen.
- 2. No sound in recorded video on Mac
- ☞ Quit the recording software you're using to capture audio. In macOS Ventura, go to Apple menu → System Settings → Privacy & Security. Find Microphone in the list and allow the applications to access your microphone.
- 3. Recording is incomplete or failed to save recording
- ☞ Ensure there is enough space for you to initiate a screen recording task and store what you capture. You can delete unused apps to make more room.
- 4. Recorded files cannot be recognized in editing software
- ☞ Make sure your recorded video is saved in a compatible format that target editing software can well support. If not, try to convert video format to a mainstream one or resort to another editing software for post-process.
- 5. Finished video is flickering after output on Mac
- ☞ Update both graphics drivers and screen recording software on your Mac computer. Before recording, go to settings to set a lower quality level and lower parameter value.
- 6. Screen recording software on Mac crashes
- ☞ Check if your screen recording software is the latest version. Or you can use another recording tool as alternative.
- 7. Recorded video is stored with a large file size
- ☞ Before recording, go to customize a lower resolution for your video. Or you can compress the video on Mac by using a video compressor. If you create MOV video with QuickTime that results in a massive file size, it's feasible to convert MOV to more compact formats, such as HEVC or H.264.
- 8. Black screen in recording
- ☞ Restart Mac computer; update your screen recording software; disable hardware acceleration for video processing; check whether the target streaming media platform limits in screen recording due to copyright protection.
- 9. Video is laggy or has a low frame rate
- ☞ Close all unnecessary apps and background tasks; restart Mac computer; only record partical area rather than the full screen; apply a lightweight screen recorder, especially when record gameplays.
Part 5. FAQs about Screen Recording on Mac
Q1. How can I record my Mac screen for free?
A: If you don't want to pay anything for screen recording on Mac, you can use the inbuilt recording tool in the Mac like Screenshot Toolbar, QuickTime Player or choose an open-source screen recorder for Mac like VLC, OBS.
Q2. Why is there no sound when I screen record on Mac?
A: In many screen recording tools, the "audio source" is set to none by default. To screen record on Mac with audio, you should confirm that you have configured the recording settings correctly and turn on your audio function in your Mac system.
Q3. How do I record my screen and audio at the same time on Mac?
A: To record screen and audio at the same time, you should prepare a recording tool featured with both screen and audio recording functions. Then go to the audio settings, simply decide to capture audio from system and mic simultaneously or separately as you want. The aforementioned Joyoshare VidiKit is a good choice for you. If you want to grab audio from microphone only, the default QuickTime Player can be also considered.
Q4. Where are screen recordings saved on Mac?
A: QuickTime Player can auto-open the video recording once you click on Stop Recording button. Then it enables you to save recording file to wherever you want (File → Save). For native Screenshot Toolbar (Shift + Command + 5), screen recording file will be saved to Desktop (To change the location, simply go to Options → Save to).
Part 6. Final Words
After reading this post, I assume you've figured out how to record screen on Mac. 9 best ways to do that have been introduced and at the same time we help you to solve common screen recording issues on Mac. Admittedly, both QuickTime Player and Screenshot Toolbar save the time of installing third-party software, which always are top priorities. However, if you have more needs in the recording functions, look further at other solutions, such as Joyoshare VidiKit, an all-in-one recording software to capture screen, audio, webcam, game, and window in high quality.
