Q: "Can I directly record a .wav file on my Mac?" - From MacRumors
Have you stumbled across a great audio file online, but can't download it locally? Or perhaps you need to capture high-quality, lossless audio for a podcast or music production? Figuring out how to record a WAV file on Mac is a common challenge, especially since Macs have native restrictions on capturing internal system audio.
Fortunately, recording directly to the WAV format is not a complicated project. Whether you prefer using the built-in QuickTime Player alongside Apple Music, or you want to use a professional third-party audio recorder to capture system sound effortlessly, we have you covered. Follow this guide to explore the 5 best ways to capture WAV audio on macOS.
- Part 1. 5 Best Tools to Record a WAV File on Mac
- Part 2. FAQs about Recording WAV Files on Mac
- Part 3. Summary
Part 1: 5 Best Tools to Record a WAV File on Mac
Recording audio on your Mac and saving it in the lossless WAV format is easy once you have the right software. While native tools require a bit of format conversion, professional third-party recorders allow you to capture and export directly. Let's explore the best methods available.
1. Joyoshare VidiKit (Audio Recorder)
Because macOS restricts users from recording internal computer audio directly, Joyoshare VidiKit acts as the perfect solution. This professional audio recorder easily bypasses Mac's limitations, allowing you to capture sound from both your microphone and internal system audio simultaneously or separately.
Unlike native Mac apps, Joyoshare VidiKit lets you export your recordings directly into lossless formats like WAV, FLAC, and high-quality MP3 without needing a secondary conversion step. It also features a built-in scheduler to auto-stop recordings, making it ideal for capturing live internet radio, streaming music, or long podcasts.

- Record WAV files on Windows and Mac in high sound quality
- Support mainstream audio formats and parameter configuration
- Auto-stop recording to avoid endless waiting
- Support capturing various types of sound sources
- Post-edit recordings such as trim, audio tag, etc.
Step 1 Run Joyoshare VidiKit and Set Audio
Double-click the program icon of Joyoshare VidiKit on your Mac device to launch it after installation. Under the Recorder section, find and hit Audio Recorder to activate it.
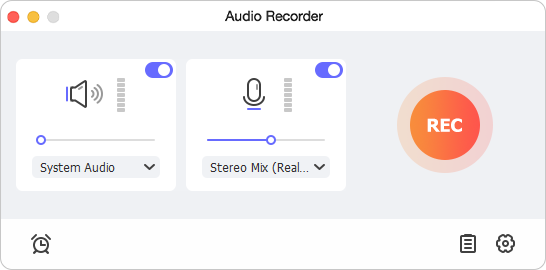
According to your actual situation, you can decide whether to turn on "System Audio" and "Microphone Audio". Simply click on the respective area to complete the sound source confirmation.
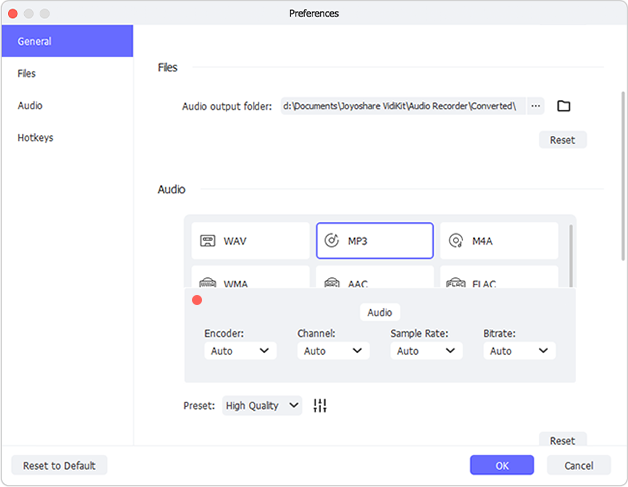
Step 2 Check Audio Recording Settings
Click the gear-shaped "Preferences" on the bottom right, locate the Audio section in the left column and select WAV as the output format. Afterwards, head to Preset, and choose whether to save your audio file in "Small Size", "High Quality" or "Customized". You can click on the "Setting" icon next to it to change encoder, bit depth, channel, and sample rate.
Step 3 Start to Record a WAV File on Mac
Prepare the track that you want on Mac, click the 'REC' button on the right of the interface to start recording, and play the audio. You can use the Pause button to skip any unwanted segment, or Cut to make it small pieces.

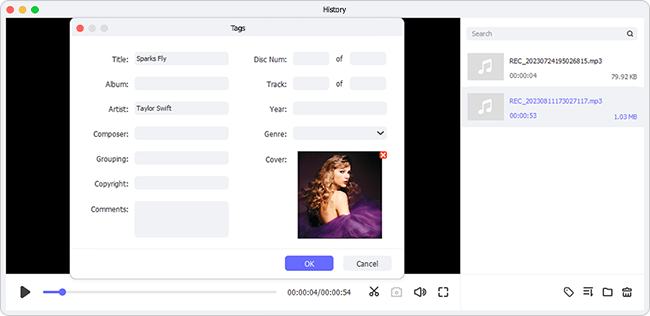
Step 4 Save Recording(s) in WAV
With a simple click on "Stop" button, Joyoshare VidiKit will save your recorded files under the History. It's feasible to right-click each audio file to furtherly open it on local folder. Or "Edit" it by trimming, changing audio tag information, etc.
2. QuickTime Player
QuickTime Player is the default media application for Mac. It features a simple user interface that lets you quickly record voice notes and microphone audio. However, QuickTime does not natively save files in WAV format; it saves them as lightweight M4A files. To get a WAV file, you will need to record the audio first and then convert it using the built-in Mac Music app.
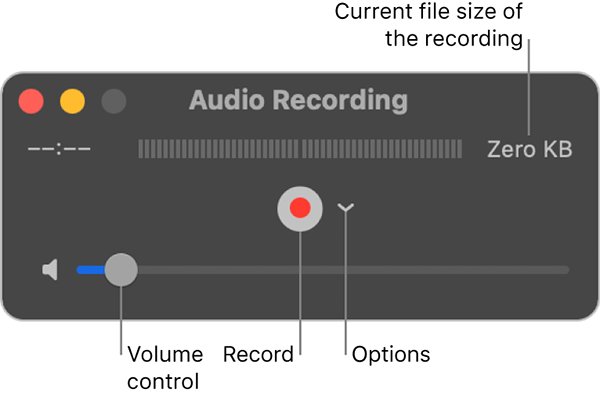
- Step 1: Open QuickTime player on your Mac and click on the New Audio Recording option under the File menu.
- Step 2: Click on the small arrow near to the red recording button to confirm settings like microphone and quality.
- Step 3: Hit the red button to start recording audio on Mac.
- Step 4: Click the same button to stop recording when done.
- Step 5: Save the recorded file on a desired storage location on Mac.
- Step 1: Open the Music app on your Mac, then choose Music → Settings → Files.
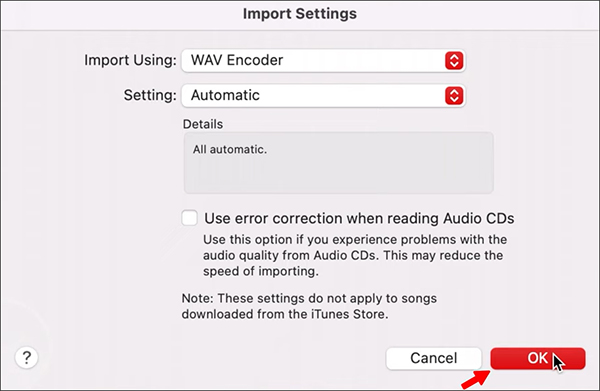
- Step 2: Click on Import Settings... at bottom left.
- Step 3: Click on Import Using drop-down menu, select "WAV Encoder", and confirm your change with OK.
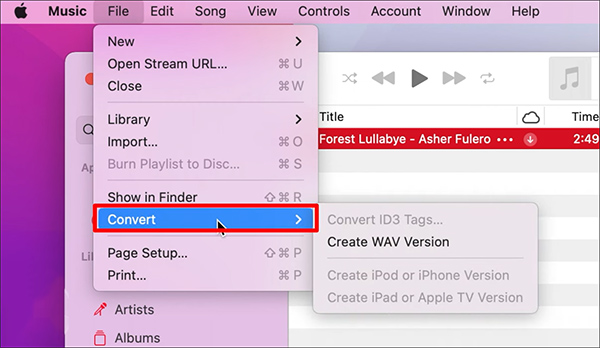
- Step 4: Now you can go to File → Import... to select and open the recorded M4A audio file.
- Step 5: Here simply hit the Songs section in the left column and choose your imported M4A file. It's time to start conversion by clicking File → Convert → Create WAV Version. Once done, the new WAV file will be shown in Songs section and then right-click it to hit "Show in Finder". Now you can get your local WAV file on Mac.
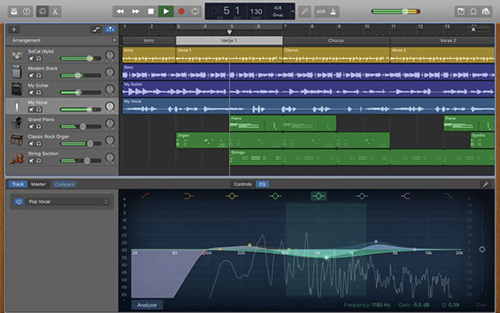
3. Garageband
Garageband is actually a superexcellent music creation studio to fully appreciate. It comes with a complete sound library, offering users an array of various instrumental effects, pre-made loops, voice recordings, and more. As an audio recorder, it's able to record sounds from both internal and external microphone. There are many sound effects it provides for enhance the audio recordings. Greatly, this app can well support popular music formats like WAV, AIFF and MIDI.
- Step 1: Install and launch Garageband on your Mac.
- Step 2: Head to "Project Templates" in the left column and choose Voice tab. Afterwards, a new project with many windows will be shown. You're suggested to close extra window and only pay attention to the editing timeline.
- Step 3: To start recording, you can hit the red Record icon in the secondary menu.
- Step 4: Click on the same red icon again to stop recording audio on Mac. If need, you can also edit it in the way you want.
- Step 5: Find and click Share → Export Song to Disk. GarageBand lets you rename, set location, quality, and format. You can choose WAVE and then click Export.
4. Audacity
Audacity is undoubtedly the most popular audio recording and editing app that has a large user base. It can record anything you want and helps create podcasts, memos, voice-over, and more. What's better, it supports importing and exporting WAV, MP3, AIFF, OGG Vorbis, etc. So, you can use it to capture audio from your Mac computer and then refine it with the built-in editing tools.
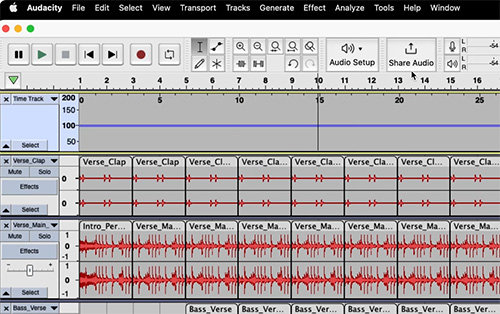
- Step 1: Run Audacity (V3.4.2) on Mac.
- Step 2: Go for Edit on the top menu and click Preferences from the drop-down list. Select Audio Settings → Recording → Device. Simply set sound source to capture audio from.
- Step 3: Now click the red "Record" button in Audacity to begin recording. You can play target audio or speak whatever you want.
- Step 4: When the recording process is finished, simply hit the Stop button.
- Step 5: Then head to the top menu bar and click File → Export Audio → Format. Choose WAV and change other settings, like metadata tags, audio channel, sample rate, encoding, etc. Confirm with "Export".
5. EaseUS RecExperts
EaseUS RecExperts for Mac is an excellent tool for capturing WAV files on your Mac device. This software can help you record YouTube audio, internet radio, streaming video, and sound from external devices. It also can be a screen recording software and decent video capture. The recordings it creates can be saved and exported to MP4, GIF, M4A and more.
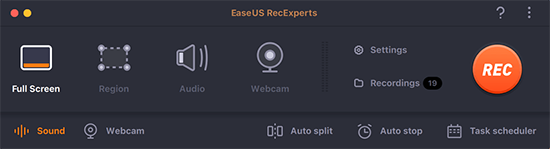
- Step 1: Launch the EaseUS RecExperts for Mac on your device.
- Step 2: Choose Settings → Audio and pick up WAV as the output format.
- Step 3: Return to main interface and set the sound source you'd like to capture audio from.
- Step 4: Click the REC button to start recording.
Part 2: FAQs about Recording WAV Files on Mac
Q1: Besides QuickTime, what tool can I use on Mac for audio recording?
A: Voice Memos app on Mac can be another good recording software. It uses built-in microphone, external microphone, or supported headset to create an audio recording. However, the same as QuickTime Player, it cannot directly save your recordings to WAV format.
Q2: How to record WAV file online?
A: This is actually a simple thing. As long as you search in Google, you can find lots of free online audio recorders. Any one of them can help record WAV file quickly. Therefore, choose it for yourself as long as you have a good network and don't mind pop-up ads.
Q3: How to record WAV on Mac with external microphone?
A: Sometimes, it's needed to record audio, including WAV, on Mac using an external microphone. However, QuickTime usually sets its built-in microphone to capture sound by default. To switch it, you have to go to "System Preferences" → "Sound" → "Input". Then choose external microphone that you've connected on Mac via USB or the one with its own separate audio interface. Go back to QuickTime and you can now record with the external one.
Or you can directly choose external microphone in QuickTime from its drop-down menu next to REC button. Just ensure your external microphone has been connected to Mac computer properly.
Q4: Why should I record in WAV instead of MP3 on my Mac?
A: WAV is an uncompressed, lossless audio format. This means it retains 100% of the original audio quality without any data loss. It is the industry standard for podcast editing, video post-production, and music mixing. MP3, on the other hand, compresses the file to save space, which permanently removes some audio data.
Part 3: Summary
Recording a WAV file on a Mac is simple. You can use native workarounds like QuickTime Player and the Music app, or choose third-party tools like Joyoshare VidiKit for direct-to-WAV recording. Ultimately, if you frequently capture high-quality system audio or streaming music, investing in a dedicated audio recorder prevents format conversion headaches and saves you valuable time and effort.
