YouTube is well designed to entertain our leisure life as one of the most popular online video-sharing sites, letting us enjoy music and videos, upload original content, and learn what's hot and what attracts attention from both home and abroad. Often having fun on this platform, is there a special video that gives you a deep impression? How will you generally save these clips on your computer or smartphone? Actually aside from downloading, some of you might wonder how to record YouTube videos to keep partial content, right? Now here in this post, we'll show how to make it on both computers and mobile phones, no matter which operating system your device is running on.
- Part 1. Is It Legal to Screen Record YouTube Videos?
- Part 2. Best Way to Record YouTube Videos on PC - Joyoshare VidiKit [21-in-1 Toolkit]
- Part 3. Record Videos from YouTube on Mac - QuickTime
- Part 4. Record Videos from YouTube on Linux - OBS
- Part 5. Record YouTube on iPhone - Default Screen Recorder
- Part6. Record YouTube on Android - Apowersoft Android Recorder
- Part 7. FAQs about Recording YouTube Videos
Part 1. Is It Legal to Screen Record YouTube Videos?
Not sure if it's legal to record a video from YouTube? You can think about what your intention is to record the content and whether it violates copyright policies and terms. Generally, unauthorized downloading is not allowed by YouTube, especially when you get something from others' published video for reuse or redistribution without permisson.
However, under some certain circumstances, copyright-protected content can be used without authorization from someone else who owns the copyright to. This is usually regarded as "Fair Use". Here are four factors of fair use that you can take a close look at:
- The actual purpose and character of the use: whether the recorded YouTube video is for commercial use (that's monetization a video), or it is only kept for non-profit educational use.
- The nature of the copyright-protected content: the content from factual works can be fairer to use than fictional works.
- The amount and substance of the parts recorded and used account for the proportion of the whole work.
- The impact of actual use on the potential market and the original work.
Part 2. How to Record YouTube Videos on PC - Joyoshare VidiKit
Joyoshare VidiKit has adopted top-leading screen capturing technology to help record screen, specific window, ongoing gameplay, audio and even webcam, without damaging original quality. With multiple recording modes for you to switch based on actual scenarios, you can capture whatever you like in the most appropriate and professional way. There is no time limit, no ads and no watermark during the whole recording process. Best of all, you can customize output format and configure desired parameters. The resolution can reach up to 1080p and 4K while the frame rate can be 240fps, ensuring you a smooth recording experience.

- Record video with audio from YouTube in 4K without time limit
- Capture gameplay, YouTube TV, live stream, music, etc.
- Support customizing resolution, codec, sample rate and more
- Set up to show cursor, adjust shortcuts, auto-stop recording, and more
- Support independent audio, webcam, window and game recorders
Step 1 Open Screen Recorder in VidiKit
Run Joyoshare VidiKit directly on your PC once you have installed it. Then, go for Recorder section in the program's main interface and fire up Screen Recorder.

Note: Considering you always visit YouTube official channel in a browser, you can also choose "Window Recorder" in VidiKit to directly capture what is going on under a specific window.
Step 2 Decide Capture Area
By clicking "Select area to record" in the left side, a window will pop up that allows you to adjust capturing area manually. Or you can straightly choose preset standard resolutions, like 1280x720, for YouTube. Besides these, you also have the right to enter the exact number in the frame to customize it with your style. It's suggested to open your YouTube window to better set a recording region.

Note: To avoid unexpected noise, you can close the microphone sound with only System Audio on. However, if you'd like to do the narration while recording, simply turn on "Microphone Audio". You can preset audio as per your needs.
Step 3 Customize Recording Options
Clicking the "Preferences" gear icon in the lower-right corner of the main interface, then the specific settings will be presented in your sight, which enables you to set up the storage path, output format, hotkeys, cursor effect and more based on your own preferences.

Step 4 Start to Record a YouTube Video
Visit YouTube's official online website and play a video you like. Then it's time for you to record it using Joyoshare VidiKit by clicking the "REC" button. During the period of capturing, screenshots can be kept using the shortcut you set previously. Also, you can hit the scissor-shaped button to cut your YouTube video into several clips.

Step 5 Edit Captured YouTube Video
Upon the recording process is finished, simply click on the Stop button and you can view your YouTube videos listed in the pop-up "History" interface. It's available to play, rename and trim it, making it whatever you want.

Part 3. How to Record YouTube Videos on Mac - QuickTime
Which way will you apply to record videos from YouTube if your computer runs Mac operating system? Indeed, options are diverse, including iMovie, Photo Booth and QuickTime. Considering operability and popularity, here we are going to take QuickTime as an example to demonstrate how to record screen on Mac from YouTube without any hassle.
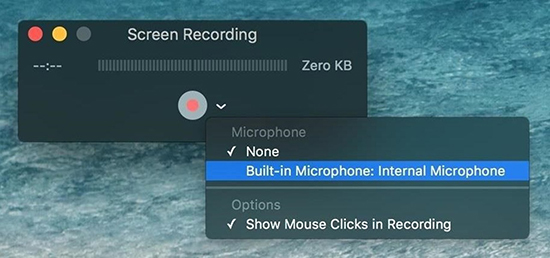
- Step 1: Find and launch QuickTime in your Applications folder on Mac.
- Step 2: Click on "File" → "New Screen Recording" from the menu bar to display the onscreen controls and initiate a recording assignment.
- Step 3: Click on the down-arrow to change relevant recording settings, such as open the Microphone, Mouse Clicks.
- Step 4: Now hit the red Record button. Then either click anywhere on the Mac screen to record in full screen or drag to select a region in any size to record. Simply click on "Start Recording" within that area to begin recording a YouTube video.
- Step 5: Using shortcut (Command + Control + Esc) or click "Stop" in the menu bar to finish your recording.
Part 4. Record a YouTube Video on Linux - OBS
Is a free and Linux-supported tool your top priority? If you are in this case, you are likely to wonder how to record YouTube videos with OBS. It is an open-source video streaming and recording program. Alright, this reputable software runs on multiple platforms and records activities on screen or from browsers in a professional way. However, it's a bit difficult for newbies to understand how it works at first. But no worries. In this part, we will go through a quick-start method to help capture YouTuve content.
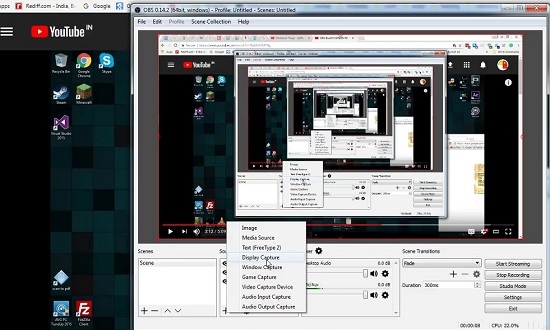
- Step 1: Open OBS on Linux → hit the "+" option under "Scenes" to create a new scene.
- Step 2: Click on "+" button under "Sources" and choose Browser or others → "Create New" to confirm the source.
- Step 3: Check audio settings under Mixer section.
- Step 4: When all Settings are decided, you can hit "Start Recording" to record YouTube video. It's better to test several times before a formal recording.
Part 5. Record YouTube Video on iPhone - Default Screen Recorder
The pre-installed screen recorder on iOS devices has brought us a lot of conveniences. You can depend on it to record your onscreen YouTube videos in pretty high quality. Requiring no extra download and installation, this onscreen video recorder can be accessed from the iOS's Control Center straightforwardly. It allows you to capture sound as well. When the recording process is completed, you can go to the Photos app to manage your saved YouTube videos.
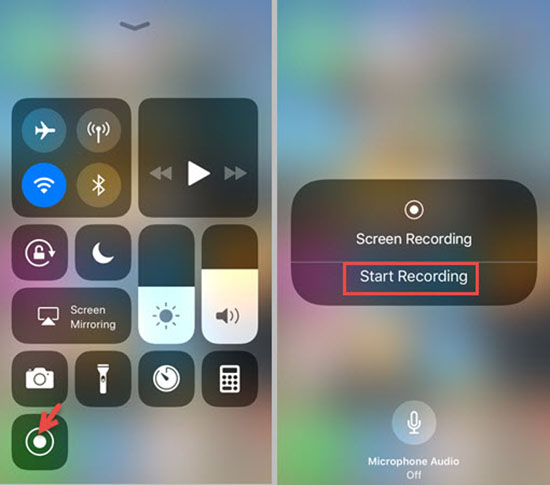
- Step 1: If you have iOS 14 or later, you can open your Settings app and then Control Center → More Controls (or Customize Controls for iOS 13 or earlier) to Select the "+" button next to Screen Recording.
- Step 2: Open your iPhone's Control Center and then touch and hold the Record button, which is grey. You can also tap the Microphone button.
- Step 3: Now you can select "Start Recording" and play your YouTube videos. After the three-second countdown, a red status bar will appear at the top of your iPhone screen, showing that your video played is being recorded.
- Step 4: Open the Control Center again to tap the red Record button or the red status bar and then choose "Stop" to end the recording process.
Part 6. Record YouTube on Android - Apowersoft Android Recorder
Apowersoft Android Recorder is compatible with Android 5.0 or later. It is capable of casting and recording your Android screen on computer. That is to say, to use this tool, you need to connect your Android device to computer so that the YouTube video played on your Android device can be viewed on your computer instantly. This lets you record YouTube video along with audio, take screenshots, create GIFs, etc. with just one click. More importantly, this Android recorder also allows you to customize quality, resolution, video format, such as MP4, FLV, AVI, etc.
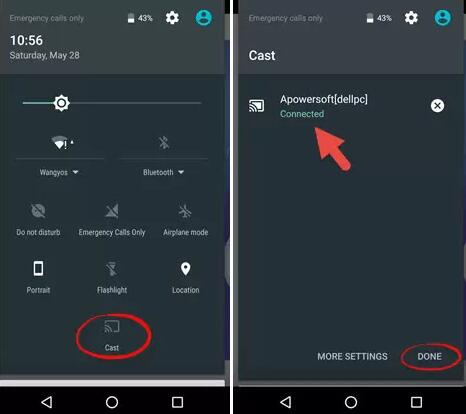
- Step 1: Connect your Android to PC and set them under the same Wi-Fi connection.
- Step 2: After you have successfully connected your Android device to your computer, you are able to click on the red record button on the upper left of the projected screen.
- Step 3: Now you are free to play any YouTube videos on your Android and they will be captured in real-time.
- Step 4: Simply click on the stop button whenever you would like to stop recording YouTube videos, and the recordings will be saved to the output path you set.
Part 7. FAQs about Recording YouTube Videos
Q1: Can I screen record a YouTube video?
A: Yes. You can record a video from YouTube as long as you comply with copyright guidelines and use it based on Fair Use policy.
Q2: Does YouTube have a video recorder?
A: No. YouTube doesn't provide a built-in video recorder. To record what you like from YouTube official website, you should ask other screen recording tools for help.
Q3: Does YouTube know if you screen record?
A: Generally, when you are screen recording a video on YouTube, it cannot detect your activity and don't know that the recording is ongoing.
Q4: Can I record YouTube videos for free?
A: Yes. Nearly all devices, including Windows, Mac, iPhone, and Android, comes with built-in screen recording feature. Such default recording tool requires no software installation, however, only comes with basic ability to record, lacking of advanced settings as well as editing capatibility. If you want to make what you record from YouTube more professional-looking, use dedicated software such as Joyoshare VidiKit here.
Conclusion
After checking out how to record YouTube videos, still not sure which solution to choose? You're suggested to learn more, test personally and look further until get a suitable one. To be frank, the tools recommended here for PC, Mac, Linux, iPhone and Android devices, including Joyoshare VidiKit, QuickTime, OBS, iPhone's default screen recorder and Apowersoft Android Recorder, are all dedicated to recording YouTube videos. Among them, Joyoshare VidiKit is the most flexible and easiest-to-use for both beginners and professionals. We hope that this post can offer real help and you can independently make it and enjoy what you like from YouTube without hassle.
