Using a handy game recorder to record gameplay on Windows 10 has tons of benefits. It is a good way to save highlights, match-winning plays, etc. ensuring that your best gaming moments are saved well so that you can share them to YouTube or Facebook. At that time, you will be able to instantly save short videos of your best action and make eye-catching game videos after clicking on a few buttons. Now here comes a detailed guide on how to record gameplay on Windows 10 in the easiest manner using up to four powerful game recorders. We are sure that you will benefit a lot from the following article.
Part 1. How to Record a Game on Windows 10 - Xbox Game Bar
Windows 10 has a pre-installed Game Bar for anyone who wants to record their gameplay and take screencasts on computer. But you need to keep in mind that Game Bar only record apps. It can only one application window at a time, which means whenever you swtich between apps, it will stop recording. Though Gme Bar is available on all Windows 10 computers, your PC's video cards must meet some hardware requirements if you plan to record game clips and screen.
Guide
Step 1: Open the Game Bar on Windows 10
To open the Game Bar while playing a diversion, squeeze Windows Key + G. It will fly up over the amusement you're playing. If you crush Windows Key + G while Windows assumes that you isn't playing a redirection, Windows will ask with reference to whether you really need to open the diversion bar.
Note: You may need to play the PC entertainment in windowed mode to see the preoccupation bar, so try setting your redirection to windowed mode if you don't see it.

Step 2: Set Recording Settings on Game Bar
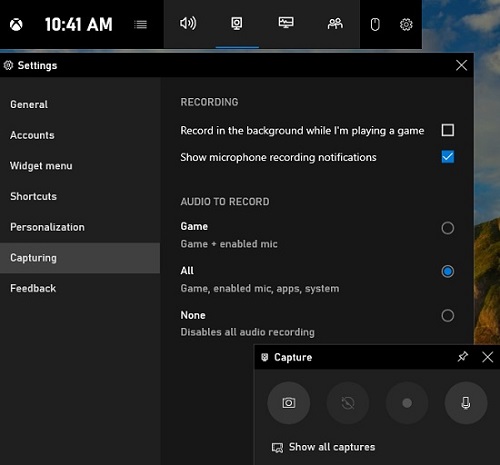
You can choose to click on the "Capture" button on the menu bar (or press Win + Alt + G) to turn on microphone. After that, you can tap the "Settings" button on the menu bar to open a window. Here you will be able to customize almost all aspects related to your gameplay recording on Windows 10. For example, you can open the "Capturing" tab and tick the "All" checkbox so that you can record audio from your gameplay, microphone, apps, etc.
Step 3: Start to Record Games on Windows 10
Now you are able to click on the "Start Recording" button or press Win + Alt + R to begin to record game clips on Windows 10. A timer will appear at the upper right corner of your preoccupation window while it's recording. Similarly, when you're done with recording, you are capable of hitting on the "Stop Recording" button to end the recording process.
More Tips
a. How to take screenshots on Xbox Game Bar?
Use the Game Bar to quickly take a screenshot by tapping the "Take screenshot" button on the "Capture" section or pressing Win + Alt + Prtscrn straightforwardly.
b. How to locate recordings and screenshots on Xbox Game Bar?
To find your game clips and screenshots, you need to press the Windows key, and then go to Settings > Gaming > Captures and find the "Open folder" button. You can also get access to your game videos and screenshots by opening Game Bar and choosing Home > Capture > Show all captures.
c. How to adjust capture settings in Xbox Game Bar?
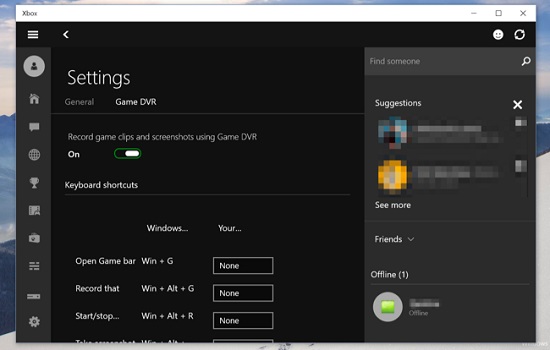
Xbox Game Bar has some settings that can also be found in Windows Settings, which means changing a setting in either location will affect the setting in the other. To open Xbox Game Bar settings, you can press Win + G to open Xbox Game Bar at first and then press the "Settings" button. After that, you will be able to make various adjustments related to your gameplay recording on Windows 10.
Part 2. Record Gameplay on Windows 10 - Joyoshare VidiKit
Joyoshare VidiKit - Screen Recorder is a multipurpose video toolbox with a built-in game recorder. It enables you to easily record games with sound from computer system and microphone. Additionally, Joyoshare VidiKit supports a wide range of output formats, gaming consoles, smart phones, etc. You will be able to create game videos in 1080p with no watermark and no time limit.
Customizing settings is also made easy. You can not only record any area of any size, but also able to adjust video codec, frame rate, bitrate, etc. Moreover, you will be able to add scheduled gameplay recording tasks, highlight cursor and clicks to track mouse movements when making instructional videos, remove any unnecessary content in your recorded game videos, and more.
- Record gameplay on Xbox One, Xbox 360, PS3/4, Wii, etc.
- Create game videos in up to 4K with no time limit and no lag
- Support a variety of output formats and many editing features
- Capture sound from computer system and microphone clearly
- Record gameplay on PC in the background without lagging the game
Step 1 Open Joyoshare VidiKit
After downloading Joyoshare VidiKit on your Windows 10, install and double-click to launch it. On the home interface, press the "Record" panel to choose to open screen recorder. After that, you can press the
 icon if you would like to record game videos with sound on Windows 10.
Step 2 Adjust Recording Preferences
As you can see, there is a little gear icon in the lower-right corner of the main interface. Once you click on it, a window will be unfolded. Then you will be able to make a series of adjustments with a few simple clicks. For instance, you can press the "Format" button to set your output format and get access to a number of parameters. You can also set start/end recording time.

Step 3Grab Capturing Area
Now move to the upper-left corner of the main screen to adjust your gameplay recording area on Windows 10. Press the "+" icon to select any customized area by dragging the blue edge. You are also able to click on the little triangle icon to choose from a list of standard resolutions.
Step 4Record Gameplay on Windows 10
After everything is set well, you can press the blue "REC" button on the right side of the screen to activate the recording process. After a three-second countdown, a dynamic dotted frame as well as a minimized toolbar will show up immediately. On the toolbar, you can press the "Pause" button to skip any content you don't want to record. The "Cut" button is available if you would like to create several different game clips. Tap the "Stop" button to quit recording at any time.

Step 5Optionally Edit Recorded Gameplay
Joyoshare VidiKit also allows you to edit recorded game videos. After the History window pops up, you can easily play your videos using the inbuilt media player and rename them as you like. The "Edit" icon can be used to open the editing window, where you can trim recordings and adjust ID3 tags.


Part 3. How to Record Game Clips on Windows 10 - FBX
FBX, a professional HD screen recorder, is good at recording gameplay on Windows 7/8/10. Supporting lag-free recording, it allows you to instantly save highlights using a single hotkey. When it comes to live streaming, FBX is able to eliminate jerky streams and live stream in real-time. As an all-round game recorder, FBX packs the essential editing tools to make you videos unique and absorbing. You are allowed to add GIFs, special sound effects, animated stickers, change the font of captions, and more.
Key Features:
- Use a hotkey to save short game clips
- Go live fast and save streams to hard disk
- Handle all major games even on low spec PCs
- Support GIFs, stickers, captions, effects, etc.
- Capture high-quality images at any time
Guide:
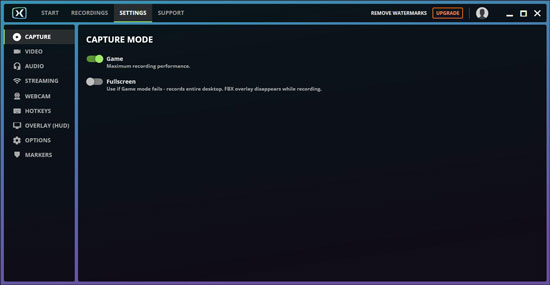
Step 1: Having running FBX game recorder on your Windows 10, you can press the "Settings" tab on the menu bar directly to adjust various settings, such as video, audio, webcam, hotkeys, overlay, etc.;
Step 2: Now you can open the gameplay you want to record on your Windows 10;
Step 3: Press Ctrl + F12 to start/stop recording; a timer will appear on the upper-left corner of the screen to indicate that your gameplay is being recorded;
Step 4: Finally, you can open FBX game recorder again, and then click on the "Recordings" tab to play and edit your recorded game clips.
Part 4. How to Record Gameplay on PC - NVIDIA Share
NVIDIA Share (formerly ShadowPlay) is a screen recording utility to record high-quality gameplay videos, livestreams with your friends as well as screenshots. Only a hotkey is needed so that you can save the last 30 seconds of your Windows 10 gameplay to your hard drive. All your wonderful gaming moments can be saved at up to 4K HDR at 60 frames per second or up to 8K HDR at 30 frames per second. Most importantly, you can totally leave NVIDIA ShadowPlay running in the background without worrying that it will impact your gaming performance.
Key Features:
- Record Windows 10 gameplay at 60fps
- Broadcast to YouTube Live or Twitch easily
- Support both full screen and windowed modes
- Capture and save a screenshot to the Gallery
- Change overlay preferences in the way you like
Guide:
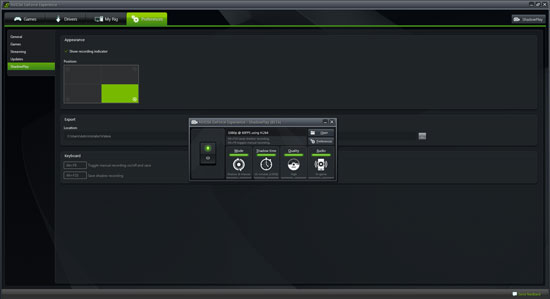
Step 1: Download and install GeForce Experience from NVIDIA, and after that, you can click on the "Share" button to the left of the settings button on the toolbar or press Alt + Z alternatively to open the overlay;
Step 2: If you want to customize related settings, you need to press the "Instant Replay" or "Record" button and then select "Settings" to adjust quality, FPS, resolution, bitrate, etc.;
Step 3: To record game clips on Windows 10, you can press the "Record" button and then click "Start" or press Alt + F9;
Step 4: To stop recording gameplay, you need to press Alt + F9 again or open the overlay instead to tap the "Record" button and then the "Stop and Save" button.
Note: The "Instant Replay" mode will become useful when you want the program to automatically record and save all your gameplay in the background. When it is enabled, you can simply press Alt + F10 to save the last five minutes of your games to a file on Windows 10.
Conclusion:
You can start to try and test each solution above to record gameplay on Windows 10. Don't want to install software? You can directly turn to Xbox Game Bar for help, which is mainly designed to capture your game video clips. However, other solution, like Joyoshare VidiKit, can be considered as well. It records game screen with audio from players' microphone in high resolution with no frame drop.
