When browsing through the Internet, watching video or listening to the podcast, every Windows user has stumbled upon some music or lines that worth saving as an offline recording for later watching or sharing with friends. While most PCs have a built-in recorder to record the sound from the microphone, many users may not know how to record audio on Windows 10 swiftly. Therefore, we have concluded 4 best ways to do that with high-quality and various formats in order to help those in need.
- Tip 1. Joyoshare VidiKit [Best Audio Recorder with Editing Functions]
- Tip 2. Audacity
- Tip 3. Voice Recorder
- Tip 4. Sound Recorder App
- FAQs about Audio Recording on Windows 10
Tip 1. How to Record Audio on Windows 10 - Joyoshare VidiKit
Joyoshare VidiKit - Audio Recorder is a mighty audio recorder that is able to record sound from the computer, the microphone, the speaker or other audio devices connected to the computer. The recording is of excellent quality, and can be saved in more than a dozen formats, including MP3, AAC, AC3, AIFF, ALAC, APE, AU, CAF, FLAC, M4A, M4B, M4R, MKA, OGG, WAV, WMA. It has a multi-functional audio editor that is able to trim the recordings, edit their sound effects and ID3 tags. In addition, the ID3 tags will be matched by the program if you record music playing on the computer. The automatic split of the recordings will increase the recording efficiency dramatically.
- A series of audio formats available on Windows 10
- Powerful audio editor with multiple functions like trimming, cropping and more
- Edit ID3 tag and change audio codec, quality, channel, sample rate, etc.
- Automatically split the recordings to record audio efficiently
- Best audio recorder for Windows 10 to record audio from Windows with original quality
Step 1 Launch Windows 10 audio recorder
Download Joyoshare VidiKit and run it. Then choose Record - Audio Recorder to open audio recorder. In the main interface, press the
 icon to the left of the Start Recording button and set System Audio as the input source. In this way, Joyoshare VidiKit will record the system sound from the computer.
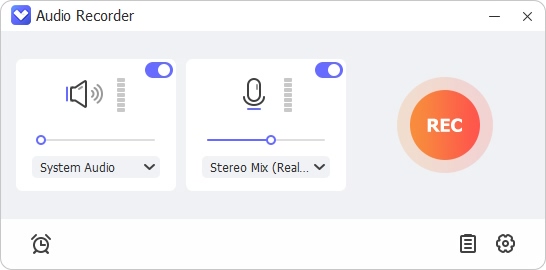
Step 2Set the output settings
Click on the
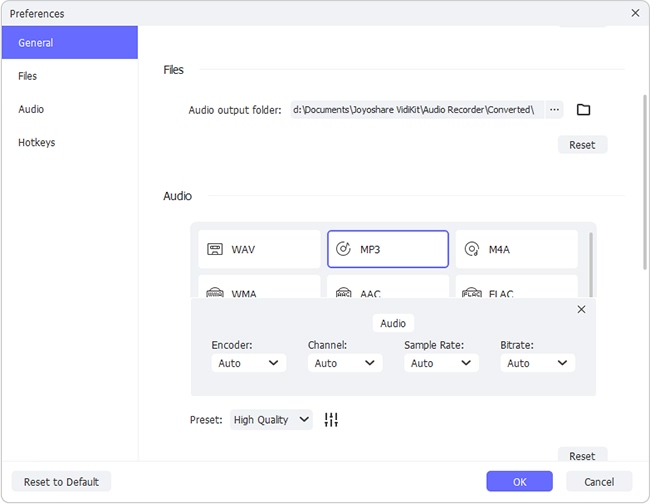
 icon to open the Format menu. Here you can adjust the format, codec, channel, bit rate and sample rate of the final recordings. If you do not know the jargon very well, you can simply choose High Quality or Small Size in the Preset option. The rest options will be automatically changed in accordance with the Preset. Next, click on the Preferences icon in the upper right corner to open the Preferences menu. Here you can choose the folder you want the recordings to be saved.
In addition, the automatic split function can be turned on in the Preferences menu. After you open the menu, go to the Convert column and tick the box under the "Split Recordings Individually", then set the time to at least 2000 milliseconds. Next, tick "The Recording Is Silent" option under the "Delete Recordings Automatically". What we just do is make Joyoshare VidiKit split the tracks when it detects silence of over 2 seconds. The time can be changed according to your own needs.
Step 3Record audio on Windows 10
Now, prepare the audio you want to record first, but don't play it yet. Press the Start Recording button and then play the audio. Now Joyoshare VidiKit will start recording the audio. If you need to record multiple audios, it would be better to play them one by one in a playlist, which would be more convenient. After all the audios finished, press the Stop Recording button to stop the recording process. The recordings can be found in the folder you previously choose in the Preferences menu.

Step 4Edit the recorded computer audios
Tap the
 icon beside each track to launch the audio editor. With this tool, you can trim the tracks, adjust the equalizer and add sound effects, making the music more enjoyable. Additionally, you can edit the tags on your own.
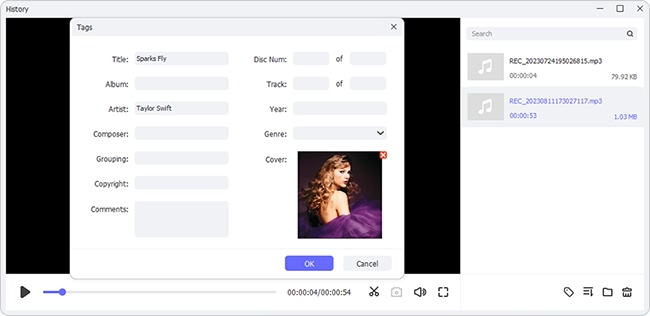
Tip 2. How to Record Voice on Windows 10 - Audacity
This freeware we are going to use is Audacity, a time-honored brand. It would be a perfect audio toolkit if you are willing to invest time and effort in learning how to use it. Audacity is able to switch recordings from the microphone to the sound card, and then save it to some common formats. Its compatibility surpasses other freeware in that you can use this software on Windows, Mac or Linux. Follow the tutorial below to make Audacity record computer audio easily and quickly.
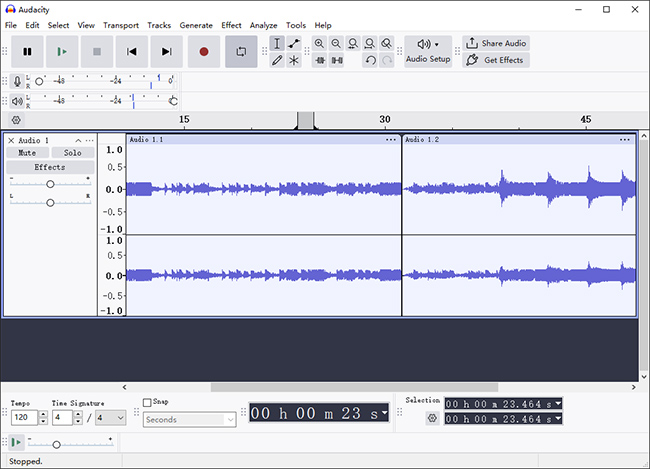
- Step 1: Search "Audacity" in Google, then download and install this software from its official site.
- Step 2: Launch Audacity. Click the audio host menu, which locates in the upper-left of the main interface and usually has MME chosen by default. Select Windows WASAPI in the menu, because this option sets Audacity to record sound from other programs on the computer.
- Step 3: Move the mouse from the Windows WASAPI box to the right, skip the microphone icon, and open the audio input menu. Click Speakers (loopback) or Headphones (loopback), so that Audacity will capture your computer's internal audio instead of external audio.
- Step 4: Tap on the recording button to start recording. When finished, tap the same button to stop recording.
Tip 3. How to Record Audio in Windows 10 - Voice Recorder
Are you still looking for a method to record voice from Windows 10 quickly and conveniently as you are not a tech-savvy Windows 10 user? Don't be depressed, Voice Recorder is presented in this post to help you solve that problem. This audio recorder, packed with intuitive and simple interface, permits you to record interviews, webinars, online chats, podcasts, lectures and so force. Also, it allows you to mark key moments so that you can trim audio handily. Best of all, after the audio recording process, you are allowed to share audio files with your friends.
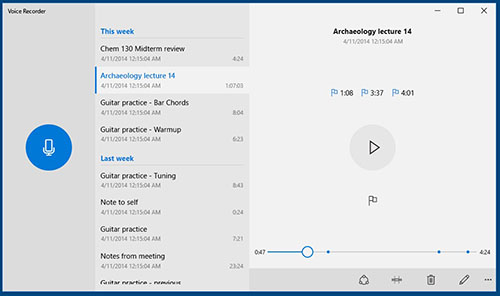
- Step 1: Open Microsoft Store and search this program to download it to your computer.
- Step 2: Then, navigate to your Start menu to find and activate it. To start audio recording, click the Record button at the left panel. Alternatively, press Ctrl + R to start.
- Step 3: Once you have finished the recording, Click the Stop option to end the process.
Tip 4. Sound Recording in Windows 10 with Sound Recorder App
Another tool to help you capture audio is Sound Recorder App, which is featured with limited functions. With the assistance of this tool, you have the power to capture presentations, gameplay footages, how-to tutorials and audios from website. The highlight of this tool is that you can open this tool by using Cortana without any click to make memos and recording notes. Even if you are a novice, you can be familiar to this program within short time, owing to its simple user interface.
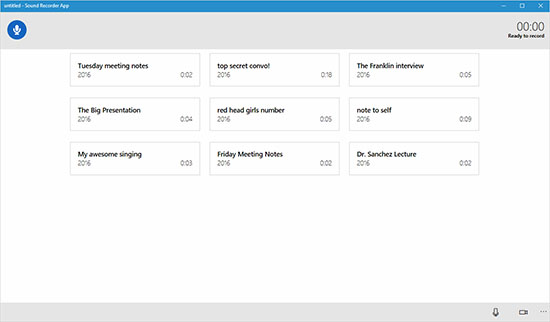
- Step 1: Activate this program after downloading and installing it to your Windows 10.
- Step 2: Get the audio that you want to record ready and click the mic icon in Sound Recorder App to begin the recording process.
- Step 3: When you want to stop the recording, simply click the stop recording button to finish recording process.
Frequently Asked Questions about Audio Recording on Windows 10
Q1. How to record screen with audio in Windows 10?
A: To record both screen and audio at the same time in Windows 10, you should choose a screen recorder, which allows users to capture video and audio simultaneously like OBS, Joyoshare VidiKit, Audacity and more. Then open your program and choose the corresponding recording mode and start the recording.
Q2. How to record audio from Internet on Windows 10?
A: In fact, it is easy for you to capture audio from Internet if you choose recording tools introduced in this post. Also, you can choose online audio recorder to help you if you don't want to download and install any tool to your computer.
Q3. How to find audio files on Windows 10 after audio recording process?
A: The answer to this question may depend on the audio recording tool that you choose. Different tool stores your recorded audio file in different location. If you want save them in a specified folder, you can change the output path as per your needs.
Q4. How to rename audio devices on Windows 10?
A: To rename audio devices, you can head to Settings and click System - Sound. Then, click the down arrow in "Choose your output device" section and select the device that you want to rename. Click the Device properties to activate a new window. Now, you can rename sound device by clicking the Rename option.
Q5. How to trim audio files on Windows 10 after stopping audio recording?
A: Some audio recording tools allows you to edit your audio by trimming after recording with its inbuilt editing functions. However, you may find there is no editing feature in some programs. You can use Windows Movie Maker or Window Media Player to help you trim audio on Windows 10 with ease.
Summary
These four audio recorders introduced above to teach you about how to record audio on Windows 10 are capable enough for you to spend time or even money on them. Joyoshare VidiKit provides you with more functions to explore and high-quality audio recording, Audacity ranks the top among recording freeware and Windows Voice Recorder and Sound Recorder App provide basic functions for users. Nevertheless, which one would be the better choice is totally up to you to decide.