Q:"How can I record audio from a website?"
In today's digital world, streaming audio content, from music and podcasts to online lectures and radio shows, has become a daily part of our lives. However, many platforms don't offer built-in download options, leaving you unable to save your favorite content for offline listening. This is where knowing how to record audio from website becomes essential. No matter what type of audio you'd like to record, this guide will walk you through simple and effective methods to preserve it directly from website.
- Part 1. How to Record Audio from Website on Computer
- Solution 1: Joyoshare VidiKit (Windows, Mac)
- Solution 2: QuickTime (Mac)
- Solution 3: Audacity (Windows, Mac, Linux)
- Part 2. How to Capture Audio from Website Online
- Part 3. How to Grab Audio from Website on iPhone
- Part 4. How to Rip Audio from Website on Android
Part 1. Record Audio from Website on Computer
Whether you want to save an online podcast, capture streaming music, or archive a webinar, recording audio directly from a website is a useful but often tricky task. This part explores the most effective ways to record website audio on your computer. Let's see what they are.
Solution 1: Joyoshare VidiKit (Windows, Mac)
Do you enjoy listening to music, online radio, podcasts, or other audio content on websites? Joyoshare VidiKit - Audio Recorder serves as your perfect digital assistant, allowing you to record and replay your favorite content anytime - even offline. This reliable software captures high-quality audio directly from your computer's system or through its built-in microphone. With customizable output settings including format, codec, bitrate, sample rate and channels, you can optimize recordings for any purpose. The program also offers convenient editing tools for trimming audio files and modifying ID3 tags, giving you complete control over your recordings.

- Record MP3, WAV, M4A, M4B, M4R, FLAC, AC3, OGG, APE and more
- Save audios into device-compatible formats like iPhone and Android
- Support switching between multiple sound sources
- Turn on/off system & microphone audios and adjust volumes
- Fine-tune recording quality by configuring sample rate, bitrate, and more
- Trim recordings, preview clips, schedule tasks, and edit ID3 tags
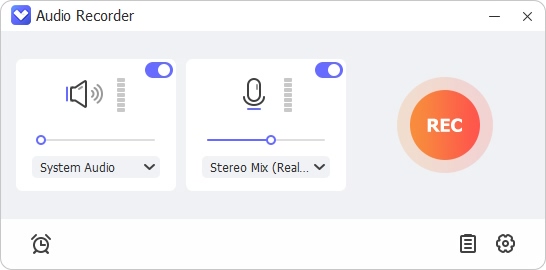
Step 1 Set Sound Source in Audio Recorder
To begin, visit the official website to download, install and launch Joyoshare VidiKit on your computer. Navigate to the Recorder section and select Audio Recorder. This tool is particularly useful when you need to record audio on PC without microphone - perfect for capturing system sounds from specific website only. To set this up, simply enable System Audio, adjust the volume as needed, and make sure to disable Microphone Audio for pure system sound recording.
 Note:
For more advanced recording needs, such as capturing both video and audio simultaneously from websites, Joyoshare VidiKit offers multiple specialized modes. You can choose Window Recorder to capture a specific app, Screen Recorder for full-screen or selected areas, Webcam Recorder to include your camera feed, or Game Recorder for smooth web-based gameplay capture. Each mode ensures synchronized audio and video recording, giving you flexible options for different scenarios.
Note:
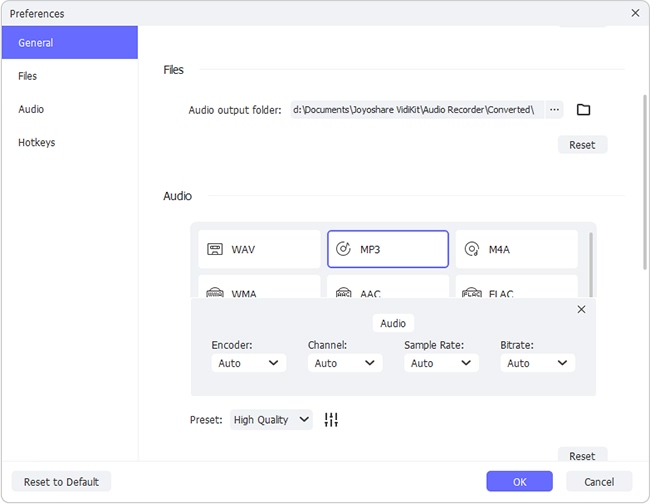
For more advanced recording needs, such as capturing both video and audio simultaneously from websites, Joyoshare VidiKit offers multiple specialized modes. You can choose Window Recorder to capture a specific app, Screen Recorder for full-screen or selected areas, Webcam Recorder to include your camera feed, or Game Recorder for smooth web-based gameplay capture. Each mode ensures synchronized audio and video recording, giving you flexible options for different scenarios.Step 2 Configure Output Format and Recording Options
To customize your output settings, click the "Preferences" button in the lower-right corner. A settings window will open, allowing you to select your preferred format (MP3, WAV, AAC, AIFF, AC3, etc.), adjust audio quality (bitrate, sample rate, encoder, and channel), and set hotkeys for quick recording control. Configure these options to match your needs before starting.
Step 3 Start to Record Audio from a Website
To begin recording, navigate to your target website and load the audio you wish to capture. Once ready, click the "REC" button in this audio recorder. After a brief countdown, Joyoshare VidiKit will start capturing the audio stream from the website. During the recording, you can optionally trim unwanted sections by using the "Cut" tool in the recording toolbar for precise editing.

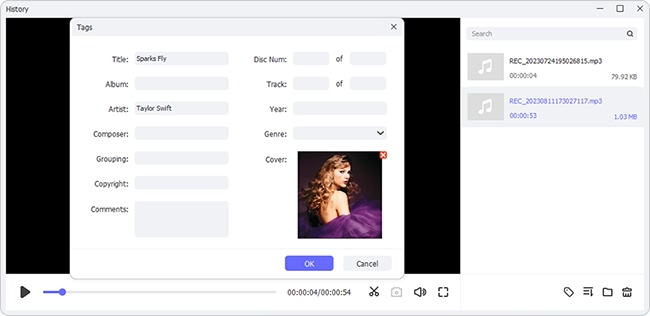
Step 4 Save and Manage Audio File(s)
Once you've finished recording audio from a website, simply click the "Stop" button. All your completed recordings will automatically appear in the History window, where you can conveniently pre-listen, edit, or rename them with just a few clicks.
Solution 2: QuickTime (Mac)
While QuickTime Player can record audio, it only captures via microphone input by default, which may include ambient noise. For system audio recording (direct website capture), you'll need Soundflower (free audio routing tool) or macOS alternatives like BlackHole (recommended for newer macOS versions).
- 😄Pros
- Pre-installed on all Macs
- Easy to use with minimal setup
- Quick export recordings to M4A or MOV
- ☹Cons
- Only record microphone input by default
- Require an additional plugin to capture system audio
- Step 1: Download Soundflower (or BlackHole) and install it. Go to System Preferences → Security & Privacy to allow the extension.
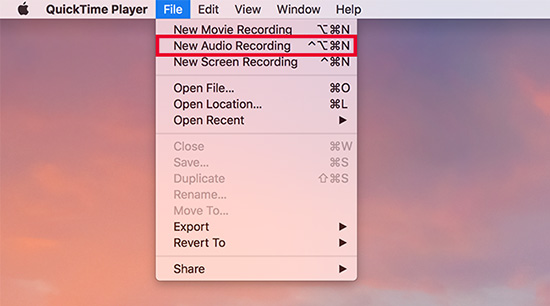
- Step 2: Open QuickTime Player → File → New Audio Recording.
- Step 3: Click the dropdown arrow next to the record button, set Soundflower (2ch) or BlackHole as the microphone, select audio quality (e.g., "High") and adjust volume.
- Step 4: Click the red record button and play the audio on your target website.
- Step 5: Click the red button again to stop and head to File → Save to export your website audio recording.
Solution 3: Audacity (Windows, Mac, Linux)
Audacity is a free, open-source audio recording and editing software that lets you capture any sound playing on your computer, including streaming audio from websites. While it requires initial setup (like installing virtual audio drivers), it offers studio-quality recordings without time limits. You can record system audio, edit tracks professionally (trim, normalize, enhance), and export in MP3/WAV/FLAC formats.
- 😄Pros
- Free and cross-platform audio recorder
- Support WAV, MP3, FLAC, and other formats
- Advanced editing features to fine-tune recordings
- Unlimited recording duration
- ☹Cons
- Require technical setup before recording
- Complicated for novices to get started
- May need virtual audio drivers on Windows
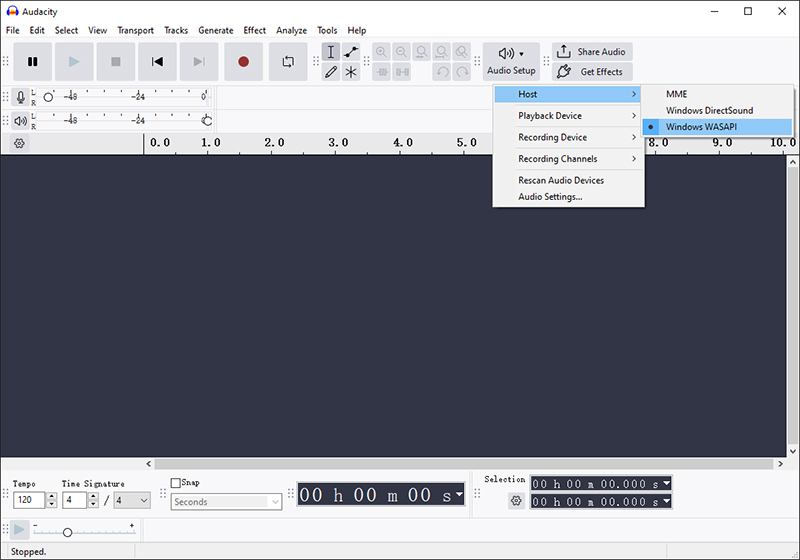
- Step 1: Launch Audacity on your Windows computer after installation. From the top menu, click Audio Setup → Host → Windows WASAPI. Then choose your default speakers as the audio source.
- Step 2: Visit a website, get ready for audio capture, and then click the red Record button (●) in Audacity to begin recording website audio.
- Step 3: When finished, click the Stop button (■) in the top menu to end the audio recording.
- Step 4: To save your audio, go to File → Export Audio, click Share to audio.com or Export to computer.
Part 2. Capture Audio from Website Online with Extension
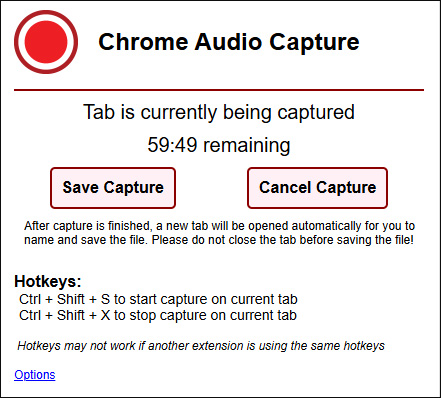
Chrome Audio Capture lets you effortlessly record audio from websites online with just one click. This powerful yet simple Chrome extension captures any sound playing in your current tab, including music, podcasts, or streaming content, and saves it as high-quality MP3 or WAV files. Whether you need to archive lectures, save interviews, or capture fleeting online audio, this tool handles it seamlessly. Record multiple tabs simultaneously, mute active recordings, and enjoy offline playback.
- 😄Pros
- Record audio from multiple tabs at once
- Save recordings as MP3 or WAV
- Silence tabs being captured for distraction-free use
- Control recordings quickly with keyboard shortcuts
- ☹Cons
- Recordings are limited to 60 minutes by default
- Step 1: Visit Chrome web store and click "Add to Chrome" to install "Chrome Audio Capture" extension.
- Step 2: Navigate to the website or open a tab containing the audio you want to capture. Then click the Extensions icon at the top-right corner of your browser to activate Chrome Audio Capture.
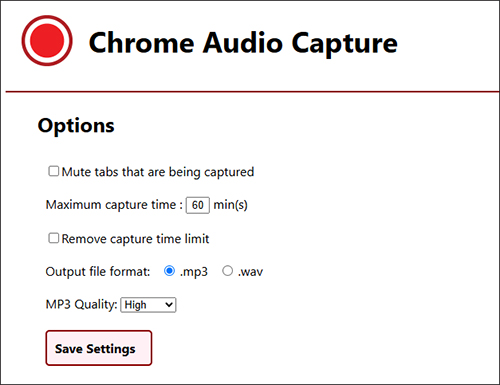
- Step 3: Click Options at the lower left corner to customize recording preferences, like output format (MP3/WAV), maximum capture time, audio quality, etc.
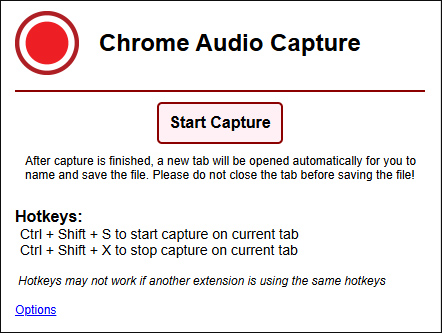
- Step 4: Simply click on Start Capture button to begin recording audio from the active tab.
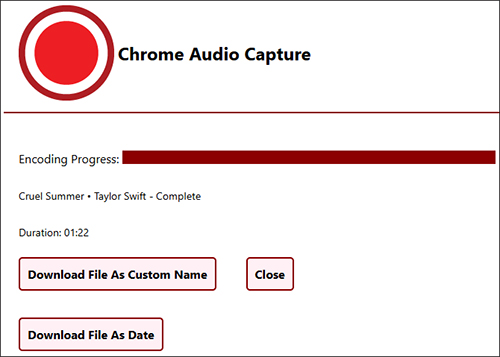
- Step 5: Once finished, click Save Capture to stop the recording.
- Step 6: Choose how to save the recording to local computer by clicking "Download File As Custom Name" or "Download File As Date".
Part 3. Record Audio from a Website on iPhone
While iPhones don't have a built-in feature to directly record website audio, you can use the native Screen Recording tool in Control Center to capture internal and external sounds. When enabled with microphone off, it preserves the original audio quality from the website. However, the recording saves as a video file on your iPhone, from which you have to extract the audio later using editing tools or converters.
- 😄Pros
- No app installation needed
- Simple to use on iPhone
- Capture system and microphone audio
- ☹Cons
- Save as video (requires audio extraction)
- Limited audio quality
- Record all system audios including notifications
- Step 1: Go to Settings → Control Center on your iPhone to add Screen Recording.
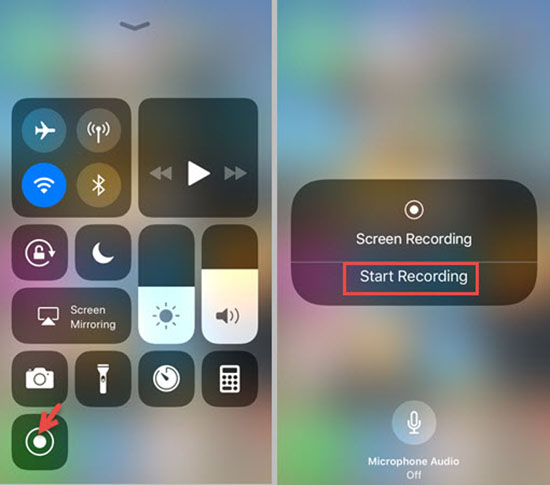
- Step 2: Open the website, swipe to Control Center, and long-press the Screen Record button.
- Step 3: Confirm whether to turn on Microphone and tap Start Recording button to record audio from the website, along with the video.
- Step 4: Tap the red status bar on the top of your iPhone screen to stop the recording.
Part 4. Record Audio from a Website on Android
Most Android smartphones do natively support recording. Take Samsung Galaxy phones as an example, it offers built-in screen recording with audio capture, allowing you to record both system sounds and microphone input. Here you can see how it works to capture audio from a website.
- 😄Pros
- Built-in recording feature
- Easy to operate
- Work for any audio capture
- ☹Cons
- May include background noise
- Record entire screen along with audio
- Step 1: Swipe down the notification panel and tap "Screen Recorder" (if unavailable, enable it in Quick Settings).
- Step 2: Choose "Media" (for system audio) or "Media + Mic" (if adding voiceovers) under the Sound section.
- Step 3: Tap "Start recording" and play the website audio immediately.
- Step 4: Stop recording via the floating button and save the video to your phone.
Conclusion
Now you know exactly how to record audio from website. Whether you're using Windows, Mac, or mobile devices, this post has provided simple yet effective solutions to capture streaming audio content. From professional desktop software to convenient browser extensions and built-in mobile features, you can easily save podcasts, music, lectures and more for offline listening. No more worrying about missing important audio content. With these reliable recording methods at your fingertips, your favorite online audio is always available.
