As a gamer, YouTuber, or online tutor, there are a few times when you need to record audio over your tutorial videos or video games to help your audience have a better experience. This will definitely call for you to record high-quality audio. Luckily, you can get it done using an in-built voice recorder or third-party application with advanced functions. This article will walk you through how to record audio on Windows 11. Keep reading and follow the instructions to do that perfectly with 4 meaningful solutions.
- Part 1. Practical Ways to Record Audio on Windows 11
- Way 1: Sound Recorder (Built-in Recorder)
- Way 2: Joyoshare VidiKit [No Time Limit]
- Way 3: Xbox Game Nar
- Way 4: Audacity
- Part 2. Comparison of 4 Ways to Record Audio on Windows 11
- Part 3. FAQs about Recording Audio on Windows 11
Part 1. Practical Ways to Record Audio on Windows 11
What are you going to record, background music, interview, podcast, talk show, voiceover or something else? To your joy, you have the privilege to enjoy the audio recording tool that comes with Windows 11, and you can also have the freedom to download a more professional one.
🎯 Way 1. Sound Recorder
An in-built voice recorder in Windows 11 is the best option for you if you merely want to record your voice and perform some simple post-processing. Like the majority of its in-built tools, Microsoft made this application exceedingly simple to use and lightweight. It can satisfy the basic needs and help create audio recordings in MP3, AAC, WMA, WAV and FLAC. The Audio quality can be preset as well, ranging from Auto, Medium, High to Best. Here's how to record audio on Windows 11 using this free audio recording software.
Step 1: Open Voice Recorder
Open the Start Menu on your Windows 11, then search for Sound Recorder. Click the topmost result to open Microsoft Sound Recorder.
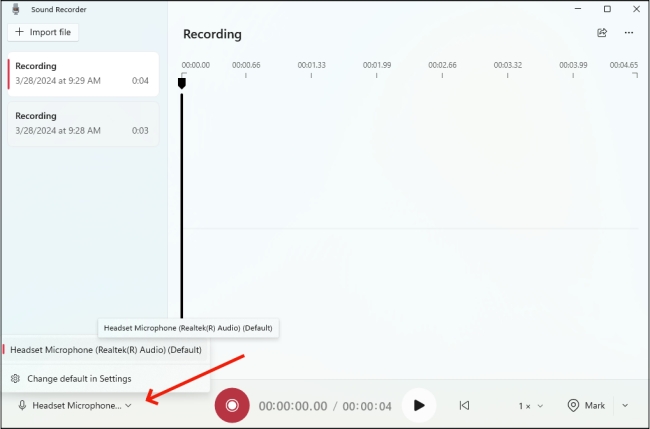
Step 2: Set Microphone and Confirm Output Settings
If there are multiple microphones on your Windows 11, you should ensure which one to use for audio recording. To do this, simply go to the bottom left and select a microphone from the drop-down menu.
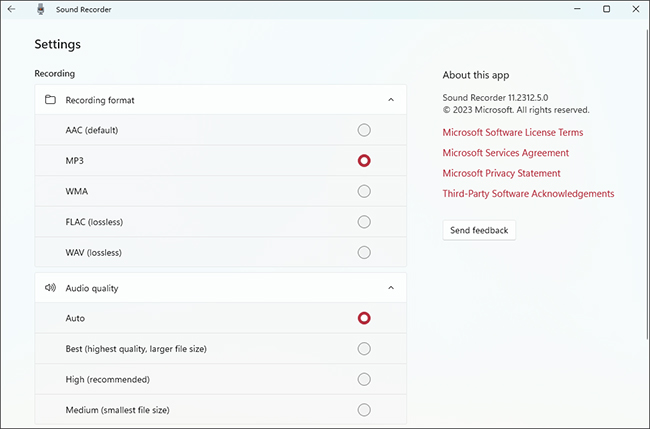
Step 3: Confirm Output Audio Format and Quality
Sound Recorder saves audio recordings in M4A format by default. If you'd like to export your file in another popular format, you can go to the top right corner and click ... → Settings icon. Under Recording section, unfold the drop-down menu of Recording format and then choose a format you like, such as MP3. Furtherly, you can click the Audio quality list to preset audio quality you expect.
Step 4: Begin Recording Audio on Windows 11
It is very straightforward to begin recording by clicking on the red Start recording button at the bottom of Sound Recorder or pressing Ctrl + R. You can speak into the microphone and make the recording work.

Step 5: Set a Timer and Monitor the Progress
You may place a marker at a certain segment by clicking the flag button while recording. For instance, you made an error and want to cut that section out later or go on to a new topic. Your marks, along with their timestamps, will appear at the bottom of this app. At the top of the interface, the amount of time you've been recording will be shown. You may temporarily pause the recording by clicking the pause symbol.
Step 6: Edit Your Recording
End the recording by clicking the Stop Recording button. Sound Recorder will automatically display your recording in a sidebar on the left once it is finished. You can directly play the audio, or right-click it in the list to Share, Rename or Show in Folder. Recordings are auto-stored in your Documents folder for quick access.
🎯 Way 2. Joyoshare VidiKit
Joyoshare VidiKit can be the best candidate for you if you want to record audio professionally and edit it effortlessly. Neither the sound of the microphone nor the audio inside the system can escape its capture. The output quality can be clear and crisp, greatly enhancing your listening experience. Aside from basic features like sound source selection and volume adjustment, it can do more. You can schedule the recording, customize hotkeys, and preset quality. Also, there are a wide variety of audio formats available, like MP3, M4A, AAC, AC3, OGG, AIFF and so on. You have additional rights to configure the parameters such as channel, sample rate, bitrate, and codec. Or change audio tag for better management.

- Record system audio and microphone simultaneously or seperately
- Record audio in MP3, WAV, AAC, FLAC, and more formats in high quality
- Change codec, quality, channel, ID3, bit rate, sample rate and more
- Trim audio files and edit ID3 tags information
- Auto-stop recording with inbult timer and pre-listen to audio
- Comprehensively record screen, webcam, window, game, and sound
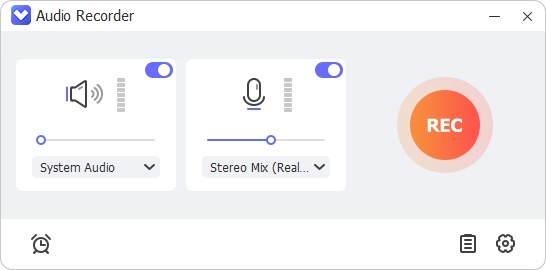
Step 1: Launch Audio Recorder and Set Sound Source
After program downloading and installation, quickly open Joyoshare VidiKit on Windows 11. Head for Recorder section and select Audio Recorder in the toolbox. Then you can click System Audio and Microphone Audio to activate them or disable either one as you wish. According to your demand, determine the sound source to record or adjust volume to an optimal level.
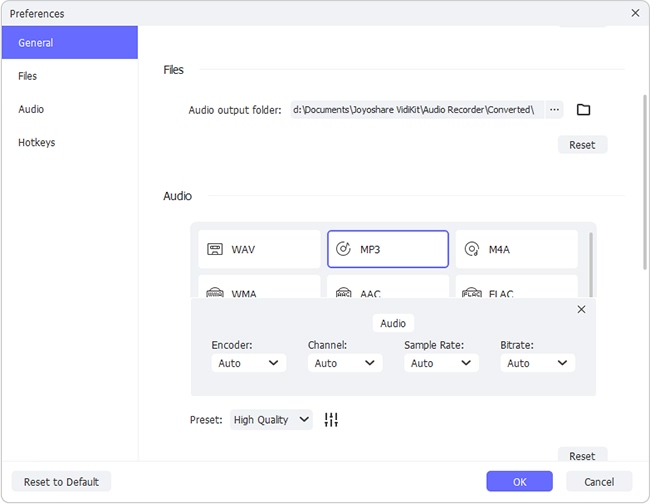
Step 2: Customize Recording Settings
Click on the Preferences button at the right bottom to customize recording options to your liking. You can select an audio output folder, set hotkeys, and even choose a desired audio format. Nearly all common formats can be supported and it's feasible to change parameters such as encoder, bitrate, channel and sample rate.
Step 3: Start to Record Audio on Windows 11
Prepare everything you need, such as the written speech, voice file, voiceover, or lyric. Then click on the "REC" button in Joyoshare VidiKit. There are 3 seconds to countdown that allows you to make adjustments. If you want, Cut your recording into separate chunks or Pause to unsave something by making use of the tools in the floating recording bar.

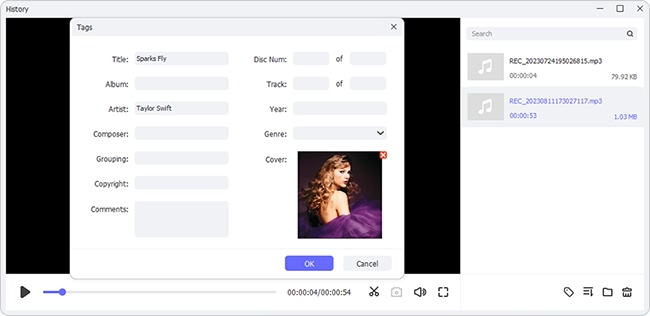
Step 4: Save and Edit Recorded Audio
After clicking the Stop button, you can furtherly listen to whatever you captured in the "History" window. Based on your needs, play, rename, trim and even change ID3 tags information.
🎯 Way 3. Xbox Game Bar
Xbox Game Bar app is also pre-installed on Windows 11 that requires no software installation. You can easily access it and keep track of your gaming actions. It includes simple controls and enables you to customize the audio settings in the way you like. You can use it to capture audio from game, enabled microphone, system, and apps. Though it is a typical recording tool on Windows, it has shortcomings. It's mainly designed for gamers to capture highlights during gameplay. Also, it lacks of independent audio recorder to grab audio only. You have to record sounds as well as screen video together.
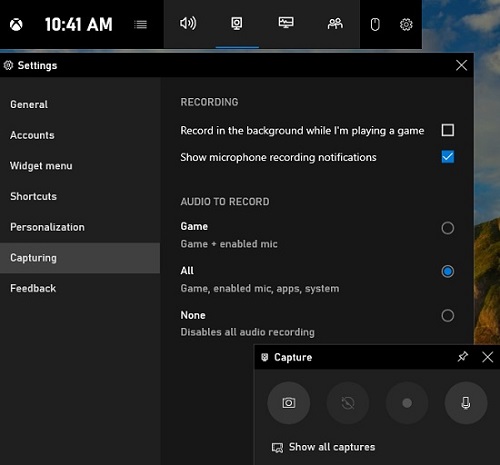
- Step 1: Press Windows + G to enable Game Bar. From the Game Bar settings, select "Capture".
- Step 2: Select the "Mic" option from the "Capture" section if you wish to incorporate your spoken narration/voice note. Alternatively, you may toggle the microphone on and off by pressing Windows + Alt + M.
- Step 3: In the "Capture" box, click the "Start Recording" icon to begin the recording process. (Start recording by pressing Windows + Alt + R is also available.) Xbox Game Bar will minimize after the recording begins, and on the right side of your screen, capture status will appear.
- Step 4: To stop recording, press Windows + Alt + R or click the Stop Recording icon.
🎯 Way 4. Audacity
Audacity is a free voice recorder that has both basic and advanced functions. You can easily edit and capture computer audio with Audacity with no hassle. It is difficult for you to operate this program if you are a beginner as it has no user-friendly interface. Using hotkeys to start and finish the recording process is also available in this tool. Here is how to capture audio on Windows 11 with Audacity.
- Step 1: Launch Audacity. On the top screen, click Edit - Preferences, or press Ctrl + P.
- Step 2: In the preferences, find and click Devices - Recording. Select the appropriate microphone from the selection next to "Device". When you're finished, click "OK".
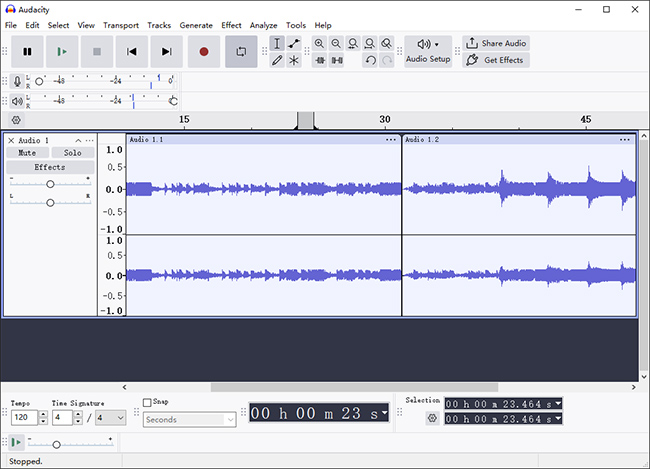
- Step 3: To start recording, click Transport on the top page and select Record.
- Step 4: Use the large stop button under the toolbar to pause or stop recording when done.
- Step 5: Save recording first before anything. To do this, click File - Save Project As, and then select a preferred location. After this, you can export the video as you wish.
Part 2. Comparison of 4 Ways to Record Audio on Windows 11
Both the default and tripartite tools can do audio recording for you, but what are the differences between them? In order to show you more clearly, a comparison table is shown here.
| Sound Recorder | Joyoshare VidiKit | Xbox Game Bar | Audacity | |
|---|---|---|---|---|
| Best for | Basic voice recording | One-stop recording | Gameplay captures | Audio recording and editing |
| Supported OS | Windows 11 | Windows XP and later (including Windows 11); Mac OS X 10.8 and later | Windows 11, 10 | Windows 10 & 11; MacOS 12 & 13; Ubuntu 22.04 |
| What to Record | Microphone sound only | Seperate audio, screen, webcam, window, and game | Screen video and audio (microphone & system) together | Audio (microphone & system) |
| Output Audio Formats | 5 formats: AAC, MP3, WMA, FLAC, WAV | 16 formats like MP3, WAV, etc. | Only 1 format: MP4 | 12 formats like WAV, OGG, MP3, etc. |
| Trim Audio | No | Yes | No | Yes |
| Edit Audio | No | Yes | No | Yes |
Part 3. FAQs about Recording Audio on Windows 11
Q1. How long can I record on Windows Sound Recorder?
A: The limit for recording on Windows 11 is 60 seconds. However, some third-party apps offer a specified time limit, while others offer unlimited audio recording time.
Q2. What is the best audio recorder for Windows 11?
A: There are many audio recorders for Windows 11. Among these, Windows Sound Recorder and Game Bar are good to consider, which requires no software downloading and are free of charge. To produce audio files with more stunning recording features, Joyoshare VidiKit, an all-powerful toolkit, cannot be missed. Besides, for professional audio editing, Audacity is a decent choice.
Q3. How to fix microphone not working on Windows 11?
1. Run Recording Audio Troubleshooter: you can press Windows key + R to call out "Run" pop-up window and type 'ms-settings:troubleshoot'. Then go to Troubleshoot → Other Troubleshooters → Recording Audio → Run. Simply choose the Current Default Device and "Apply this fix" to get the issue solved.
2. Enable Microphone Access: easily press Windows key + R and open Run window to enter 'ms-settings:privacy-microphone'. After that, go to Privacy & Security → Microphone → Microphone acess. Turn on this option and let apps access your microphone.
3. Enable Recording Device: similarly type 'devmgmt.msc' in the Run window to open Device Manager → 'Audio inputs and outputs' → right-click to set 'Enable device'. Or you can go to Sound Settings on Windows 10 directly to finish this operation.
Conclusion:
With in-built audio recorders like Sound Recorder and Game Bar on Windows 11, you can record audio anytime. However, you may not be able to do some advanced editing on the output, including adding ID3 tag, cutting and cropping audio, specifying output path, customizing output format, etc. and the sound might not be the quality you like. After pointing out how to record audio on Windows 11 with these in-built apps, some third-party tools such as Joyoshare VidiKit, are worth to try. You can be sure of advanced editing and top-notch sound quality.
