Q:"Hello. iTunes has recently started to report me an unknown iTunes error 54 when I connect my iPhone to Mac. It says my library can not be saved on iTunes. Does this matter? How can I fix it? Thanks in advance for any help." - Jay from Meraki Community
When syncing your iPhone/iPad/iPod with iTunes, you might run into an unknown iTunes error code 54. It is understood that this is the most heavily reported iTunes error some time ago. Although this seems not to be a tough problem, it is downright annoying. Focusing on this problem, the following shows 5 solutions to it. Read on to see all of these.
- Solution 1: Consolidate iTunes Media Files
- Solution 2: Update iTunes or iOS Device
- Solution 3: Check If iTunes Folder Is Set to Read Only
- Solution 4: Fully Control iTunes Folder
- Solution 5: Fix It with No Data Loss
Why Does iTunes Error 54 Happen?
This is an alert message that you probably encounter while using iTunes to sync your iOS device. Why would it happen? It may be because the files on your device or computer is locked or there is something troublesome with iTunes itself/the computer /iOS system. No matter which situation you are in, you can do the following to get it fixed.
Note: Before moving on to the next section, please first turn off the firewall and disable security software on your computer for the moment. Besides, try easily restarting your computer to deal with this case. When you get nothing from these two tips, please perform the following.
Part 1. Try Consolidating Media Files into One Library
An official method to correct iTunes error 54 is to consolidate all iTunes media files into one folder. It is possible that the iTunes media files that are stored in different locations result in this error code. If this happens to you, you can try this method. The steps are detailed below.
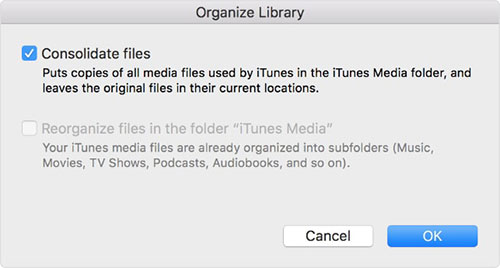
Step 1: Open iTunes. Then from the menu bar at the top of the window, you need to choose "File";
Step 2: Under this option, you have to click on "Library" and followed by "Organize Library";
Step 3: In this interface, check "Consolidate files". Lastly, just tap on "OK" to confirm this action.
Part 2. Update iTunes or iOS to the Latest Version
Suppose the above is not the solution to iTunes sync error 54, next check if iTunes or iOS software is to be updated. An outdated iTunes and iOS software will cause something to go wrong. You can check it and update it according to the following guide. Suggestion: keep checking for updates at regular intervals to prevent the recurrence of a similar phenomenon.
Update iTunes:
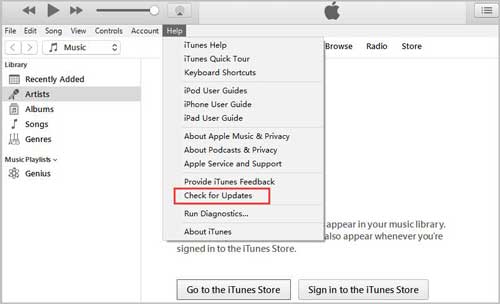
Step 1: First, open iTunes on the computer. Next, choose the "Help" option and then tap on "Check for Updates";
Step 2: If there is a new version of iTunes is available, it will pop up a small window. You just touch "Download iTunes" to update it.
Tips: You can click "Edit" - "Preferences" - "Advanced" - "Check for iTunes updates automatically" to let iTunes check for updates automatically. But this requires that you use iTune once a week.
Update iOS Version:
Step 1: The first thing is to go to "Settings" on your iOS device;
Step 2: Afterward, scroll down to the "General" option and then to "Software Update";
Step 3: iPhone will check for updates after clicking "Software Update". If there is a pending update, please download and install it.
Part 3. Uncheck "Read-only" option
Maybe now, your iTunes error 54 issue has yet been solved. Even so, there is no need to worry about it. Just follow the instructions to check if iTunes folder is set to "Read-only". You know, this is also one of the possible factors of the iTunes sync error code. Faced with the case, hold your horses and let the guide below direct you to the right path.

Step 1: On your PC, click "Start" button and choose "File Explorer";
Step 2: After getting into this interface, please tap on "Music" folder from the side menu and then go to "iTunes" folder;
Step 3: Right-click "iTunes" folder and you will many options. You need to hit on "Properties";
Step 4: Under "General", see if the "Read-only" is checked. If so, uncheck it and click "OK" to save it.
Part 4. Control iTunes Folder
In the event of iTunes error 54 continues to trouble you, then take full control of iTunes folder to settle it. But this method is only for Windows 10 users. If you are a member of this group, follow the steps to have complete control over iTunes folder to allow iTunes to sync with your iDevice without any problem. In case it is of no use, just go to the ultimate solution below.
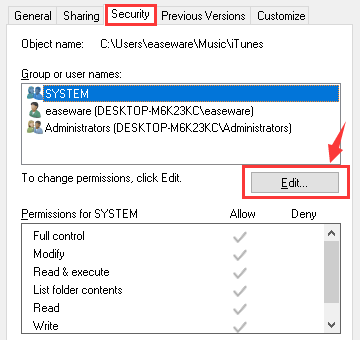
Step 1: Repeat the first three steps listed in part 3;
Step 2: Now, from the "Properties" option, please choose "Security" and then touch "Edit" button;
Step 3: Locate "full control" and check it. After that, remember to click "Apply".
Note: To get full control of iTunes folder, there is a need for you to launch iTunes in compatibility mode. How to do it? Please right-click on iTunes app and then tap "Properties" from the pop-up menu. Later, select "Compatibility" and check "Run this program in compatibility mode for:".
Part 5. Losslessly Fix iTunes Error 54 with Joyoshare UltFix
When all the above can not save you from suffering, then consider that it may be the iOS system issues that lead to this error. At such times, an achievable and lossless solution to iTunes error code 54 is to recur to Joyoshare UltFix iOS System Recovery. It is professional in repairing a large number of iOS system issues with keeping all data intact. Not only iOS issues but also Apple TV OS problems will be handled gracefully by it.
With a friendly interface, Joyoshare UltFix allows you to make your iDevice into or out of recovery mode with just one click. Furthermore, having advanced technology enables it to work well out different trouble like iTunes error 14, iPhone error 4013, iPhone frozen/black screen, and many more. Undoubtedly, this is an excellent idea to troubleshoot such an iTunes error.
Key Features of Joyoshare UltFix iOS System Recovery
Easy to operate and 100% safe in the process
Troubleshoot iTunes error 54 without data loss
Give two modes including standard mode and advanced mode
Compatible with each iOS device and the latest iOS version 13
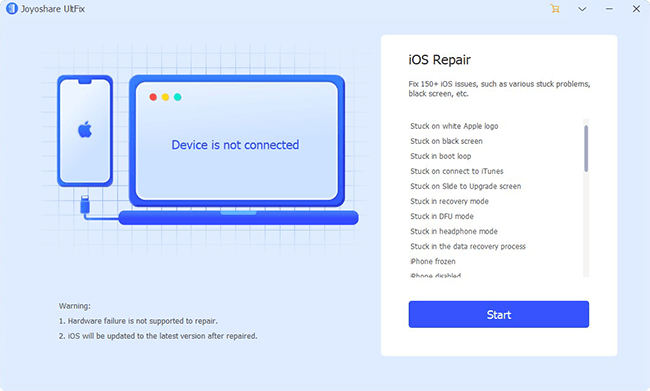
Step 1: Suppose you have downloaded and installed Joyoshare UltFix on your computer, then you can directly run it and then connect your iDevice to the program via a USB cable. When your device is successfully detected, just go on by click "Start";
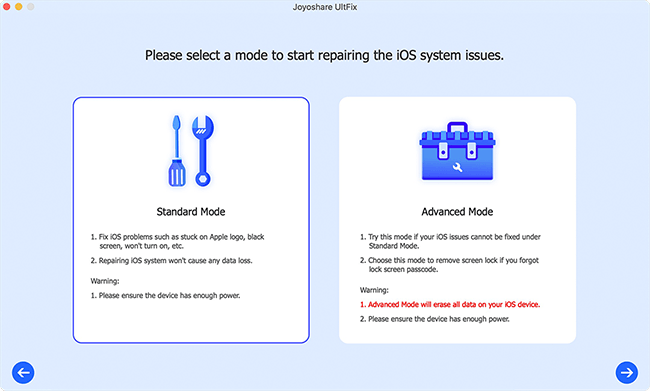
Step 2: The next thing is to choose a repair mode. You are generally suggested to select standard mode, for it won't cause data loss in the process;
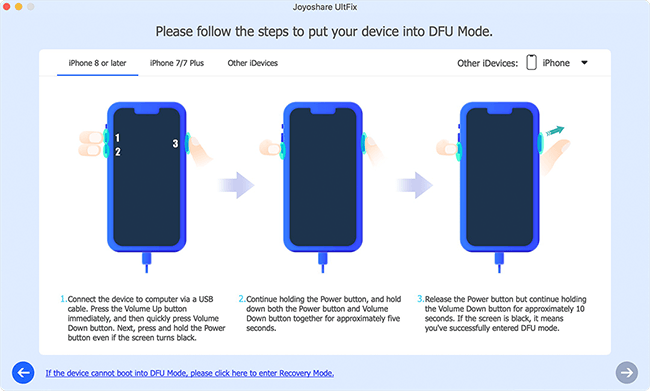
Step 3: After getting into this step with the "Next" icon, please have your device set into DFU mode or recovery mode by following the on-screen steps. Once entered, move to step 4;
Step 4: At this time, you need to select "Download" to download the matching iOS firmware package for your iDevice. When the download completes, the iOS firmware will be verified automatically;

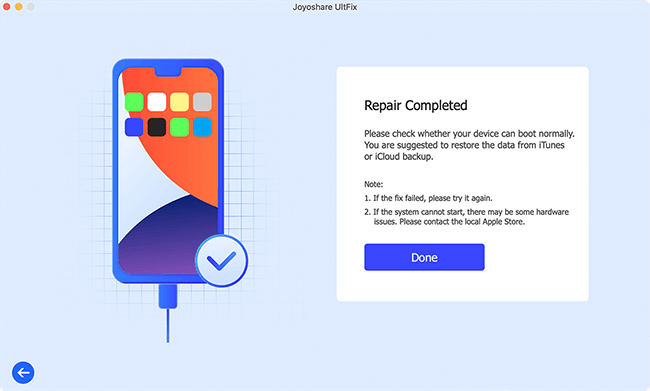
Step 5: Get the firmware package unzipped with the "Repair" button. Then the program will proceed with the repairing process. It takes you some time. Please be patient.