Q:"Is there a way to record your screen on windows?" - From Reddit
To usher in a new era of computer operating systems, Microsoft has made significant advancements with Windows 10, featuring an elegant interface and innovative design that caters to the majority of users' needs. As the adoption of Windows 10 continues to grow, there is an increasing demand for screen recording capabilities on this platform, such as capturing live streams, video calls, and game footage. Notably, having an easy-to-use screen recorder can greatly enhance user experience. In consideration of both practicality and ease of use, we present three reliable solutions to assist you in effectively learning how to record screen on Windows 10.
- Part 1. Built-in Screen Recorder - Xbox Game Bar
- Part 2. Dedicated Screen Recorder - Joyoshare VidiKit [21-in-1 Toolkit]
- Part 3. Microsoft's Desktop Software - PowerPoint
- Part 4. FAQs about Screen Record on Windows 10
- Part 5. Conclusion
Part 1. Built-in Windows 10 Screen Recorder - Xbox Game Bar
The first way to record screen on Windows 10 is to draw support from Windows system's native screen recording utility, called Xbox Game Bar. It is designed to capture gameplay mainly as well as other types of screen activities in Windows 10. Given that Xbox Game Bar is a default app pre-installed on your computer, it is convenient and safe enough, so you may prefer to use it.
- 😄Pros
- Pre-installed on Windows 10
- Free and simple to use
- Support background recording
- Optimized for game recording
- ☹Cons
- Cannot record desktop and File Explorer
- Only capture one app each time
- May slow down computer system
- Lack of advanced editing features
1.1 How to Record Windows 10 Screen
If you'd like to use this hidden recording feature on your Windows 10, you can follow the instruction below.
- 📍 What to Prepare:
- ✔ A Windows 10 PC
- ✔ Xbox Game Bar (enabled by default)
- ✔ Your computer system meets the minimum requirements for screen recording
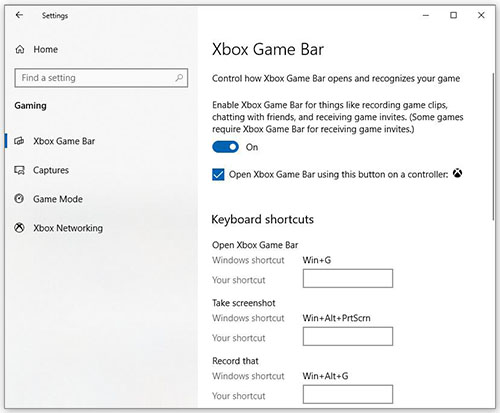
Step 1 Activate Xbox Game Bar
Users who never utilize Xbox Game Bar has to enable it first. Simply press Windows + I keys together to open Settings menu on Windows 10. Then choose Gaming → Xbox Game Bar in the left column. Now you can toggle the button to On status to activate Game bar successfully.
Step 2 Set up Xbox Game Bar
Xbox Game Bar comes with default settings for use, which are usually enough for recording. If you want to customize some options, you can click on Captures in the left sidebar.
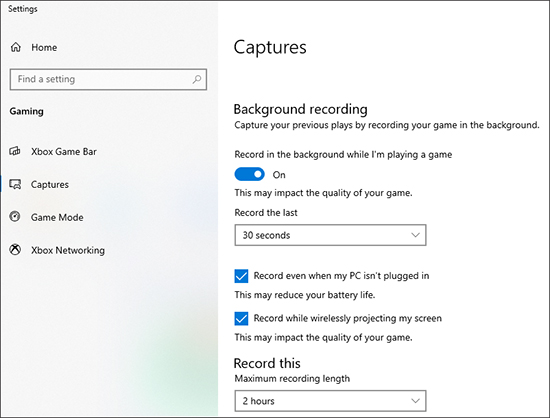
- Open folder: the screen recording you create for Windows 10 will save in C:\Users\Administrator\Videos\Captures by default. But you can also change the location as you like.
- Background Recording: simply turn on the switch for "Record in the background while I'm playing a game". Xbox Game Bar will capture the last 30 seconds (or longer, up to 10 minutes, available to adjust) of your game or target content. It's also possible for you to check "Record even when my PC isn't plugged in" and "Record while wireless projecting my screen".
- Maximum recording length: The supported recording time length options include 30 minutes, 1 hour, 2 hours, and 4 hours. After reaching this specified duration, the screen recording process automatically terminates.
- Record audio when I record a game: Xbox Game Bar can grab sounds from your microphone and target game. However, it excludes background audio from your Windows 10 computer and other apps. You can meanwhile check "Turn mic on by default when I record" or tick "Record game audio only" based on your actual needs. Notably, the audio quality can be set to recommended 128kbps (you can change it up to 192kbps).
- Recorded video: the video you record for Windows 10 can be saved at 30 fps by default, however it is also supportable to change to 60 fps. Besides, you can set video quality and decide whether to "Capture mouse cursor in recordings".
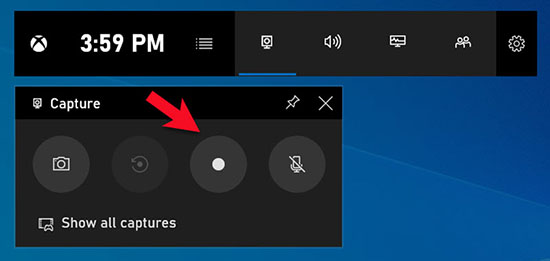
Step 3 Open the Game Bar
Upon you finish setting up Xbox Game Bar, hit keyboard shortcut "Windows key + G" to open Game Bar. Don't forget to check all options, including "Audio", "Capture", "Xbox Social", "Performance", "Enable Click-through" and "Settings".

Step 4 Start screen recording Windows 10
If it is your first time to record, there will be a pop-up window showing a question "Do you want to open Game bar?" Click "Yes, this is a game" although it is not. To start a Windows 10 screen capturing, you need to click "Start recording" or use "Win key + Alt + R" shortcut. Remember that only app window can be recorded, without including Windows 10 full screen.
Step 4Manage recorded Windows 10 video clips
Once the recording is completed, click the red stop button. A message will show to tell you that the game clip was recorded. You can hit that pop-up message or open up the Game bar interface by pressing Windows key + G. The Gallery window will appear on your Windows 10 with details of your recorded video.
1.2 What People Also Ask about Xbox Game Bar
How to record your screen on Windows 10? Most of you will probably answer Xbox Game Bar. Alright, as a built-in tool, it is undeniably the first choice for recording. However, it is not perfect. Let's take a look at the key points that you will overlook when applying Game Bar on Windows 10.
Q1: Does Xbox Game Bar only record games?
A: No. It is developed to record games directly on your Windows 10 or those you play and stream from Xbox One. However, Xbox Game Bar can be used to record more screen videos you want.
Q2: Does Xbox Game Bar record everything on Windows 10?
A: No. Actually, Xbox Game Bar is disabled for the Windows desktop and File Explorer. You'll be informed that gaming features aren't available for them. Nevertheless, it has ability to capture video activities from your Windows 10 applications, web browser and other programs.
Q3: Is there any system requirement when using Game Bar?
A: Frankly, there is strict system requirement in Game Bar, especially the type of your graphics card. You will see Settings in Game Bar - Gaming features - Graphics, which shows that your system doesn't support it. In this case, you may receive an error prompt when recording and indicates your Windows cannot meet the hardware requirement.
Q4: How do I access the Game Bar?
A: As a Windows 10 built-in screen recorder to help you record video, gameplay, online music, meetings and lectures, Game Bar allows you to activate it via two methods, including tapping Settings - Gaming - Game Bar and pressing the Windows key + G.
Q5: Does Game Bar lower FPS?
A: Due to the enhanced Game Bar, the FPS on your screen will drop largely. You can turn off Game Bar to fix this problem by clicking Settings - Gaming - Xbox Game Bar - Captures and switching off the Record game clips button.
Part 2. Record Windows 10 Screen - Joyoshare VidiKit
Joyoshare VidiKit is a versatile and user-friendly screen recorder for Windows 10 designed for high-quality screen recordings. It supports recording the entire screen, specific windows, or custom regions, making it suitable for a wide variety of needs, from gaming to tutorials. Its intuitive interface and stunning features like real-time annotations and editings make it a perfect choice for both beginners and professionals.

- Record Windows 10 screen with system audio and microphone voice
- Flexibly set capture area, either full screen or part of screen
- No recording lag and recording time limit
- Customize format, resolution, frame rate, bitrate, and more
- Offer stunning recording options to trim, effect clicks, annotate, etc.
- Record game, webcam, audio, and specific window
Step 1 Download and install Joyoshare VidiKit on Windows 10
Visit Joyoshare official webiste to download VidiKit for Windows. Double-click program icon to activate it, locate Recorder functionality section and choose Screen Recorder. Joyoshare VidiKit includes full support for capturing any video and audio in Windows 10 screen simultaneously. You can close microphone voice so you can remove unexpected intervention during recording process on Windows 10.

Step 2 Choose recording area
Joyoshare VidiKit makes it available to choose capture area at will. Simply click the "Select area to record" in the main interface. A pop-up window will appear. You can drag the edge of the window to make adjustment and set desirable recording region. Additionally, a preset standard ratio and customized size can be selected if you want.

Step 3 Customize Windows 10 recording preferences
To capture any activities in Windows 10 screen, you can check and confirm all recording options in Preferences. Joyoshare VidiKit is supportable for choosing output format, creating tasks by presetting stop time, highlighting click movements, configuring parameters from systematic settings, etc.

Step 4 Start to record screen on Windows 10
Click the "REC" option to start a recording on Windows 10. You are entitled to trim video, take screenshots, add annotations and pause to skip content.

Step 5 Save and edit recordings
Simply click the "Stop" button to end the screen recording process. Joyoshare VidiKit lets you preview and rename your recording in "History" list. If your trim your video during the previous recoding process, you will see different segments here.

Part 3. How to Screen Record Windows 10 - PowerPoint
Few people know that PowerPoint can also help you record. However, you need to install Microsoft's desktop program and subscribe to Microsoft 365 in advance. This is a better option to help record your Windows 10 screen than Game Bar if you'd like to create recordings quickly and embed them to your slides for presentations.
- 😄Pros
- Built-in feature in PowerPoint
- Simple to record screen
- Easily insert recordings into presentations
- Directly trim recordings within PowerPoint
- ☹Cons
- Limited editing features
- Cannot record system audio only
- Not handy for long recordings
- Lack of customization options for frame rate, resolution and more
- 📍 What to Prepare:
- ✔ A Windows 10 PC
- ✔ Microsoft PowerPoint installed on Windows (part of Microsoft 365 or standalone)
- ✔ A microphone for audio capture
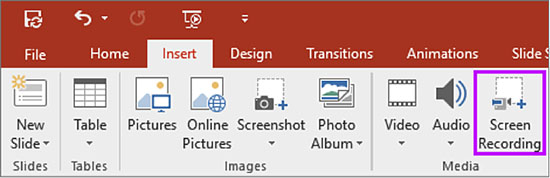
Step 1 Activate PowerPoint
Activate PowerPoint on your screen and create a new presentation. Click Insert in the menu bar and select Screen Recording sign in the Media panel to access its capture feature.
Step 2 Customize recording settings
Now, it will pop up a toolbar along your screen's top-center edge and PowerPoint will minimize at the same time. Click the Select Area button to confirm your capture area based on your need. You can click the Audio and Record Pointer to decide whether record sound and your mouse.
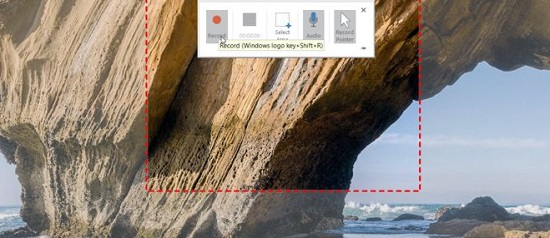
Step 3 Start to record screen on Windows 10
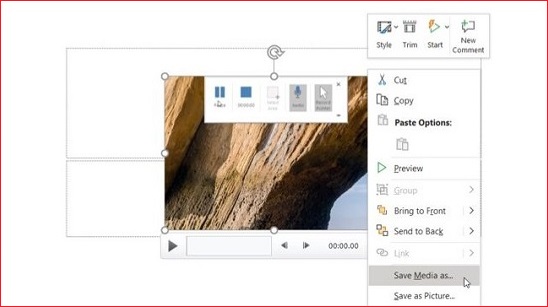
Hit Record button or press Windows + Shift +R to start the recording process when you are ready. To cut unwanted content and stop the recording, you can tap the Pause button and the Stop button respectively. It gives you the power to save the recording by right-clicking on the video and choosing Save Media as....
How to Fix PowerPoint Screen Recording Not Working
Don't know what to do when your PowerPoint fails to record screen? This post is here to show you how to fix PowerPoint screen recording not working error.
Read More >>Part 4. FAQs about Screen Record Windows 10
Q1: How do I record my desktop screen?
A: You can record your desktop screen using Xbox Game Bar, Joyoshare VidiKit and PowerPoint by following the above-mentioned steps. Also, you can choose other screen recorders like VLC, OBS and more to help you.
Q2: How long can Windows screen record?
A: According to data from Xbox official website, it allows you record screen up to 4 hours. If you want to screen record for a longer time, you have to choose a screen recorder without time limit.
Q3: How to record screen Windows 10 with audio?
A: Activate Joyoshare VidiKit or PowerPoint and activate their recording audio functions, then you can record sound and screen simultaneously.
Q4: How to record screen on Windows 10 without Xbox?
A: Both Joyoshare VidiKit and PowerPoint allows you to record screen on Windows 10. And you can trim and cut your recordings after the recording process according to your requirement using Joyoshare VidiKit.
Part 5. Conclusion
After learning how to record screen on Windows 10 in this post, you will be able to effortlessly create recordings at any time using both native and third-party tools. If you prefer not to download or install additional software, Xbox Game Bar is a recommended option. Alternatively, PowerPoint offers a convenient method for screen recording, particularly suitable for presentation purposes. However, for those seeking a comprehensive solution, Joyoshare VidiKit stands out as an indispensable tool. It caters to diverse recording requirements and provides advanced features to enhance your recording experience.
