
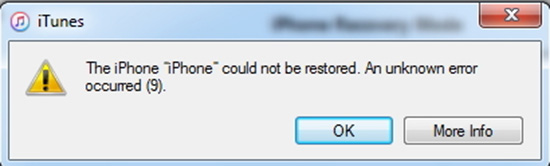
In most cases, users get a prompt of iPhone error 9 while updating the firmware or restoring iPhone via iTunes. With this error, update and restoring process will be tampered or restricted. If you happen to encounter the particular error, you are supposed to seek a sure-fire solution to eliminate the problem. However, there are so many factors behind this error that it is hard to know exactly why it occurred. Maybe iPhone network settings are crashed or there is a conflict between history data and existing data. It is even possible that iPhone system issues result in this error. At any rate, you can know 5 methods from this tutorial to get out of the fix.
- Solution 1: Use Another Computer
- Solution 2: Erase All Content and Settings
- Solution 3: Clear History and Website Data
- Solution 4: Put iPhone into Recovery Mode
- Solution 5: Try Joyoshare UltFix without Data Loss
Part 1. Try a Different Computer to Fix iPhone/iTunes Error 9
If you have checked USB connection and ensure everything is fine, a practical way you can try is to employ another computer to avoid the trouble. It is an attempt to test whether iPhone unknown error 9 results from your device issue or computer problem. If this works, it does mean there are certain issues on the previously used computer that need to be handled. It is better to ask professionals for help if you do not possess relevant technical skills. Decidedly, when this error still occurs on another computer, it signifies that a problem on your iPhone has yet to be tackled. At this time, the following solutions will grant you a favor.

Part 2. Erase All Content and Settings to Repair iPhone Error 9
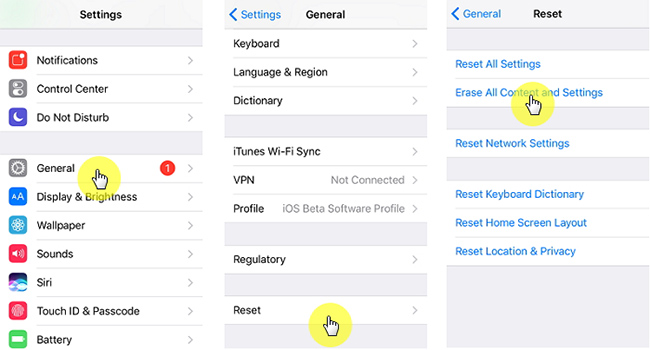
As previously mentioned, the iPhone error is possibly caused by corrupted network settings. Therefore, you may try erasing all content and settings or resetting network settings to repair this iPhone issue. Before doing this, you must back up your iPhone data, because this action may cause data loss. It is suggested that you do the resetting network settings first, which just makes your iPhone settings restored to the default settings instead of removing other content on iPhone. To do it, just head to "Settings" - choose "General" - Tap on "Reset" - touch "Reset Network Settings". Then, you maybe need to enter passcode to confirm this option. If resetting network settings fails to function, you can erase all content and settings to fix it. The method to operate is basically the same as above. Just in the last step, you ought to choose "Erase All Content and Settings".
Part 3. Clear History and Website Data to Fix iPhone Error 9
If the spam files generated by iPhone browser or Safari are not cleaned up in time, this error may also happen when you restore or update with iTunes. Not only can this approach assist you in addressing the problem but also make your iPhone run faster. A quick guide below would teach you how to do.
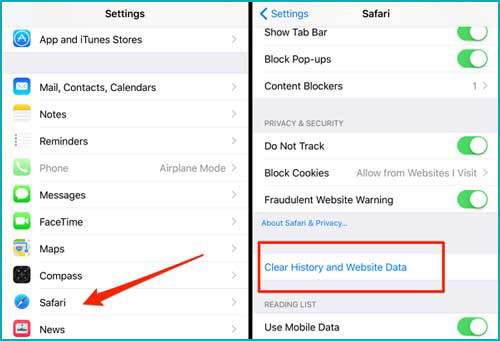
Step 1: In the first step, you should get into "Settings" from the home screen;
Step 2: Afterwards, you just find and choose the "Safari" option;
Step 3: Lastly, scroll down to touch "Clear History and Website Data" in the Safari window;
Step 4: By the time all is finished, you'd better check if this method is workable by restoring or updating iPhone again.
Part 4. Set iPhone into Recovery Mode
Now comes the part that use recovery mode to fix iPhone error 9 if none of the above solutions can work properly. You have to be careful that it is virtually impossible to back up data in such a situation. In case you think it is acceptable, you are able to follow the steps given below to do. Please keep in mind that if you are not happy with this approach, you can skip it over and attempt the final solution which will remain your iPhone data intact.
Step 1: To begin with, run the recent version of iTunes. If not, just upgrade it. Then connect your iPhone to the computer via an original USB;
Step 2: Press and hold the "Sleep" button and the "Home" button until iPhone is turned off. And then continue to hold down the "Home" button and release "Sleep" button until "Connect to iTunes" displays on the iPhone screen;
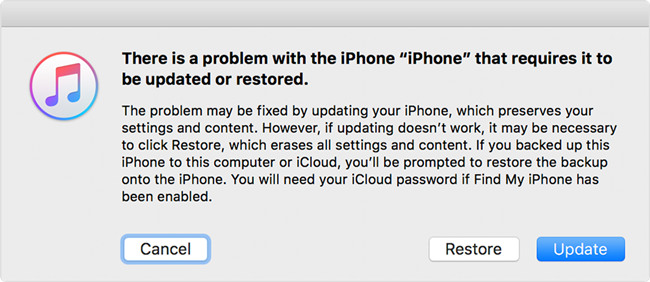
Step 3: Once iPhone has entered into recovery mode, iTunes will ask you to update or restore. According to your real demand, choose "Restore" to fix iPhone error.
Part 5. Employ Joyoshare UltFix with No Data Loss
Adopting the dependable repairing software like Joyoshare UltFix is the safest way to fix iPhone error 9. Developed with advanced precise algorithms and advanced technologies, it can be applied to repair a variety of issues associated with iOS devices system using two modes. More concretely, standard mode has the capability to settle many ordinary iOS issues, such as iPhone error 4005, iPhone error 4013, iPhone error 3194 and so on without the risk of damaging data. The other one is advanced mode, the primary function of which is to solve those relatively serious problems and even unlock your iPhone without passcode.
In addition to iPhone issues, Apple TVs, iPod touch, and iPad system problems can also be finished off with Joyoshare UltFix. Not only that, but you may also apply it to run on all iOS devices and the recent iOS 12.4. By the way, it offers a free and one-click enter/exit recovery mode feature so that you can get into or out of this mode at any time you want.
Key Features of Joyoshare UltFix iOS System Recovery
Fix iPhone could not restored error 9 without losing data
Provide two repair modes to fix issues in different cases
Can be run on all iOS devices and the newest iOS 13
Let your iPhone enter/exit recovery mode for free
Now, how to use Joyoshare UltFix to help you get rid of the iPhone error 9 fix is about to be discussed below. Here a single example of Windows will suffice.
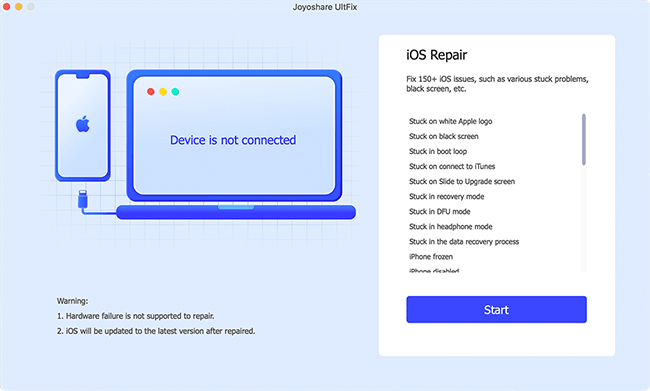
Step 1: At first, it is essential to launch Joyoshare UltFix on the computer and plug your iPhone to it. When your device is connected, click on "Start" to move on;
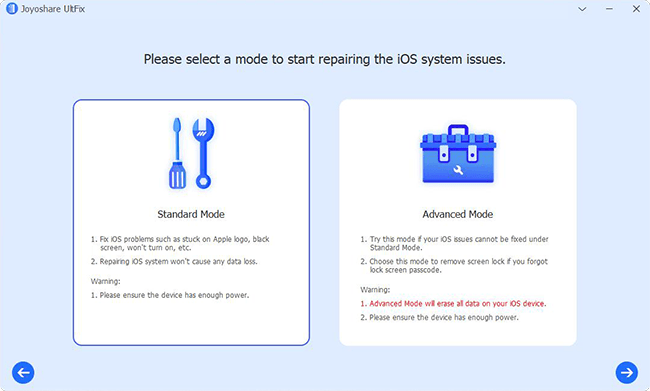
Step 2: In the second step, you should select one repair mode. As to your iPhone error, choosing standard mode is more than enough. Then reach the step 3 by touching the "Next" icon;
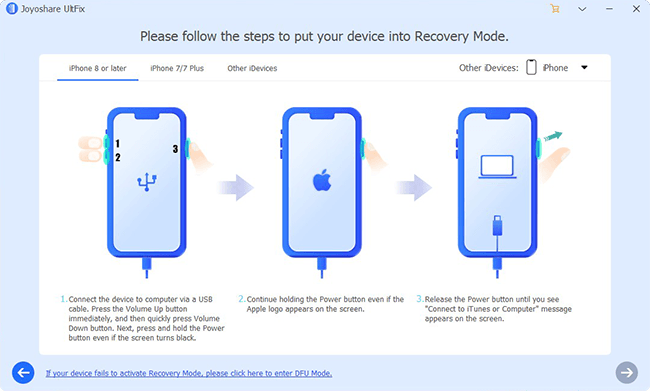
Step 3: Now, you need to manually boot your iPhone into recovery mode as screen instructs. Or put iPhone into DFU mode by clicking the link in the lower part of the window;
Step 4: Subsequently, you are required to make a confirmation after Joyoshare UltFix detects all details of your iPhone. After that, tap on "Download" to get the new firmware package and verify it;
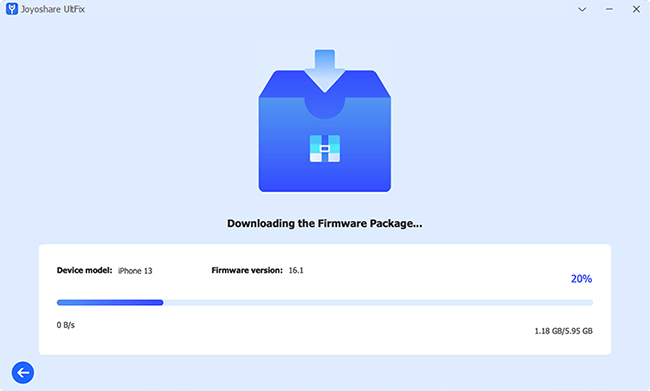
Step 5: Please be patient. It will take you some time to verify the firmware package. In a while, Joyoshare UltFix starts to unzip the package and automatically fix your iPhone error with the "Repair" button.

Conclusion
With the 5 top solutions above, you surely solve iPhone error 9 in a hassle-free manner. If you would not like to lose any data during the repairing process, you need to do with the assistance of Joyoshare UltFix. As a remarkable iOS system recovery tool, it never disappoints. Say more not salutary, try it out!
