
Just think, if your iPhone stops ringing normally, you will miss a great many phone calls. There is no denying that iPhone not ringing is a real hassle even if you can see the missed calls on the iPhone screen in hindsight. Now that the issue has happened, to get upset won't help. All you need to consider about is what you should do to correct the situation. In order to help you get this problem worked, the following summarizes several methods proven to be efficient by those who have experienced the same trouble as you.
- Method 1: Disable Do Not Disturb
- Method 2: Check Ringing Volume
- Method 3: Reset All Settings
- Method 4: Check for Headphone
- Method 5: Factory Reset iPhone
- Method 6: Fix via Joyoshare UltFix iOS System Recovery
Part 1. Turn off Do Not Disturb
It is certainly possible that iPhone ringer refuses to work if you turn on the "Do Not Disturb" option accidentally. In fact, when this feature is enabled, not just iPhone ringer but also notifications and alerts on your device will be silenced. Hence, when you find the iPhone ringer not working issue arises, you may check if you enable "Do Not Disturb" first. If it is on, follow the steps to disable it.
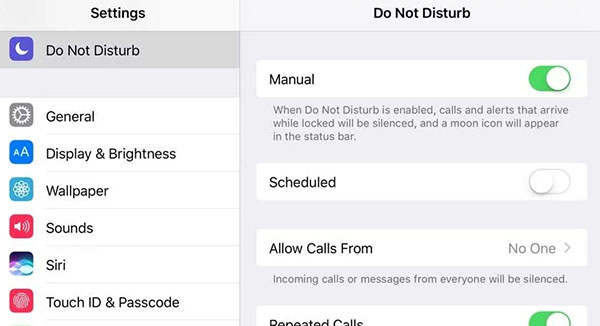
Step 1: The first method is to get into Control Center by swiping up from the bottom of your iPhone screen. Then tap on a moon icon to toggle it off;
Step 2: Another approach is to go to "Settings" and then to "Do Not Disturb". Afterwards, click the button to disable it.
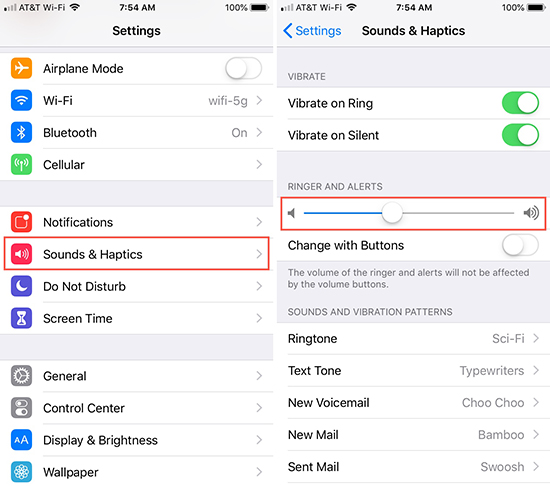
Part 2. Turn up Ringing Volume
If iPhone not ringing issue has not resulted from the above cause, then you ought to check if you engage the silent switch button without realizing or the ringer volume is needed to be turned up. It should be known that when your iPhone volume level is adjusted to the too low level, you certainly can't hear the phone ring. To adjust the ringer volume to the proper level, you need to go for "Settings" and followed by "Sounds & Haptics". Under the "RINGER AND ALERTS" section, you should move the slider to the right to crank up the ringer volume. After doing this, please remember to call your number using another device to see if the problem has been settled.
Part 3. Reset All Settings
Incorrectly configured settings on your device may also bring about the issue of iPhone not ringing. Resetting all your iPhone settings is the easiest and most effective way to get done the problem under the circumstances. You can be at ease about this operation which can definitely not affect any saved data or files and just reset iPhone settings to the default settings. Here is how to perform it.
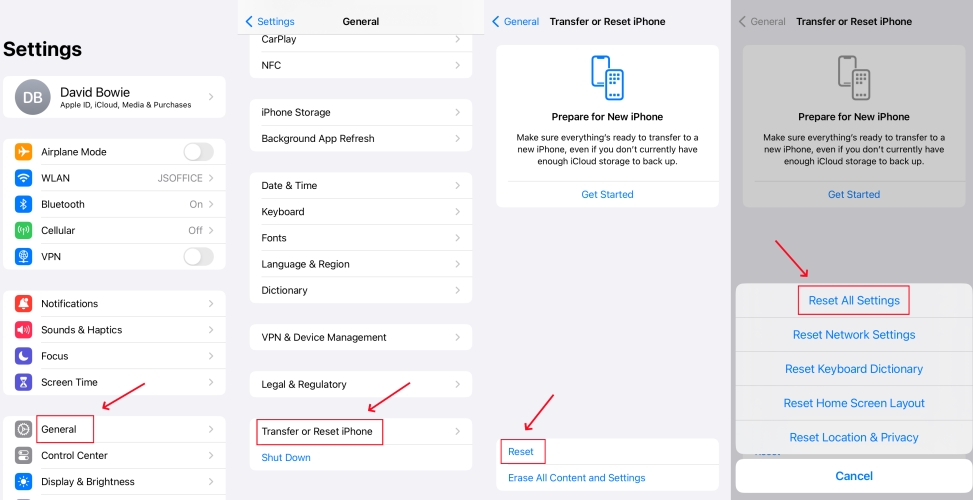
Step 1: On the iPhone home screen, head to "Settings" and then scroll down to "General";
Step 2: Next, tap on "Reset" and choose "Reset All Settings";
Step 3: Now, you will be prompted to enter your passcode to confirm the option. Like that, all settings including ringer settings would be reset, which may help you do the issue.
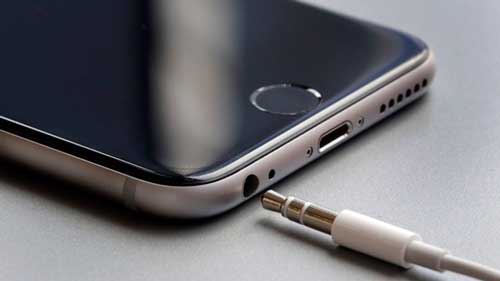
Part 4. Check If iPhone Stuck in Headphone Mode
Sometimes, why iPhone stops ringing suddenly may be that your iPhone is stuck in headphone mode. If you can see a headphone icon at the top of the screen even though you do not plug in the headphones at all, that means your iPhone is thrown in headphone mode. The iPhone ringer not working issue naturally has gone as the headphone mode problem has been resolved.
Part 5. Restore iPhone to Factory Settings
It is time to do a fresh start on your device to repair iPhone not ringing issue if nothing above can pull you out of the mess. You are able to apply iTunes to restore your iPhone. Notably, restoring will wipe everything stored on the iPhone. Thus, you must bear in mind to back up your iPhone before doing this. In case it is all set, please follow the instructions below to operate.
Step 1: To begin with, go to "Settings" and tap on "iCloud" to disable Find My iPhone if it is turned on;
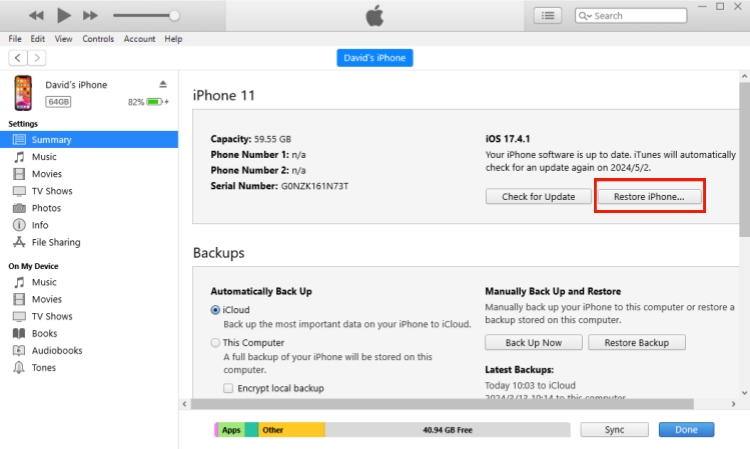
Step 2: Run iTunes and connect your iPhone to computer;
Step 3: Click the icon of your iPhone and touch "Summary";
Step 4: You will see many options on the right panel. Simply click "Restore iPhone" to repair your issue. If you need to back up, please choose "Back Up Now" before restoring. After the whole process, choose "Restore Backup" to get all erased data back.
Part 6. Fix iPhone Not Ringing with No Data Loss
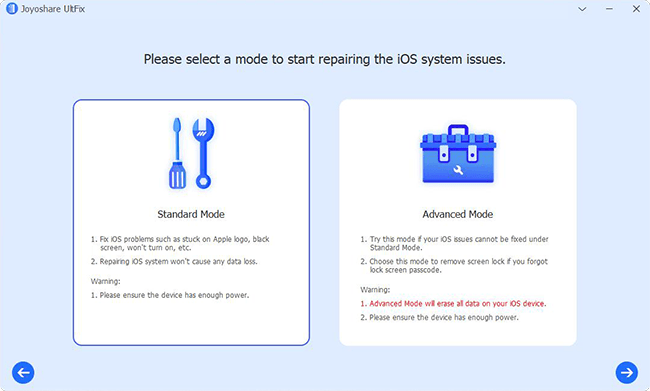
Be afraid of losing data with general methods? Want a solution to the problem with no data loss? In that way, a superb repair program termed Joyoshare UltFix iOS System Recovery is exactly what you want. The program is intended to repair a variety of iOS related problems by updating your firmware package to replace the previous one. In order to highlight its powerful features, Joyoshare UltFix is taken with two repair modes, standard mode or advanced mode as you want.
Based on the fact, such as iPhone ringer not working, iPhone not making calls, iPhone vibration not working, you just choose standard mode which causes no data missing throughout the process. As for getting some serious problems tackled, you have to ask advanced mode for help. Additionally, it is a snap for this program to let your iPhone enter/exit recovery mode with one click, and totally compatible with each iOS device even Apple TVs as well as the latest iOS version without extra effort.
Key Features of Joyoshare UltFix iOS System Recovery:
Get many iOS issues repaired with ease
Fix iPhone stops ringing without data loss
Feature with two repair modes
Free enter/exit recovery mode function
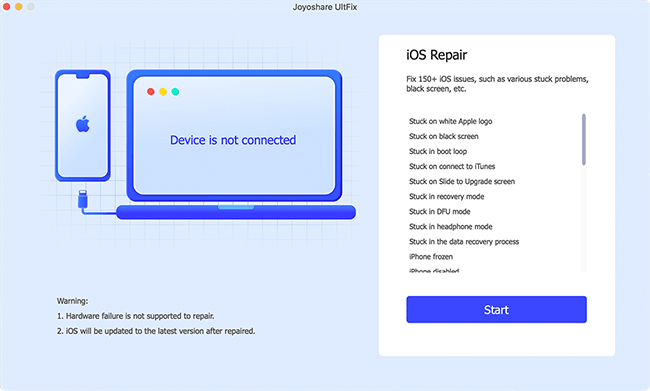
Step 1: Install the recent version of Joyoshare UltFix and run it. Then connect your iPhone with the computer and click the "Start" button to go further after this software detects your device;
Step 2: As not to damage your iPhone data, you ought to choose standard mode to repair the issue in this interface. Once done, touch "Next" to the next section;
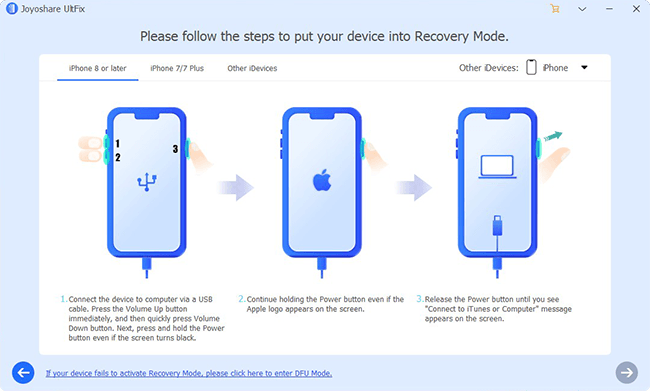
Step 3: Tap your iPhone model on the screen. Then you will be demanded to manually set your iPhone into recovery mode or DFU mode. As soon as it has trouble entering either mode, just the link to switch another mode;
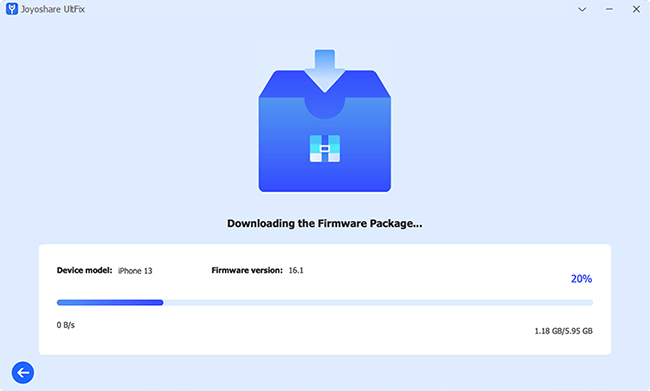
Step 4: Now, all your iPhone info will be displayed on the screen. Before downloading and verifying the firmware package with the "Download" icon, you need to make a confirmation about the info;
Step 5: End by hitting "Repair" to unzip the firmware package, and after a while, your iPhone ringer issue is going to get fixed.

