Recording what is happening on Windows screen becomes a high demand among different user groups, especially after the release of Windows 11. Microsoft has made improvements in recording, adding new screen recording feature for users to quickly access. Though the computer is equipped with default recording tools, not everyone knows how to record screen on Windows 11. If you'd like to create how-to tutorials, report tech issues, share excellent gaming performance, etc. screen recording is necessary. Luckily, this post shows detailed guides with different screen recorders for Windows 11, including both built-in and third-party software.
- Part 1. Easy Ways to Record Screen on Windows 11
- Way 1. Joyoshare VidiKit [All-in-one Recording Toolkit]
- Way 2. Snipping Tool
- Way 3. Xbox Game Bar
- Way 4. PowerPoint
- Part 2. Comparison: Which Way to Choose for Screen Recording Windows 11?
- Part 3. Summary
Part 1. Easy Ways to Screen Record Windows 11
Screen recording Windows 11 can be easily done by using the built-in tools as well as third-party software. You can learn what they specifically are and how each one works below.
Way 1. Joyoshare VidiKit
If what you're after is a professional recording tool, Joyoshare VidiKit is worth a try. With perfect coverage of your desired objects, it gives you the most freedom to record what you want, including screen, audio, webcam, gameplay and a certain window. You have the flexibility to activate the advanced options and even configure the output parameters according to your own needs. To make the video demonstration and instructions vivid and easy-to-understand, Joyoshare VidiKit clearly shows real-time annotations, keystrokes and mouse movements. There is no time recording limit and no frame drops (up to 240fps). The completed screen videos can be saved in your Windows 11 computer in 1080p and 4K, great for further playback.

- Record screen and audio on Windows 11 in high quality
- Add facecam to video for detailed explanation and interaction
- Capture sound from computer system and microphone
- Draw on video recording in real time with arrows, annotations, etc.
- Recording screen with timer to automatically stop process without waiting
- Support mainstream media formats as well as parameter customization
Valid until Dec 31, 2025
Copy the coupon and paste it at checkout.
Step 1 Run Screen Recorder on Windows 11 PC
Get the newest version of Joyoshare VidiKit downloaded to your Windows 11. Quickly finish program installation and then launch it on the computer. In the main interface, go forward to "Recorder" section and click on "Screen Recorder" to activate it.

Step 2 Choose Capture Area and Sound Source(s)
Click the drop-down button on the far left to pick up a system preset ratio from the list. Or click the "Select area to record" option to choose an expected region. Then enable "System Audio" or "Microphone Audio" according to your actual needs. If you'd like to record screen and camera at the same time, here you can also enable Camera and set it properly.

Step 3 Customize Recoding Settings
Afterwards, click on the gear-shaped "Preferences" icon on the bottom right. In the pop-up window, you can pay attention to "Video" section first and complete format confirmation. Here you can configure the parameters such as resolution, codec, sample rate, frame rate and more. Then check and set other options for Mouse, Hotkeys, Files, etc.

Step 4 Start Screen Recording Windows 11
Prepare what you're going to record on your desktop and then click on REC button in Joyoshare VidiKit to begin the recording process. After 3-second countdown, a floating recording menu bar will appear. You can click on the "Draw" tool to add marks and annotations, take snapshots or divide the long video recording to smaller segments with Cut option.

Step 5 Save and Edit Recorded Video
The video recording file(s) will be saved on your Windows 11 PC as long as you click on the Stop button. You'll be taken to the History window. It's available to preview video, change file name, trim and take screenshots.

Way 2. Snipping Tool
Snipping Tool is originally a Microsoft Windows screenshot utility that built in Windows Vista and later. It can take screenshots easily and add annotations. Happily, the Snipping Tool on Windows 11 currently provides screen recording feature. To use this new feature without hassle, you should make sure your computer has a qualified build, specifically 22621.1344 or higher. Besides, don't ignore that Snipping Tool cannot support audio recording, only screen recording available now.
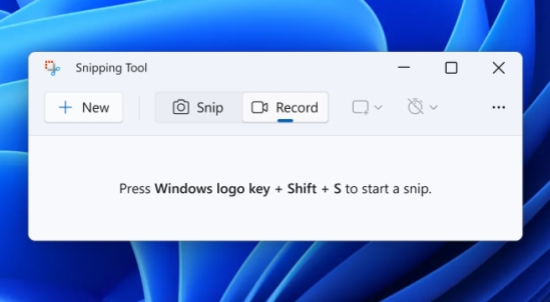
- Step 1: Go to Windows Search bar and enter "Snipping Tool" to search it. In the results page, open Snipping Tool.
- Step 2: To use screen recording feature, simply click on the Record button, which looks like a camcorder.
- Step 3: Click on "+ New" option at the top left to choose a designated area on Windows 11.
- Step 4: Here click the Start button in the floating recording bar to start recording activity on your computer.
- Step 5: When the desired activity is recorded, you can go to the top right corner in Snipping Tool and click "Save as" option to store the video file on local folder.
Way 3. Xbox Game Bar
Xbox Game Bar is pre-installed on Windows 11 and 10. It's mainly designed to capture game clips, receive game invites and chat with friends. But you can also apply it to record screen on PC. It's practical to show camera, grab microphone voice, and take screenshots. It outputs videos at 60fps and audio at 192kbps. Though it is free to use without downloading, it has shortcomings. Only one app can be recorded at a time and you cannot record the full screen.
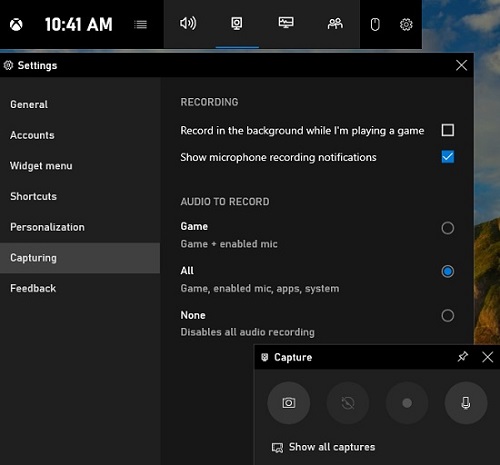
- Step 1: Go to Settings → Gaming → Captures in your Windows 11 computer. Then confirm related settings as per your needs. You can set how long to record, which sound source to capture audio from, how high the output video quality is, and more.
- Step 2: To control Xbox Game Bar quickly and improve recording efficiency, you can head to Settings → Gaming → Xbox Game Bar to customize keyboard shortcuts.
- Step 3: Get what you're going to record ready on Windows 11. Next, press Win + G keyboards to call out the toolbar and Capture panel. Simply set options if you need.
- Step 4: Click on the Record button in the Capture panel to start a recording task on Windows 11. Or you can press Win + Alt + R shortcut.
- Step 5: Once you complete capturing ongoing activity, click on the Stop recording button to save recorded video.
Way 4. PowerPoint
PowerPoint is a part of Microsoft Office, which always be used to create presentations, tutorials, and demos. To make content more visualized, PowerPoint allows you to record screen and audio at the same time, then insert it to your slides. Also, you can show mouse pointer in the recorded video. The program operation is easy, requiring no learning curve.
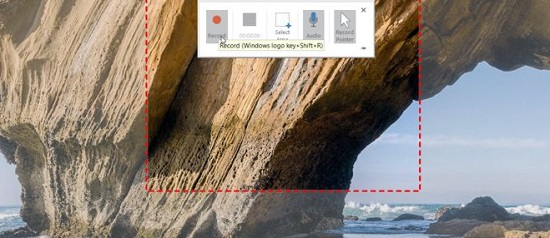
- Step 1: Open PowerPoint on Windows 11 and create a new slide that you want to add screen recording to.
- Step 2: At the top, find Insert tab and choose Screen Recording option.
- Step 3: Hit Select Area on the Control Dock and then drag on your computer desktop to select an area. (Both Audio and Record Pointer are enabled by default.)
- Step 4: Click on Record button to let PowerPoint carry out a recording assignment.
- Step 5: When you're done, simply hit Stop button and your recorded video will be embedded to the slide. You can right-click the video and Trim it. Or click on Save Media as to store it as a separate video file on Windows 11.
Part 2. Which Way to Choose for Screen Recording Windows 11?
As you can see, the main solutions described above have their own advantages and disadvantages. If you want to intuitively learn differences between them, the following comparison table can take you far.
| Joyoshare VidiKit | Snipping Tool | Xbox Game Bar | PowerPoint | |
|---|---|---|---|---|
| Best for | Multipurpose recording | Screen recording and snapshots | Gameplay captures | Presentation recordings |
| Supported OS | Windows XP and later (including Windows 11); Mac OS X 10.8 and later | Windows 11 with a build (22621.1344 or higher) | Windows 11, 10 | Microsoft Windows including Windows 11 |
| What to Record | Screen, audio, webcam, specific window, game | Screen only | Screen, audio | Screen, audio |
| Video Output | Nearly all | MP4, AVI, MOV | MP4 | MP4 |
| Real-time Drawing | Yes | No | No | No |
| Schedule Recording | Yes | No | No | No |
Part 3. Summary
This article talks about how to record screen on Windows 11 and demonstrates different solutions to help you in screen recording. If you don't want to install software and don't pursue advanced recording features, the built-in tools like Snipping Tool, Xbox Game Bar, and PowerPoint, deserve your consideration. However, if you want more control over your recording, you can try Joyoshare VidiKit, a mighty toolkit with various surprises.
