Q:"How to screen capture or record a video/desktop on Windows 8?" - From Microsoft Community
A large number of screen and audio recorder tools in the market enable you to not only record screen on Windows 8 but also do that at your own will without any hassle. There is no denying that learning how to screen capture Windows 8 will allow you to do many things to enjoy a better life, such as download online movies for offline viewing, record important virtual meetings for future reference, make how-to videos for customers, etc. You can totally rely on this article if you have no idea which screen recorder to choose and how to use it. It will show you the top 6 options as well as a series of brief and clear guides.
- Part 1. Joyoshare Screen Recorder (Handy and Smart)
- Part 2. Built-in Steps Recorder
- Part 3. Camera App
- Part 4. Movavi Screen Recorder
- Part 5. EaseUS RecExperts
- Part 6. Apowersoft Screen Recorder Pro
Part 1. Screen Capture Windows 8 - Joyoshare Screen Recorder
Specialized in recording any ongoing video and audio desktop activity on computer, Joyoshare Screen Recorder is indeed an ideal tool to record screen Windows 8 with audio. It is devoted itself to capturing all possible desktop doings in high quality, including live chats, class lectures, YouTube audios, streaming movies, online radios, system audio, microphone sound, webcam videos, Google Hangouts, Yahoo messengers, etc.
What is mentionable is that this amazing tool is well arranged with attractive recording features and built-in editing functions. You can decide specific capturing area, enable system audio/microphone sound, switch recording mode, customize output format and so forth. Best of all, it is available to spotlight click or cursor movements, skip unwanted contents, trim finished recordings, add ID3 tag info, personalize watermark, make recording tasks, etc. in the way you like.

- Support Windows 10/8.1/8/7/Vista/XP and macOS
- Grab the entire screen or a specific area of any size
- Offer built-in editing tools to touch up recorded files
- Trim screen recordings and take screenshots losslessly
- Record screen with audio from interal and external sources
Step 1 Equip Windows 8 with Joyoshare Screen Recorder
Easily download and install Joyoshare Screen Recorder on your Windows 8. Soon after, this software will be automatically launched. The "Record video and audio" mode will be turned on by default. If you only want to record audio, you can press the speaker-like icon on the right side of the main screen to enable the "Record audio" mode with ease.

Step 2 Customize Recording Area
It is necessary to set up capturing area at your own will. You can get it done by simply tapping on the "+" icon at the upper-left corner of the main screen, after which a pop-up window will be shown to let you adjust. Or you can click on the drop-down list to select one systematic ratio. Moreover, this program also gives you access to set width and height manually based on your needs.

Step 3Confirm Screen Recording Preferences
Before recording your Windows 8 screen activity, you are supposed to set up many options. For example, you can decide whether to grab microphone sound and system audio at the same time. Afterwards, press the "gear" icon at the right bottom to add image watermark, choose shortcut, select output format, change relevant parameters, etc. Meanwhile, effects can be added to click or cursor movements.

Step 4Record Screen on Windows 8
Having finished confirming all recording preferences, you can now go straight to click the red "REC" button to start to record desired desktop screen on Windows 8. During the recording process, you can hit "Pause" button on the minimized toolbar to skip any useless content, take snapshots with previous selected shortcut and cut recording file using the "Cut" button.

Step 5Manage Finished Windows 8 Recordings
To make your destination files more unique, you are allowed to edit them with a compact "edit" option. No matter what target file is, video or audio, the trim feature can be applied without problem. Plus, ID3 tag info can be added as well for better and convenient management. Besides, the preview window can facilitate you to see all recordings in advance.

Part 2. Record Screen on Windows 8 - Steps Recorder
Steps Recorder is also sometimes referred to as PSR or Problem Steps Recorder. It is a screen capture, which is used to record actions taken by a user, including every mouse click and keyboard action, that is only available in Windows 10/8/8.1/7 and Windows Server 2008. It is commonly used to document a computer issue so someone else can help you troubleshoot it. But it does not run in the background, and the recorded file will be saved in MHTML format. To access this tool, you can go to the Start menu on Windows 10 and the Apps Screen on your Windows 8.

Step 1: Open the Start menu or press Win + R to activate the Run dialog box, and then type "psr" to open Steps Recorder on your Windows 8;
Step 2: Now tap the "Start Record" button to begin recording Windows 8 to demonstrate your computer issue;
Step 3: Click on the "Stop Record" button to quit recording your actions.
Note: You can tap the "Add Comment" button during a recording to manually add a comment. Finally, a single ZIP file, which contains all of the content recorded by Steps Recorder, will be created and saved to your Desktop.
Part 3. How to Screen Record on Windows 8 - Camera App
A small tile called Camera can be found on the Windows 8 Start screen. It is a shortcut to a little app that can be used to record videos on Windows 8 without downloading and installing any other screen capture software. Follow the instructions below and you will find it very easy to understand how to use it to record Windows 8 screen.
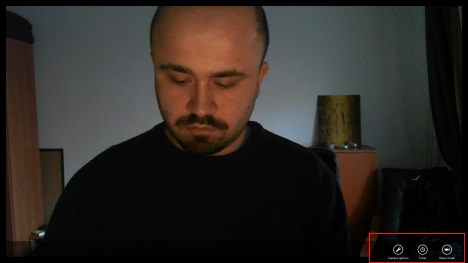
Step 1: Install your webcam and click on the Camera tile on the Start screen; tap the "Allow" button if you were asked whether the Camera app can use your webcam and microphone;
Step 2: After successful activation, you will see a live image and three small buttons at the bottom-right corner of the screen;
Step 3: Click on the "Camera options" so that you can set the video resolution, change the audio device, turn on/off video stabilization, etc.;
Step 4: Enable the "Video mode" and click somewhere in the middle of the live image so that you can start to record screen on Windows 8; to stop recording, you need to click the displayed image again and the Camera will spend some time saving your recording.
Part 4. How to Record Windows 8 Screen - Movavi Screen Recorder
Movavi Screen Recorder supports Microsoft Windows 7/8/10 operating system. This professional tool is able to record video tutorials, grab streaming events, capture webinars and online calls, etc. You are allowed to select the capturing area freely and adjust the recording settings in the way you want. Moreover, you will be able to edit the screen recording using many inbuilt editing tools without any difficulty.
Step 1: Install and run Movavi Screen Recorder on your Windows 8 computer;
Step 2: Click the "Screen recording" option on the sidebar of the screen and adjust the frame to garb the part of the screen you would like to record;
Step 3: Press the icon appearing outside the frame to select your desired audio source;
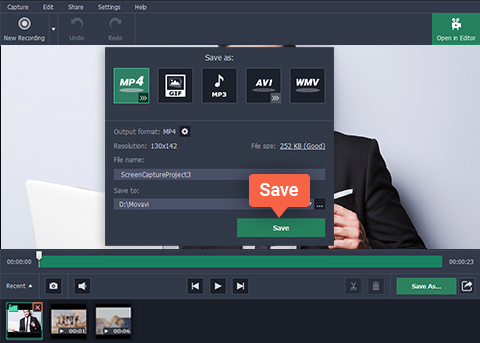
Step 4: Now press F10 or tap the REC button so that the software will start recording everything on your screen; tap the F10 key to stop recording, and the screen recording video, which will be automatically saved in MKV format, will be open in preview window.
Step 5: You can click the "Show in Folder" button at the top of the screen to access the recorded video; you can also hit on the "Save as" button after editing your screen recording to save the file in the way you like.
Part 5. How to Screen Capture on Windows 8 - EaseUS RecExperts
EaseUS RecExpers is an easy-to-operate screen capture software to reocrd all desktop activities. It supports Windows 10/8.1/8/7 as well as Mac operating system. Using this tool, you are not only able to record online videos, live streams, etc. with audio like system sound and microphone, but also can choose to grab recording area of any size.
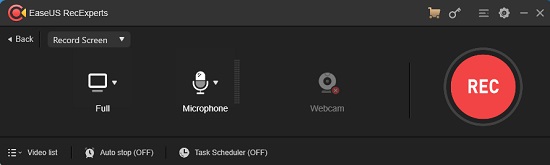
Step 1: Open EaseUS RecExperts and select "Record Screen" from the four main functions on the main interface;
Step 2: Press the "Custom" button to expand a dropdown list and choose "Full screen", "Select region", "Fixed region", or "Lock window" according to your actual needs;
Step 3: Click on the "Microphone" button to adjust whether you are going to record screen on Windows 8 with or without audio;
Step 4: Now tap the "REC" button on the right side of the main screen to begin to screen capure video Windows 8.
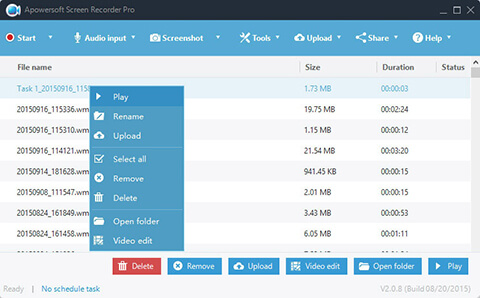
Part 6. Record Windows 8 Screen - Apowersoft Screen Recorder Pro
Supporting Windows 7/8/10, Apowersoft Screen Recorder Pro is a reliable desktop screen recorder to record video and audio activities at the same time. Video recorded with this tool will be saved into nine different formats, including VOB, MP4, FLV, MKV, MOV, AVI, WMV, WebM, and MPEG. It is also equipped with editing tools, which will enable you to perfect your recorded videos easily.
Step 1: Launch Apowersoft Screen Recorder Pro on your Windows 8 computer;
Step 2: Drop down the "Record" menu and select the recording mode you prefer; remember to press the "Audio Input" button to choose an audio input source and the "Settings" button to adjust everything related to screen recording, such as cursor effects, the output format, bitrate, frame rate, etc.;
Step 3: Tap the "Start" button to begin to record Windows 8 computer after confirming all your settings, and once the recording is done, you can click on the Stop button to finish the recording process.
