MP3 is incredibly a widespread and popular format that's highly used to save audio files. It makes efficient compression to retain sound quality and well reduces the file size to occupy small storage space. Admittedly, MP3 format comes with strong compatibility to nearly all devices, multimedia players, audio editors, and social media. There is no doubt that most people these days prefer this file format. You can record MP3 and easily generate voice memo, songs, agenda, podcasts, voiceovers, and more. However, if you're feeling confused and not sure which method is best for you to create MP3 recordings, this post is right for you. You can make it effortlessly on different devices.
- Part 1. How to Record MP3 on Windows
- Part 2. How to Record MP3 on Mac
- Part 3. How to Record an MP3 Online
- Part 4. How to Record MP3 on iPhone
- Part 5. How to Record MP3 on Android
- Part 6. Conclusion
Part 1. How to Record MP3 on Windows
1.1 Joyoshare VidiKit
Are you looking for a one-stop recording solution? Well, Joyoshare VidiKit is an amazing toolkit. It combines audio recorder, screen recorder, window recorder, webcam recorder, game recorder and more, to meet your needs in all aspects. As a decent audio recorder for Windows and Mac, it comes with a robust built-in audio encoder that helps you save types of audio sources in popular formats like MP3, AAC, WAV, FLAC, M4A, M4B, etc. Both system sound and microphone voice can be captured in high quality. Also, it's available to change channel, codec, quality, bitrate, sample rate and more before the recording starts.

- Record audio with no time limit and latency in MP3 and more formats
- Configure codec, bit rate, sample rate and channel based on your needs
- Detect and capture high-quality sound from your computer and microphone
- Record voice over, streaming music, online radio, calls, podcasts, etc.
- Auto-stop recording, trim audio, edit ID3 information, and apply effect
40% Off Coupon Code: MECC40ASP
[Valid until Aug 31]
Step 1 Open Audio Recorder in Joyoshare VidiKit
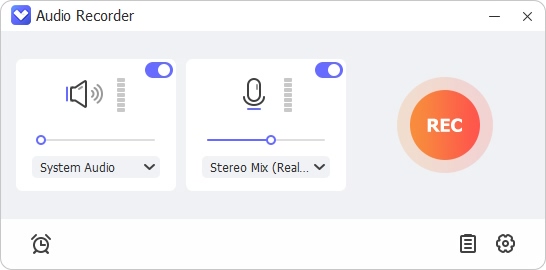
- Download and install Joyoshare VidiKit from the official website based on your OS. Double-hit the program icon on your computer and select Audio Recorder under the Recorder section. Simply get this tool run.

Step 2 Customize Recording Parameters
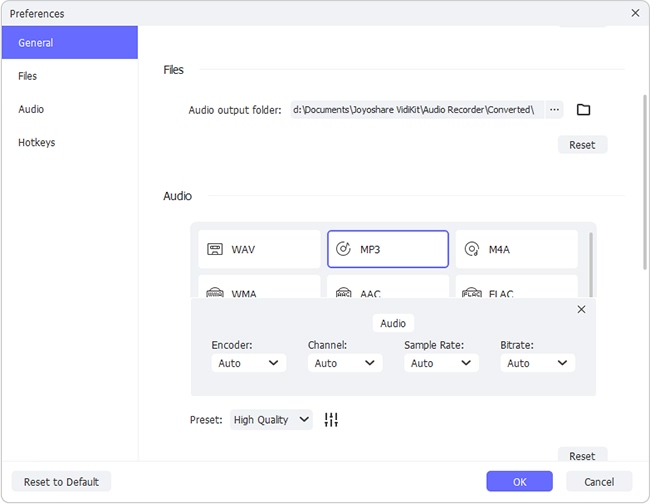
- Select and adjust both System Audio and Microphone Audio according to your own needs. Then, click on the gear-shaped "Preferences" icon to access another window. Under Audio section in the left sidebar, you can select MP3 format and change its parameters like encoder, channel, sample rate and bitrate. Besides, you can set hotkeys, output quality and more easily.
Step 3 Start to Record MP3
- Get your audio or music ready and then click on the "REC" button in Joyoshare VidiKit to start recording an MP3 file on PC. You can click on scissor-shaped icon to cut your recordings to different segments, or use "Pause" button to skip something that you don't like.
Step 4 Save and Edit MP3 Recordings
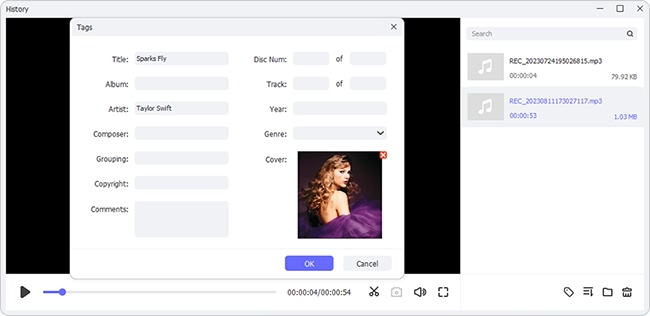
- Here you can click the Stop button and save the MP3 audio file in the "History" window. It's possible to trim the recording using "Edit" tool and change ID3 tags information using "Audio tag".

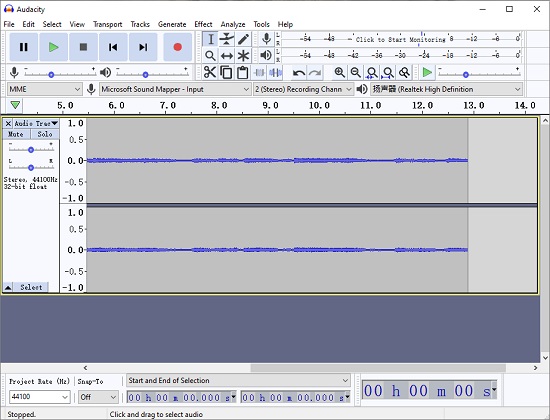
1.2 Audacity
Audacity functions as both an audio recording application and audio editor available on Windows, Mac, and Linux. This free and open-source software enjoys high popularity among musicians, sound engineers, and podcasters. It's well developed with many practical features, including multi-track, combining, scheduling recordings, adding effects, and more. With its assistance, you can effortlessly capture and edit any type of audio sources.
- Pros:
- Record live audio through a microphone or mixer
- High-quality sound recording
- Combine and edit multiple audio files
- Export audio files in several formats
- Cons:
- Complex for beginners to independently use
- Lack of support for MIDI playback
- The learning curve is a bit steep
- Step 1: Download, install and open Audacity on your PC.
- Step 2: Go for the top menu bar and click on "Edit" → "Preferences" → "Audio Settings". Simply set recording device, channel, playback device and more as you want.
- Step 3: Now click the red Record button to begin recording audio from your designated sound source.
- Step 4: Click on Stop button once the recording comes to end.
- Step 5: As per your needs, edit the recorded audio in the way you like. If not, you can click on File → Export Audio. Here select "MP3 Files" as the output format and configure paramters. Then hit the "Export" button at the bottom to save it.
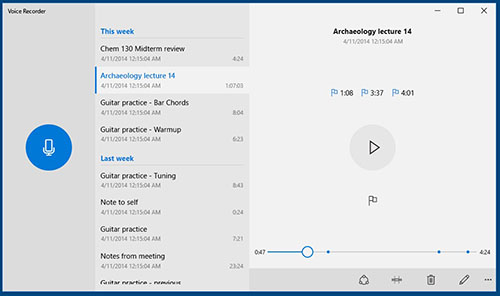
1.3 Windows Voice Recorder
Voice Recorder is a built-in recording tool in Windows 10 to help you record voiceovers, ambient sounds, lectures, interviews, sound effects, conversations, and more. It's free to use and comes with basic features. Because of its simplicity, you can completely operate it at home without any technical skills. There are no downloading and installation requirements. You can capture voice through microphone and easily create a local audio file.
- Pros:
- Default voice recording tool in Windows 10
- Support grabbing voice from both internal and external microphones
- Free and simple to use
- Cons:
- Only save audio recordings to M4A format
- No built-in option to convert M4A to MP3
- Step 1: Navigate to "Type here to search" section and search "Voice Recorder" app. Then get it launched.
- Step 2: Click on the blue microphone-shaped icon in Voice Recorder to start capturing voice from a microphone.
- Step 3: Hit the blue Stop button in the center to end the recording.
- Step 4: The recorded audio will be listed in the left of the main interface. Here you can play, rename, trim and share it.
- Step 5: Now you can use the free Audio Converter in Joyoshare VidiKit to convert M4A to MP3.
Part 2. How to Record MP3 on Mac
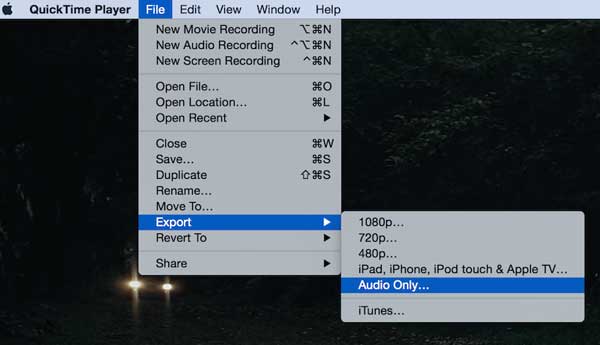
2.1 QuickTime
To record audio on Mac, you don't need to download an external audio recorder. Mac comes with a preinstalled recording software named QuickTime Player. Developed by Apple, QuickTime is a multimedia player that allows you to handle videos, audios, and panoramic images. This program has a clean and easy-to-use UI, which means that you don't need steep learning curve to operate it. Notably, QuickTime supports simple audio editing, like trimming, splitting, merging and rearranging clips.
- Pros:
- Clean, interactive and easy-to-use interface
- Various audio and video editing features
- Free to use on Mac without software downloading
- Cons:
- Save audio recording in M4A by default
- Record microphone sound rather than computer system audio
- Step 1: Open QuickTime Player on Mac and choose the "New Audio Recording" from the "File" tab at the top left corner.
- Step 2: Once you select the "New Audio Recording" option, a recoding panel will appear on the screen. Under the Options menu, you can choose the source of your audio and adjust the audio quality from the drop-down menu.
- Step 3: Now you need to activate the red Record button to start recording target audio track. Once done, again click on the same red button to stop the recording.
- Step 4: Then go for File at the top and click on Save... to save the recording in M4A by default.
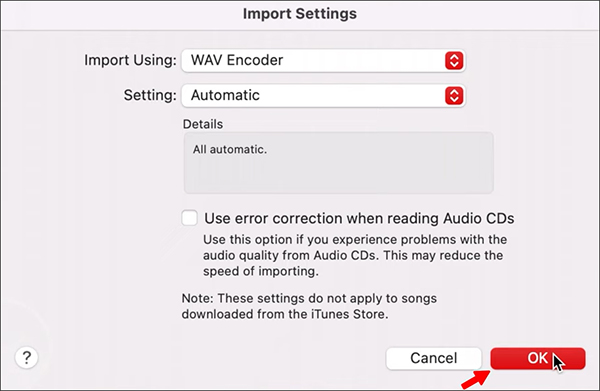
- Bonus: How to Convert M4A to MP3 on Mac Using Music App?
- 1. Run Music app on your Mac desktop and head to Music → Settings → Files.
- 2. Hit Import Settings... at the bottom left and click on Import Using to choose "MP3 Encoder". Then confirm the change with OK.
- 3. Go back to the main interface of Music app. Go forward to click on File → Import... to add the recorded M4A audio file.
- 4. Head to Songs section in the left and select the imported M4A audio file.
- 5. Click on File → Convert → Create MP3 Version to convert the recorded M4A audio file into MP3 format. You can see the new MP3 file under Songs section as well.
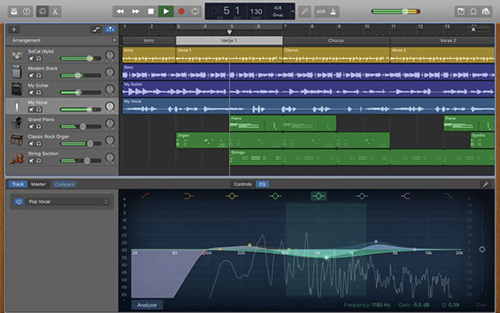
2.2 GarageBand
GarageBand is a well-known software application developed by Apple for macOS, iOS, and iPadOS devices. It is completely equipped with a best-in-class music creation studio for you to produce professional-sounding music. Moreover, GarageBand provides a stunning sound library that covering presets for guitar and voice, instruments, drummers and more. This can be an optimal solution for music recording, editing and production.
- Pros:
- Great music creation studio with complete sound library
- Flexible to use across Apple devices
- Record, arrange and mix audio files in a dedicated manner
- Cons:
- Not friendly for novices
- Need to improve Mixer and levels indicators with plug-ins
- Step 1: Open GarageBand on Mac and go to New Project → Voice. Follow onscreen instructions to finish Create a new project.
- Step 2: Once the new project opens, choose a voice or apply effects based on your actual needs.
- Step 3: Now click on the red recording button in GarageBand to start recording MP3 on your Mac computer.
- Step 4: Hit the same button again to stop recording and then head to File → Save as to save this project.
- Step 5: Click on Share → Export Song to Disk to save your recording and confirm the output format is MP3.
Part 3. Record MP3 Online
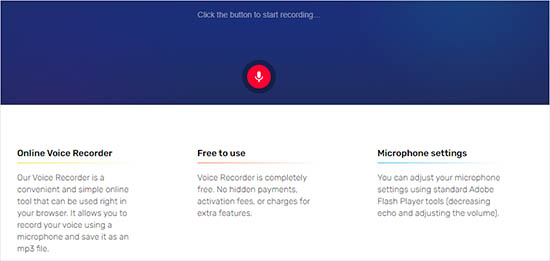
3.1 Online Voice Recorder
You can utilize an online tool to record MP3 if you don't want to download anything on your device. Online Voice Recorder is a completely free mp3 recorder, coming with editing functions like cropping and cutting for you. The best part of this tool is that it can automatically detect the silent fragments at the beginning and the end of your MP3 recordings and get rid of them at your convenience. It is very simple, which means that you can't change the parameters like codec, quality and sample rate to enhance your files.
- Pros:
- Easy to operate and save your recordings
- Automatically detect and delete silent fragments
- Without hidden payment and activation fee
- Cons:
- Only grab sounds from microphone, not the computer system
- Rely on network status
- Step 1: Go to Online Voice Recorder website. And allow it to access your microphone.
- Step 2: Click the red button to begin the MP3 recording process. To stop the recording, you can click the red button again.
- Step 3: Slide the three dots sign to cut unwanted content. Press Save button to download your recorded MP3 files.
3.2 Rev Online Voice Recorder
You can also use other voice recording tools available on Google Chrome and Safari. Rev Online Voice Recorder is one of the most easy-to-use voice recorders on desktop, Android and iPhone. Using Rev Online Voice Recorder, you can record high-quality audios, edit and transcribe audio files. Please keep in mind that you need to pay if you want to transcribe online voice recording to text. Apart from recording MP3 online, you can also download files using its appropriate tools.

- Pros:
- Free to record voice online without account login
- Option to transcribe speech to text
- Record and download MP3 files
- Cons:
- Advanced features require payment
- Step 1: Head to Rev Online Voice Recorder official website and click the RECORD button.
- Step 2: Then, speak into your microphone device.
- Step 3: To stop the recording, you can tap the Pause button and preview it to check quality.
- Step 4: Hit the Download button to save your audio files to your desired folders in MP3 format.
Part 4. How to Record MP3 on iPhone
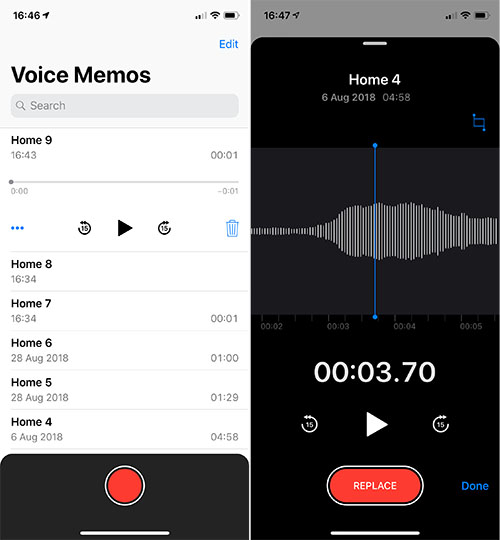
4.1 Voice Memos
Voice Memos app comes preinstalled on your iPhone. It is a smart audio recorder that helps you capture lectures, personal notes, musical ideas and more using an in-built microphone, an external microphone, or a compatible headset. You can share your recordings with a link provided by this application and rename your recorded files after the recording files. Also, it allows you to delete and trim unwanted audio fragments.
- Pros:
- Easy and free to use
- Help you record audio files instantly and share them with a link
- Organize your recordings by giving different file names
- Cons:
- Only offer basic features
- Cannot support MP3 output format
- Step 1: Open Voice Memos app from the "Extra Folder" on your iPhone.
- Step 2: Next, tap the red button to start recording audio.
- Step 3: Hit the same red button to stop the recording.
- Step 4: Simply tap on the ... icon at the upper right corner and click on "Edit Recording" to trim the recording.
- Step 5: Tap on Save to keep the desired audio track and then "Done" to save it. You'll need to convert it to MP3 format furtherly.
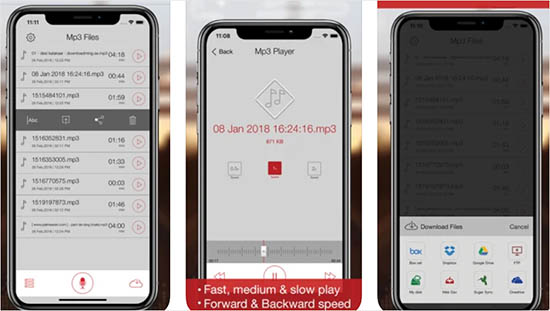
4.2 Mp3 Recorder: Voice Recorder
By turning iPhone and iPad devices to a handy MP3 recorder, Mp3 Recorder: Voice Recorder gives you the power to record various audio like voice memos, songs, meetings, etc. With one touch recording feature, it is friendly for beginners and can record your sound for seconds or hours. Besides, it also supports multiple bitrate like 128 kbps, 160 kbps, 192 kbps and 256 kbps and several input channel modes, including stereo, mono and jsterio. What's more, you can upload your recordings to different clouds and export files to Cloud drives.
- Pros:
- Capture and play audio files in the background
- With simple to use functions and intuitive interface
- Support a series of input channel modes and offer adjustable play controls
- Cons:
- Long recordings not saving issue happens to users
- Require in-app purchases
- Step 1: Activate Mp3 Recorder: Voice Recorder on your iPhone and click the red microphone icon at the bottom to initiate recording.
- Step 2: Press the pause button to skip unwanted content.
- Step 3: To stop the recording process, you can hit the stop sign.
Part 5. How to Record MP3 on Android
5.1 Android Sound Recorder
Want to know how to record files on Android? Just like an iPhone, you can record files on your Android smartphone using built-in sound recorder too, which means that you don't need to download application to your device. Android Sound Recorder allows you to record audio files, voice notes, and phone calls easily. It has an easy-to-use interface and gives you the option to save recorded files from different names to keep them organized.
- Pros:
- No need to download any external software
- Free to use and operate
- Some support setting as ringtones
- Pros:
- Some don't support saving audio recordings in MP3
- Step 1: Locate the sound recorder app on your Android phone.
- Step 2: Tap on the red record button or any other voice recording icon on the app to start recording MP3.
- Step 3: Once done, you can save the recording on your phone by giving it a name of your choice.
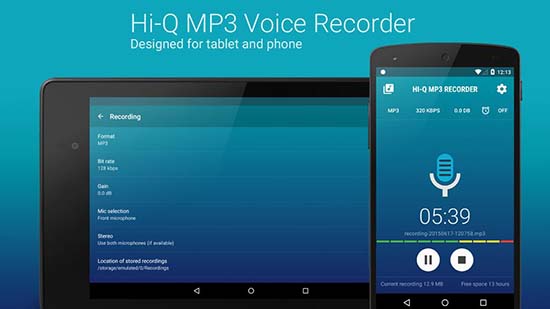
5.2 Hi-Q MP3
If you don't like the recorder that comes with your Android phone, you can also download other reliable sound recording applications from the Google Play Store. Most Android users prefer Hi-Q MP3 to capture high-quality MP3 up to 10 min on their devices. It also enables you to edit recordings with its built-in various editing function like customizing bitrate, format, quality, deleting recordings, transferring files to PC, etc. However, you can't record phone calls using this application.
- Pros:
- Record audio using the free application
- A variety of audio customization options
- High-quality 44 kHz audio sampling
- Cons:
- Isn't compatible with some Android devices
- Need to pay for Pro version
- With audio recording length limitation
- Step 1: Download and install Hi-Q MP3 from the Google Play Store.
- Step 2: Tap on the mic icon to start recording the audio.
- Step 3: Once done, you can save the audio in MP3 by giving it the desired name.
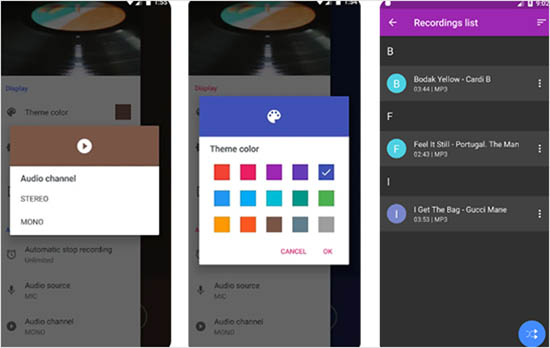
5.3 MP3 Recorder
You will get a totally free application to improve your recording functions and audio editing features if you download MP3 Recorder. With multiple attrctive themes and colors, this tool is suitable for anyone and can play sound in bubble and wave form. What's more, it presents the time for recording and allows you to brighten the screen during the recording process, change sounds channel to stereo or mono. Once you have done the recording, you can change the storage location and edit files.
- Pros:
- Offer timer to stop recording
- Arrange your recordings in time order, format, name as you want
- Share your recorded files to Facebook, Dropbox, Twitter, Messenger
- Cons:
- Cannot record when the device screen is off
- The shared recording file can be saved as an AMR file instead of MP3
- Step 1: Download this application from Google Play and run it on your phone.
- Step 2: Set the recording settings before recording and tap the record button.
- Step 3: To stop the recording, you can hit the stop button and share your recordings with your friends.
Conclusion:
If you are looking for how to to record MP3, this article is of great help. It demonstrates different audio recording tools to help you capture audio recordings and save them in MP3 on Mac, Windows, iPhone, Android and even online. You can produce high-quality MP3 recordings for specific purpose by following the detailed steps outlined here. If you want to a comprehensive recording solution for not only audio but also others, like screen, game, window, webcam, Joyoshare VidiKit can be the best option to consider. Now, you can start your recording and enjoy listening to MP3 files on any device.
