Q: "My friends and I like to have a session every weekend where we will spend hours and hours going around reading and talking. We'd like to start recording that. What's the best audio recording software to record a Discord Voice Chat?" - From Reddit
Discord is a freeware instant messaging application available for Windows, Mac, Linux, Android, iOS, and web browsers. It successfully creates a great platform for friends, gamers, businessmen, etc. all around the world. People can spend time sending texts and images, having video and audio chats here. If you are using Discord, and wonder how to record Discord audio so as to save your conversations with your friends from school clubs, gaming groups, or any other communities, then you are in the right place now. Here we are going to introduce you up to 12 different methods for computers and mobile phones to record audio in a simple and easy way ever.
- Part 1. How to Record Discord Audios on Windows
- Part 2. How to Record Discord Audios on Mac
- Part 3. How to Record Discord Audios on Linux
- Part 4. Record Discord Audios on Android
- Part 5. Record Discord Audios on iPhone
- Tips. How to Solve "No Device Found" Issue
- FAQs
- Conclusion & Comparison
Part 1. Record Discord Audio on Windows
Joyoshare VidiKit
Joyoshare VidiKit (originated from Joyoshare Screen Recorder) provides the best and easiest video and audio recording method for users at home and abroad. It is able to capture any on-screen activities, such as gameplay, video calls, online movies, live streaming videos, radio shows, lectures, etc. in high quality with zero lag. You can save your recordings into various digital formats for fashionable devices.
This software is assisted with a full set of flexible features as well. For example, you are allowed to grab recording area freely, take screenshots easily, schedule recording tasks, show/highlight cursor/clicks, adjust audio codec, etc. Provided with a user-friendly interface and all kinds of functions, you will be able to make your recordings fantastic and satisfying without too much effort.
- Keep and save video and voice calls in HD or 4K quality
- Support a number of video and audio output formats
- Record YouTube audio, Skype calls, Teamspeak chats, etc.
- Adjust audio codec, sample rate, bitrate, channel, and more
- Select the entire screen or any customized region to record
- Capture videos and audios in real-time with no time limit
Step 1 Launch Joyoshare VidiKit
Download Joyoshare VidiKit. Launch it on your computer after installation, then choose the "Record" panel to open the screen recorder. If you only want to record audio, you are supposed to choose "Record audio" mode. To do so, you need to click the
 icon right next to the "REC" button on the right side of the screen.
Note: By clicking the
 icon, you can choose "Record video and audio" mode. It will enable you to record a full or partial screen with or without system audio and/or microphone.
Step 2 Adjust Audio Recording Settings
Press the gear icon near the "speaker" icon to unfold the setting window. You could designate your save path, set audio output format as MP3, AAC, WAV, M4A, WMA, etc. adjust shortcut keys, set recoding start/end time manually, etc.

Step 3 Enable System Audio and/or Microphone
Now move to the middle part of the main interface. You can turn on/off system audio/microphone as you like. You are also able to adjust their volume freely.

Step 4 Start to Record Discord Audio
When everything is set properly, you can press the red REC button now. After a 3-second countdown, this program will begin to capture your computer sound in real-time. You can press the Pause button to skip your unwanted audio and the "scissor" icon to cut your Discord recordings into different pieces.

Step 5 Manage Audio Recordings
After pressing the Stop button to stop recording, the History window will pop up. Here you could rename, edit and play your recordings directly. You are also permitted to adjust the ID3 tags information, such as album, title, cover, etc.
Bandicam
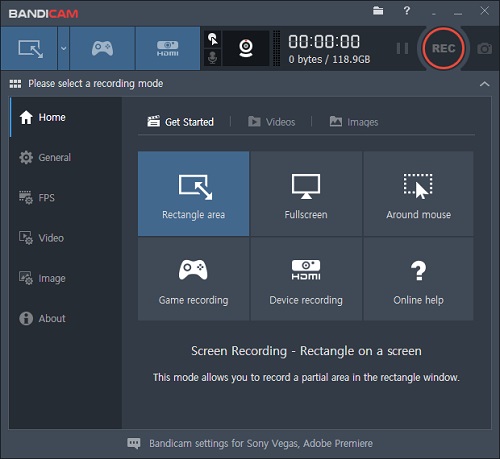
Bandicam is a lightweight video recorder software, which only supports Windows. You are allowed to record screen with a high compression ratio. However, this program has no independent "Record audio" mode, which means you cannot record Discord audio without recording video.
Pros:
- Minimize CPU usage
- Capture video up to 480 fps
- Be able to add Webcam overlay
Cons:
- Only support Windows system
- Cannot only record audio
- Do not include any video and audio editing features
- Guide:
- Step 1: Run Bandicam and select the "Video" tab on the left side of the screen;
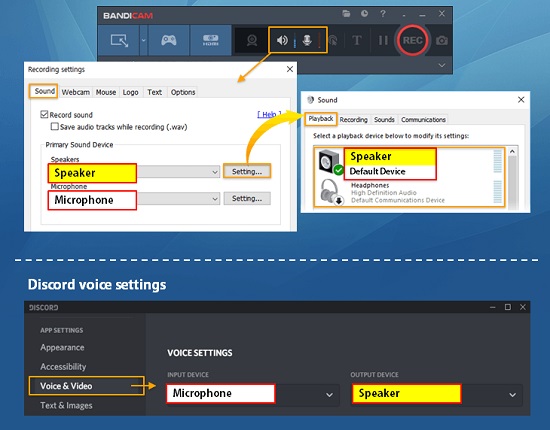
- Step 2: Press the "Add Speakers" or the "Add Microphone" button at the top of the screen to open a "Recording settings" window;
- Step 3: Under "Primary Sound Device", Select "(Default Output Device)" for "Speakers" and "Microphone", then tap the "Setting..." button nearby to check "Do nothing" under the "Communications" tab (otherwise, the computer volume will be reduced automatically);
- Step 4: When it comes to Discord audio settings, you need to select your "Input Device" and "Output Device" same from Bandicam;
- Step 5: Now, you can use either tap the "Screen Recording Mode" button or the "Game Recording Mode" button, then click on the REC button to start to record Discord video and audio.
Xbox Game Bar
Xbox Game Bar is a built-in screen recorder on Windows 10. You can open it by pressing Win + G on your keyboard. Xbox Game Bar works with almost all PC games. With its "Capture" option, you are able to save your game clips directly. However, this recorder can only record one application window at a time, which means you can't switch to another window during recording.
Pros:
- Free and safe
- No watermark
- No need to download any software
Cons:
- Lack of extra mature editing features
- Cannot record mouse movement
- Capture video for no more than 4 hours
- Guide:
- Step 1: Press Win + G to open Xbox Game Bar on Windows 10;
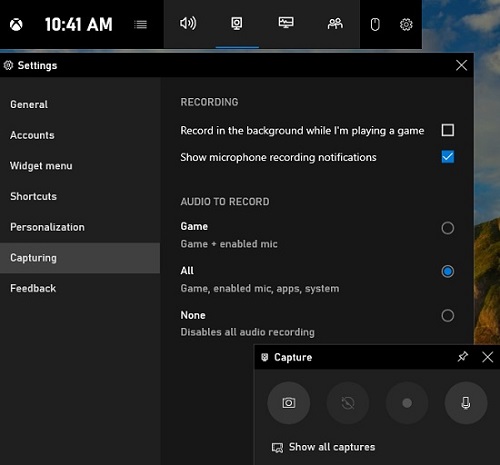
- Step 2: Click the "Capture" button on the menu bar to tackle the microphone on (which can be also done by pressing Win + Alt + M);
- Step 3: Press the "Settings" button on the menu bar to open a window;
- Step 4: Choose the "Capturing" tab and enable "All" (including game, enabled mic, apps, and system) under the "Audio to Record" option;
- Step 5: Hit on the "Start Recording" button or press "Win + Alt + R" to begin to record your Discord audio;
- Step 6: Press the "Stop Recording" button or Win + Alt + R to stop recording.
EaseUS RecExperts
EaseUS RecExperts is growing quickly in popularity. Similar to Bandicam, this recording tool only supports Windows as well. It is capable of capturing webcam, a specific screen, and the entire screen with system sound, microphone, or both. You are also able to add lines, text, arrows, etc. during your recording process.
Pros:
- Record screen and webcam
- Support 4K UHD resolution
- Create recording tasks automatically
- Add arrows, lines, etc. to videos during recording
Cons:
- Only support Windows system
- Cannot customize output formats
- Guide:
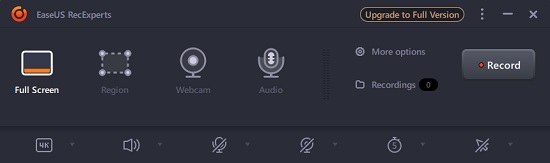
- Step 1: Launch the program on your computer, then press the "Audio" button and adjust the volume;
- Step 2: You can also press the "Record system audio" button and the "Record microphone" button at the bottom of the screen;
- Step 3: For more settings options, you can click on the "More options" button on the right side of the main interface, which will allow you to change Discord audio output format, bitrate, sample rate, and more;
- Step 4: Now you are able to tap the "Record" button to start to record your Discord audio.
Part 2. How to Record Discord Calls on Mac
Camtasia
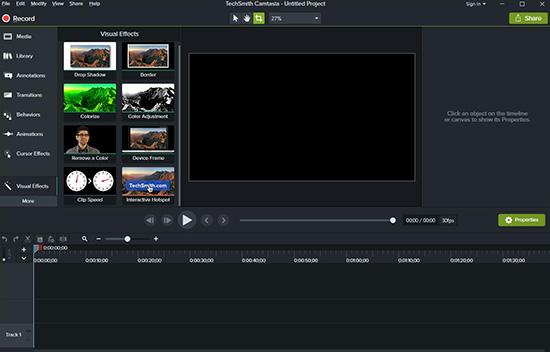
Offering an all-in-one solution, Camtasia is an excellent screen recorder and video editor. Apart from Discord audio recording, you are also able to use it to make video tutorials, capture videos from browsers, etc. Its mature editing features allow you to remove audio track from videos, add annotations, special effects, zoom in, zoom out, etc. However, this program might cost you a large amount of money.
Pros:
- Edit audio and video tracks separately
- Import pictures, songs, PowerPoint slides, etc.
- Add visual effects, quizzes, annotations, etc.
Cons:
- Extremely expensive
- Easily get stuck
- Guide:
- Step 1: Launch Camtasia and choose "New Recording" to open a toolbar and a capturing frame;
- Step 2: You can turn on or off "Camera" in the middle of the toolbar according your needs, and when you open the "Audio" dropdown list, you will be able to choose to whether to record system audio and microphone;
- Step 3: Hit on the "rec" button or press F9 (set by default) on your keyboard to start to record Discord calls;
- Step 4: Click the "Stop" button or press F10 (set by default) to stop recording your Discord;
- Step 5: It is worth noting that Camtasia cannot record audio only, but you can extract Discord audio from video using Camtasia's built-in video editor.
Craig
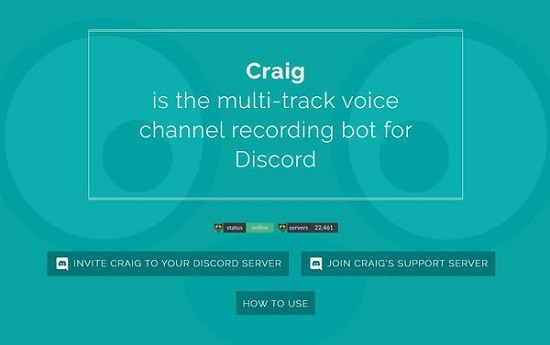
As the picture suggests, Craig is the voice channel recording bot with multi-channel and multi-track specially for your Discord. It means that if you allow Craig to record your Discord voice channel, you will be able to get a separate audio file for each different speaker, which creates more convenience for you to cut and edit each speaker independently. To use Craig to record Discord audio, you are supposed to invite it to your server first and then use some text commands to begin. Some simple commands can be found on the website.
Pros:
- Support multiple output formats
- Can upload recordings to Google Drive automatically
Pros:
- No built-in video or audio editor
- Record no more than 6 hours and keep audios only for 7 days
- Guide:
- Step 1: Open the Craig Records! website and click the "Invite Craig to Your Discord Server" link;
- Step 2: Open the "Add Bot To" list and choose your server, and then press the "Authorize" button to allow the bot to join;
- Step 3: After you begin to use Craig directly, you need to enter an audio channel and type ":craig:, join" to let Craig enter the channel;
- Step 4: Craig will begin recording within seconds, and you will hear the bot saying "now recording" as well;
- Step 5: Type ":craig:, leave" to stop Craig recording the current channel, or you can type ":craig:, stop" to force Craig to end all audio recordings.
Note: When you begin recording, you will receive a message from the Craig bot, which is a link to download or delete your Discord conversations. Notice that Craig will record up to 6 hours at a time.
Free Sound Recorder
Free Sound Recorder is able to capture any external or internal sound detected on your Windows or Mac. You can use it to record Discord, streaming audio broadcasts, VoIP phone calls, YouTube music, etc. Though it is totally free, it still promises you great sound quality. However, the enhancement of its audio functions is not as good as it should be.

Pros:
- Free and user-friendly
- Record any sound played on computer
- Support recording sound from a DVD/CD player
Cons:
- Support limited audio formats
- Many advanced features are only available for Premium users
- Guide:
- Step 1: Press the "speaker" icon to show the mixer window, where you could check "Recording Mixer"/"Recording Device" and adjust audio volume/balance;
- Step 2: You could press the "Options" button in the middle of the screen to set audio output format, customize recording shortcut keys, enable schedule recording, etc. and then click the "OK" button to confirm settings;
- Step 3: Press the red "Start recording" button to start to record your discord audio;
- Step 4: Finally click the "Stop recording" button to finish recording process, and then you are able to click the "note" icon to show your recordings.
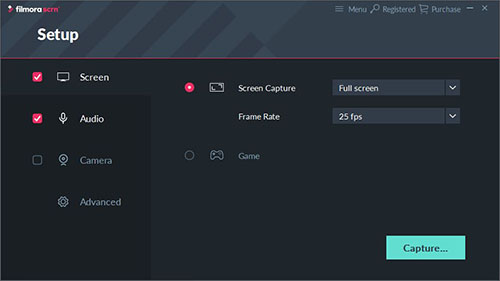
Filmora Scrn
Filmora Scrn is one of the top-ranking screen recorders in the market. It supports up to 60 fps for Mac, making it an ideal option for fast-paced gameplay recording software. This program is also able to record your screen and webcam simultaneously and quickly.
Pros:
- Import 50+ file formats
- Record computer and webcam at the same time
- Offer 15-120 fps for Windows and up to 60 fps for Mac
Pros:
- Cannot record mobile phones
- Have watermark in free version
- Guide:
- Step 1: Run Filmora Scrn on your computer and press the "Get Started" tab;
- Step 2: Choose to enable the "Audio" option on the left side of the screen to set "Computer Audio" and "Microphone";
- Step 3: Click the "Capture…" button to begin to capture recording area;
- Step 4: Tap the "Start capturing" button or F10 (set by default) to begin to record your discord audio;
- Step 5: Press the "Stop capturing" button or F10 to stop your recording.
Part 3. How to Record Audio from Discord on Linux
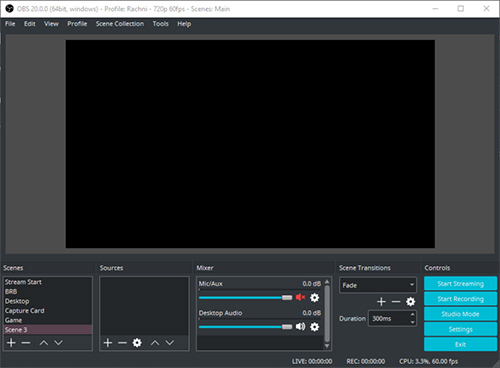
OBS
OBS is an open-source and free program available for Windows, Mac, and Linux. Proficient in live streaming and video recording, this software enables you to record Discord audio or other videos with sound in a quick and reliable way. But beginners might easily get confused about its buttons. Its large installation package also creates great inconvenience.
Pros:
- Open-source and ad-free
- Support Windows, Mac, and Linux
- Record video with no time limit
- Support streaming to Facebook live, YouTube live, etc.
Cons:
- Could be too complex for beginners to operate
- Fail to link an audio file as a source
- Guide:
- Step 1: Run OBS on your computer, then click the "+" button in the "Sources" area at the bottom of the screen to choose "Audio Output Capture";
- Step 2: Click the "File" option at the menu bar and choose "Settings";
- Step 3: Select the "Audio" tab and click the Desktop Audio dropdown list to choose your audio source (choose headphone if you use your headphones to listen to discord audio, or select your computer speakers from the list);
- Step 4: Click the "Apply" button and then the "OK" button;
- Step 5: Press the "Start recording" button at the lower-right corner of the main interface to begin to record your discord audio and then the "Stop recording" button to stop the recording process.
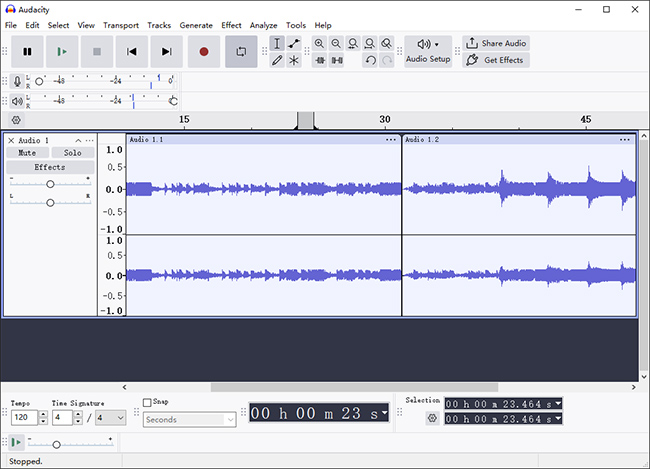
Audacity
Similar to OBS, Audacity is a free, open-source, and cross-platform audio program for Windows, Mac, and Linux systems. It is competent to edit audios in multi-track and enables you to record Discord audio through a mixer or microphone in high sound quality. After recording, you are also able to edit and combine your audio files. But be aware that audacity can only record one-sided audio at a time.
Pros:
- Edit audio in multi-track
- Can work with almost all computer systems
- Support for VST, LV2, and Audio Unit effect plug-ins
Cons:
- Have a complicated interface with lots of buttons
- Guide:
- Step 1: Open Audacity and click the "Edit" option at the menu bar to select "Preferences…";
- Step 2: Adjust the "Host" to "Windows WASAPI";
- Step 3: Adjust the "Device" (whose name should be followed by "(loopback)") under "Recording" to the playback device/headphones/speaker that you are using and then press the "OK" button;
- Step 4: Click the red circle "Record (R)/Record New Track (Shift + R)" button at the top of the screen to begin to record your discord audio;
- Step 5: Press the "Stop" button to stop recording.
Part 4. How to Record Audio on Discord - Android
Recording Discord audio on smartphones has its pros and cons. For instance, it may have no need for you to download any extra apps, but it also means it can only record Discord in a much limited time due to the huge file size of your Discord recordings. But if you only need to record Discord audio in a few minutes or for a few times, you are free to use the screen recording function on your mobile phone. In the following part concerning how to use the screen recording function on Android, we will take Huawei and Samsung as examples respectively.
1 Use Huawei to record Discord
a. Use Huawei's status bar:
- Step 1: Swipe down to open the notification panel and choose "Screen recorder";
- Step 2: Tap it to begin to record your Discord audio;
- Step 3: Press the red timer that appeared at the top of the screen to stop recording.
b. Use Huawei's Power button and Volume up button:
- Step 1: Press and hold the Volume up button and the Power button at the same time to start recording;
- Step 2: Ready to have your Discord chats;
- Step 3: Press and hold the two buttons at the same time again to stop screen recording.
c. Use knuckle gesture:
- Step 1: Knock the screen with two knuckles twice continuously to start screen recording;
- Step 2: Begin to have your audio calls on Discord;
- Step 3: Knock the screen with two knuckles twice in quick succession again to stop screen recording.
Note: If you would like to record your voice, just tackle the microphone on.
2 Use Samsung to record Discord
- Step 1: Swipe down to access Quick Panel, and then choose "Screen recorder";
- Step 2: Confirm your favorable sound settings, and then click "Start recording";
- Step 3: To stop recording your Discord audio, you need to click the "Stop" button at the top of the screen.
Note: Currently, this setting is only available on Note10, Note 10+, Note10+ 5G, Galaxy ZFlip, S20, S20+, S20 Ultra, S10e, S10, S10+, S10 5G, A71, Galaxy Tab S6 and Galaxy devices on Android OS Version 10 (Q).
Part 5. Record Discord Audio - iPhone
It is easy to use iPhone to record screen. Here are some steps:
- Step 1: Swipe down to open the control center and then select "Screen Recording";
- Step 2: You can begin to chat with your friends on Discord;
- Step 3: Open control center again and tap "Screen recording" to stop.
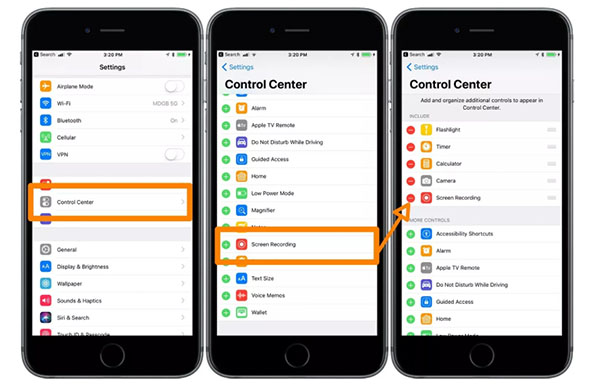
- Note: "Screen Recording" is hidden on your iPhone automatically. To enable "Screen Recording" on iPhone Control Center, you need to:
- Step 1: Run the Settings app on your iPhone;
- Step 2: Scroll down and find the Control Center;
- Step 3: Choose "Customize Controls" and then tap the "Screen Recording" option;
- Step 4: Click the "+" icon to add "Screen Recording" to the Control Center.
Tips. Trouble Shoot: "No Device Found"?
On some occasions, you may receive an error message saying "No Device Found" from your computer or the product you are using, like Audacity, before starting recording Discord audio. There are many reasons account for this situation, and one of them may be that your computer fails to detect your microphone. To fix this issue, maybe you could check the following method.
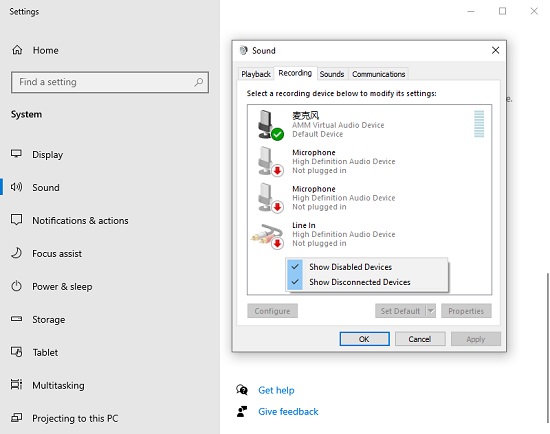
- Step 1: Right-click the sound icon on your desktop and choose "Recording Devices" or "Sounds" (if you have no these options, you are supposed to choose "Open Sound settings");
- Step 2: Select the "Sound" tab on the left side of the screen and then go to the right side and scroll down to choose "Sound Control Panel" under "Related Settings";
- Step 3: Click the "Recording" option on the pop-up window, then right-click in a blank space and choose "Show Disabled Devices";
- Step 4: Find the "Stereo Mix" and right-click to enable it, then select it and then click the "Properties" button at the bottom of the screen to open another window;
- Step 5: Select the "Listen" tab and apply the "Listen to this device", then confirm settings finally and close the window.
Now you can go back to where you stop and check whether you could record Discord normally.
Related Questions about Discord
Q1. Can Discord record audio?
A: Discord does not have any built-in recording features, so it does not support recording within its platform. However, you can use a screen recorder to record video and voice chats in Discord.
Q2. What is the best way to record Discord audio?
A: If you are running Windows and Mac, Joyoshare VidiKit (upgraded from Joyoshare Screen Recorder) is recommended as it is able to record any video and audio from any source in extremely high quality. A large number of output formats and flexible editing features are well supported. If you have Discord on your iPhone or Android, maybe the default screen recorder will be enough for you. However, if you are looking for a free and open-source service that can also work with Linux, then both OBS and Audacity could be your best choice.
Q3. Does Discord alert someone if I screen record?
A: No, it doesn't. Discord has no notification feature like that. But if you use Craig to record Discord audio, you will get a private message telling you where you can download your audio. It will not alert someone when you screen record Discord as well.
Conclusion:
So far, we have discussed up to 12 different tools for you to record Discord audio on Windows, Mac, Linux, Android, and iPhone. Some of them may even be cost-effective, feature with extra advanced editing functions, have a user-friendly and unique design, etc. In a word, every program has its pros and cons. And price should not be the only factor you would like to consider. The best way for you to choose a satisfying video recorder is to check carefully what you really need, and then choose the tool that can meet your demands and cost you the least at the same time.
| Supported OS | Record video with audio | Record audio only | Support system audio and microphone | Built-in editing tools | Edit ID3 tags | Price | |
| Joyoshare VidiKit | Mac, Windows | √ | √ | √ | √ | √ | $19.95 |
| Bandicam | Windows | √ | × | √ | × | × | $39.95 |
| Xbox Game Bar | Windows | √ | × | √ | √ | × | Free |
| EaseUS RecExperts | Windows, Mac | √ | √ | √ | √ | × | $19.95 |
| Camtasia | Windows, Mac | √ | × | √ | √ | × | $249.99 |
| Craig | Windows, Mac | × | √ | √ | √ | × | Free |
| Free Sound Recorder | Windows, Mac | × | √ | √ | √ | × | Free |
| Filmora Scrn | Windows, Mac | √ | √ | √ | √ | × | $39.99 |
| OBS | Windows, Mac, Linux | √ | √ | √ | × | × | Free |
| Audacity | Windows, Mac, Linux | × | √ | √ | √ | × | Free |
| Android Screen Recorder | Android | √ | × | √ | √ | × | Free |
| iPhone Screen Recorder | iPhone | √ | × | √ | √ | × | Free |
