Q:"Is there a way to do screen recording on Windows 7?" - From Super User
Windows 7 itself comes with various features but it does not have any built-in screen recording feature. Therefore, you can find a lot of software specially developed for this purpose on the Internet. However, only after you really try, you can tell which one works as promised. Sometimes you even can't 100% assure their reliability. To avoid such a time-consuming process, here in this article, we'll show how to record screen on Windows 7 with 4 popular solutions.
How to Record Screen in Windows 7 without Any Software?
Most users want to know if there is a pre-installed recording tool for Windows 7 without having to download any more. Unlike Windows 10, you can go straight to use Xbox Game Bar on your PC to carry out recording tasks. Windows 7 gives no access to it. However, if you are willing to update your Windows system, you can still have this chance to record using Game Bar on Windows 10 screen, considering this OS is more popular and compatible currently.
1. Best Recording Software for Windows 7 - Joyoshare VidiKit
Joyoshare VidiKit - Screen Recorder is a powerful tool with strong compatibility to Windows XP and later, such as Windows 7, 8, 10 and 11. It's easy-to-use and capable of recording any video and audio activity on computer desktop with HD quality. Adopted with advanced screen capturing technology, it records and saves the screen video in various popular formats and devices, like MP4, WMV, FLV, SWF, AVI, iPhone, Android, etc. Moreover, you can add personalized effects to your clicks and cursor movements. Different activities on Windows 7, for instance chat calls, live-streaming videos, gameplays, streaming music and tutorials can be captured without time limit and no watermark.

- Record screen on Windows 7 with/without audio
- Capture types of screen activities in high quality without lag
- Schedule screen recording with task scheduler
- Support shortcuts, trim, watermark, effects and more
- Record video in high resolution without time limit
Step 1 Install Joyoshare VidiKit on Windows 7
The first step is to download Joyoshare VidiKit on your PC. This software will run automatically once it is installed properly. Then get its Screen Recorder started and begin your recording with "Record video and audio" mode.

Step 2 Set up the criteria for capturing
The second step is to set the capture parameters and it can be done by selecting the area that needs to be captured. To do this, simply press the '+' button on the upper left corner. A pop up window will appear from which you can adjust the size that you want to capture. The software also provides some ratios i.e. 320x240, 640x480, 1280x720, etc.

Step 3Set recording preferences for audio and more
The third step is to decide whether to record the screen with audio or without audio. You can turn on microphone or system audio to grab it. Besides, note to press "Options" button to furtherly confirm output format, storage location, shortcuts, cursor effects and more.

Step 4Start to record screen on Windows 7
The fourth step includes the recording of the desktop video and once you have selected everything according to your need, you can now record desktop screen on Windows 7 by clicking the blue 'REC' button. It's allowed to cut your video or skip content during the recording process by using tools in the menubar.

Step 5Edit the recording
The last step is to preview and edit the recorded video. This is an optional step to make the recorded videos look more attractive. The recorded video can be adjusted, trimmed and many more. You can save and export the recordings anywhere for later use.

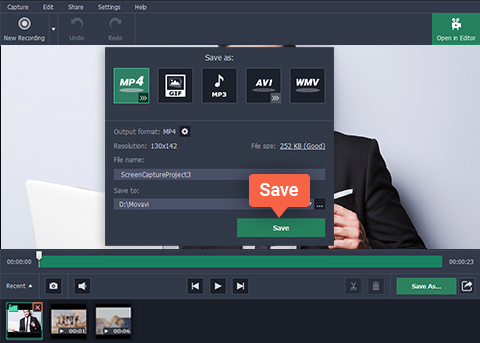
2. How to Screen Record on Windows 7 - Movavi Screen Recorder
Movavi Screen Recorder, dedicated screen recording software for Windows 7, is able to capture webinars, calls, tutorials, TV shows, online games and more in high quality. It grabs audio from multiple possible sources, edits video to make it better and saves as you want in compatible format.
Step 1: Install and launch Movavi Screen Recorder on Windows 7;
Step 2: Tap on the 'Recording' button in the right toolbar to choose recording area and set keyboard actions or more under 'Settings';
Step 3: Now hit the 'REC' button to record Windows 7 screen with audio, then apply F9 to pause or F10 to stop;
Step 4: Your screen video will be saved as MKV file, which can be checked in the pop-up preview window.
3. How to Record Your Screen on Windows 7 - VLC
VLC is definitely one of the most popular solutions many users pursue. Aside from being a media player to help play and edit videos, it actually has an ability to record your computer screen, like Windows 7, Windows 10 or others. If you don't know how to operate this open source to free record screen, you might as well check out the steps below:
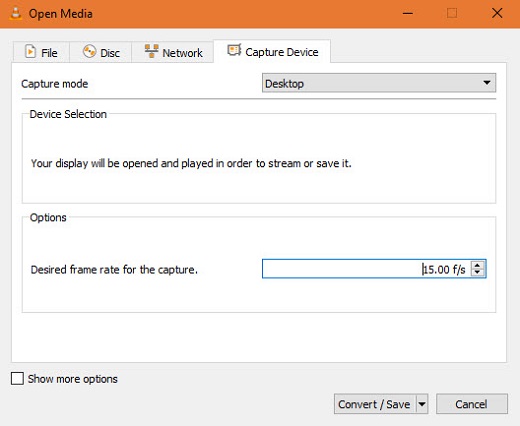
Step 1: Run VLC > click 'View" > 'Advanced Controls' to find media tab and hit its open capture device option;
Step 2: Go to 'Capture Device' section under Open Media and choose 'Capture mode' > 'Desktop';
Step 3: Specify your desired frame rate for the capture, like 10.00 f/s, and click 'Show more options' to add voice if you need;
Step 4: Tap on the "Convert" button to 'Create' a profile based on your preferences;
Step 5: Having set up all options, you should 'Save' and click 'Start' to record screen with VLC on your Windows 7.
4. How to Record Screen on Windows 7 - OBS
Don't miss this cross-platform software, OBS, to record your screen activities. It supports Windows (Windows 7 included), Mac and Linux. As a freeware, it's also highly recommended. You can create unlimited scenes to capture, add images, texts, adjust audios, etc. in a professional way.
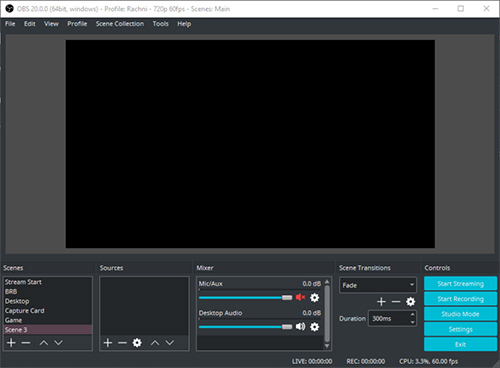
Step 1: Get OBS started on desktop, click '+' under Sources > 'Display Capture' to 'Create New';
Step 2: Type the name of your display capture and click OK to finish recording settings;
Step 3: Uncheck 'Capture Cursor' option to let your mouse hide and designate one under 'Display' if you have multiple displays;
Step 4: Here record with OBS by clicking 'Start Recording' at the right bottom.
Conclusion & Suggestion
It's a common thing to screen record Windows 7. If you also have this need, the methods shown in this article should help you. According to your own actual situation, choose the most suitable one. If you are a novice, a program with an overly complex interface should be difficult to operate. Please try it yourself first. Of course, if you have any satisfactory tools, you can also share with us.
