For users who are used to working, studying or entertaining on a PC, video recording is one of the indispensable skills. This sometimes unexpectedly makes most of your things easier, such as creating how-to tutorials, sharing online meetings, showing wonderful performances in gameplay, intuitively displaying program errors, etc. As you can see, a large number of users are learning how to record video on PC. In fact, there are many solutions to help you, including both pre-installed PC-based and three-party professional recorders. Just follow up us to explore them in this article.
- Part 1. Xbox Game Bar
- Part 2. Camera App
- Part 3. Joyoshare VidiKit [Hot]
- Part 4. Microsoft Office PowerPoint
- Part 5. OBS
Part 1. Record Video on PC - Xbox Game Bar
Xbox Game Bar is mainly developed to record a game that's playing on your computer. Sure, non-gaming apps and web browsers can be supported to capture with the help of it. What you should pay more attention to is that it lacks the ability to record your entire desktop and also gives no access to specific programs such as File Manager, Weather. It has strict hardware requirements, especially for the graphics card, on your PC. If what it offers is enough for you, you can check the guide to operate it below:
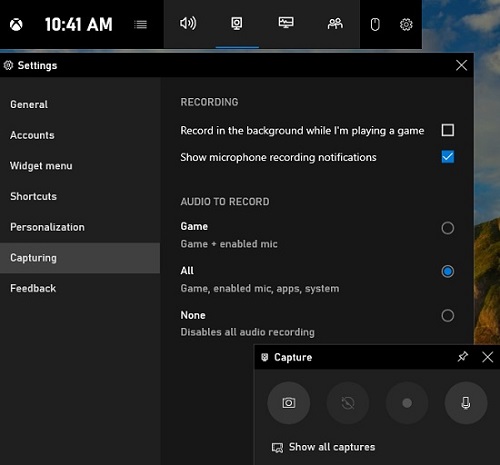
Step 1 Adjust settings
On your Windows PC, press the "Start" button at bottom left → hit gear-shaped "Settings" → "Gaming" → "Captures" to set location, background recording, video frame rate, video quality and more.
Step 2 Launch Xbox Game Bar
Get Xbox Game Bar started with Win + G shortcut and click "Yes" if it asks whether you are going to record is a game.
Step 3 Record a video on Windows PC
Use Win + Alt + R or click on the recording button in Xbox Game Bar to initiate a task. Record your prepared video activity on PC screen.
Step 4 Stop and save video
End up the recording with stop button and the recorded video will be saved as MP4 to "Videos" → "Captures" folder.
Part 2. How to Record Video on PC - Camera App
Camera app is inbuilt on your Windows PCs with the capability to record videos and photos. It supports different video quality settings, for instance, 1080p 16:9 30fps, 1440p 4:3 30fps, 720p 16:9 30fps, etc. It's quite simple but has no editing functions. To add effects, trim and more, you may need to furtherly ask Photos on PC for help. Notably, it uses a front or rear camera for basic recording. If you don't have one, connect the webcam ahead of time.
Step 1 Connect webcam to PC (optional)
For the one whose PC has no built-in webcam, it's necessary to connect one by plugging in USB cable to the computer.
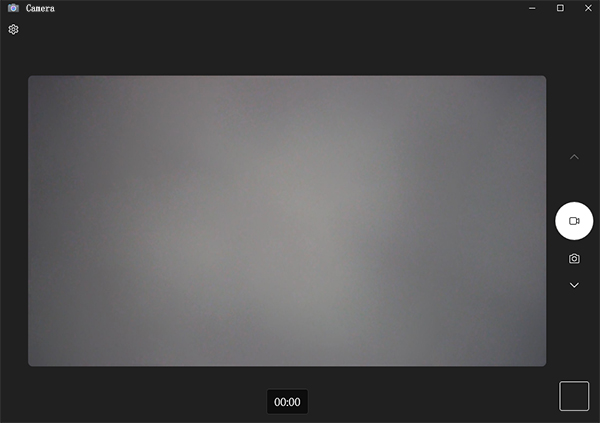
Step 2 Open Camera app
Go to the bottom left corner of your desktop, click on "Type here to search" button and input "Camera" in the search bar to get it launched. By running it, the webcam will be automatically opened or you can give permission to it.
Step 3 Configure "Settings"
Get ready in "Take Video" mode and head to "Settings" button to confirm video quality, location info and more.
Step 4 Start to record PC video
Go back to the main interface and click on the "Take Video" button, which looks like a camera, to begin your video recording process on PC. Stop it as you wish to save the video to "Camera Roll" folder.
Part 3. Record a Video on PC - Joyoshare VidiKit
Joyoshare VidiKit is a typical PC video recorder that is friendly to both novices and professionals. The simplicity of its design makes recording a complete hassle-free task. Other than that, the supported types of videos can be various, covering different fields, such as social, education, entertainment, etc. You can effortlessly capture online meetings, gameplay, class lectures, movie and more with preset high resolution. Based on your preference, you can readily show cursor movements, add effect to clicks, add annotations, take screencasts and grab audio from different sound sources.

- Record video from website, streaming video platforms, and more
- Guarantee high quality output and parameter customization
- Support getting audios from available sound sources
- Capture screen activities without time restriction and watermark
- Record screen, audio, webcam, selected game or specific window
Step 1 Get Joyoshare VidiKit started on PC
Download, install and launch this professional video toolkit - Joyoshare VidiKit, on your PC computer. Move forward to the Recorder section and open "Screen Recorder".

Note: If you'd like to record a webcam video on PC, ask "Webcam Recorder" in Joyoshare VidiKit for help. It supports both internal and external cameras. The resolution of output quality can be high, up to 4K.
Step 2 Confirm Capture Area
Go leftmost and hit the drop-down list. You can choose full screen, a systematic ratio or "Select area to record". This locks a definite capture area. Besides, confirm which sound source you'd like to grab audio from, the system or the microphone. Simply click on the corresponding panel to enable or disable them.

Step 3 Set Recording Options
To schedule a recording task, you can click on Autostop button at bottom left. If not, furtherly hit the Preferences option to unfold all available recording functions, such as output format, file location, hotkeys, mouse effect, webcam, etc.

Note: You're able to pick up a desired one under "Video" panel. To configure your recorded videos in advance, it's possible to set resolution, channel, codec, sample rate and frame rate here.
Step 4 Start to Record Video on PC
It's time to record video with audio on your PC screen by using Joyoshare VidiKit as long as you have finished setting all options and preparing the activity to record. Just click on the "REC" button. The program will start its process and give you 3-second countdown to re-adjust the capture area. When it begins recording, you can trim, pause to skip content, take snapshots, and draw in real-time.

Step 5 Save and Manage Video(s) on PC
Once the video on your PC is recorded as you want, you can click the "Stop" button to save it. Joyoshare VidiKit will automatically pop up a "History" Windows to let you preview, trim and rename.

Part 4. How to Record a Video on PC with PowerPoint
Microsoft Office PowerPoint is always the first choice when it comes to make presentations. It does well in screen recording, allowing area selection, audio capture and pointer display. Most users make the best of this feature to embed videos into slides. But actually, you can save the finished video as a separate file on your PC. Here's how to make it.

- Step 1: Open Microsoft Office PowerPoint on your PC , head to the top menu, and click on "Insert" tab → select "Screen Recording" option.
- Step 2: Click on "Select Area" on the Control Dock to choose a recording area.
- Step 3: Use the mouse to click on Audio and Record Pointer sections to enable or disable them.
- Step 4: Simply click on the red Record button to begin video recording on your PC and stop it once everything goes well.
- Step 5: The recorded video will be saved to PowerPoint slide by default. Now right-click on it and choose "Save Media As" option to store it on your local computer as a separate video file.
Part 5. How to Record Videos on PC with OBS
OBS is an eminent free and open-source tool that's good at both screen recording and live streaming. It is available on Windows, Mac and Linux. You can use it to capture videos from different sources, add transitions between scenes, mix audio from multiple sound sources, etc. It's professional and suitable for skilled users. If you're a new beginner, you will need a long learning curve to understand and operate it.
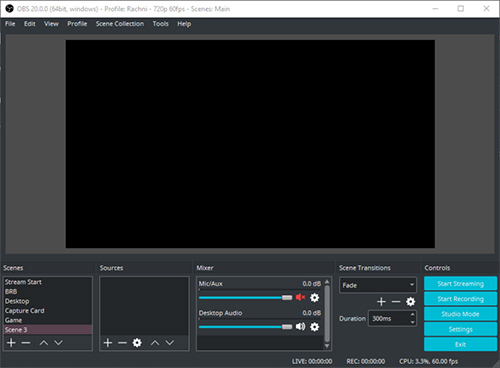
- Step 1: Based on your operating system, download a compatible program of OBS. Simply launch it on your PC.
- Step 2: Under Sources box, click on + button to choose what to record for video capture.
- Step 3: Go to click on Settings and set Output according to your preferences.
- Step 4: It's time to click on Start Recording in OBS to begin video recording process. Once done, click Stop to save it.
Final Words
After learning how to record video on PC in this article, you should know what to do next. If you'd like to record a video with webcam, the default Camera app on Windows can be a good option. If you want to record a screen video on PC, then Xbox Game Bar can be used directly without software downloading. However, all these pre-installed tools come without advanced recording features. In this case, take OBS into your consideration. It's well-developed for professionals. But if you're not skilled in tech, Joyoshare VidiKit cannot be missed. It has excellent performance in recording and offers a one-stop solution to help create whatever you want.
