Microsoft PowerPoint is a presentation program. From classrooms to boardrooms, Microsoft PowerPoint slides become the go-to medium for sharing content. The program succeeds in helping the audience engage and connect with the ideas shared in a presentation. To achieve this goal, sometimes you may also need to let PowerPoint record screen directly for you so that you can insert the recording in your slides to make them more intuitive and attractive. Below are detailed instructions. Additionally, to overcome the limitations of screen recording brought by PowerPoint, we also recommend you the best screen recorder to record all desktop actions with ease.
- Part 1. Steps to Record Screen Using Microsoft PowerPoint
- Part 2. Best Alternative to Record All Desktop Activities
- Part 3. More Tips about Microsoft PowerPoint
Part 1. Record Screen with PowerPoint Easily
You are able to record your computer screen and related audio using Microsoft PowerPoint, and then choose to either embed it in your PowerPoint slide or save it as a separate file. Be aware that in order to record and listen to the audio that is associated with your screen recording, you'll need a microphone, speakers and a sound card.
-
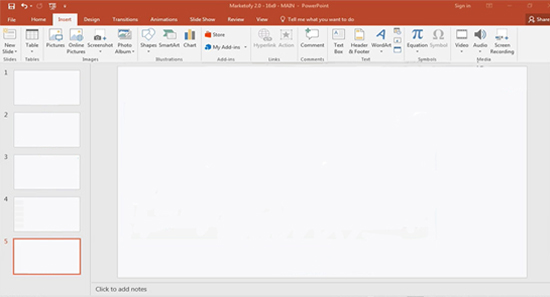
Step 1 Open Microsoft PowerPoint
Open the PowerPoint slide that you would like to put your screen recording on. Find the "Insert" tab in the navigation bar and tap the "Screen Recording" button.
-
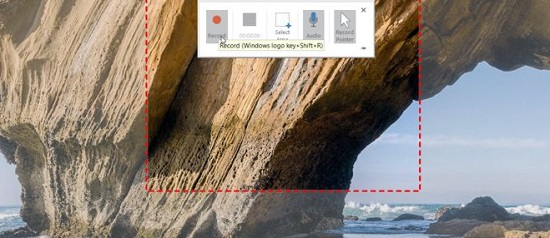
Step 2 Adjust Recording Settings
On the Control Dock, press the "Select Area" button or press Windows + Shit + A to drag the "+" so that you can select the area of the screen you want to record. Additionally, Microsoft PowerPoint will automatically record the audio and the mouse pointer. So you can find that the "Audio" option and the "Record Pointer" option will be chosen by default. If you want to turn them off, you can deselect them.
Note: If you prefer to record the entire screen, you can press Windows + Shift + F, which is only available if you have an Office 2016 Click-to-Run Installation.

-
Step 3 Begin to Record Screen in PowerPoint
Click the "Record" button to begin. After a three-second countdown, the Control Dock will slide up into the margin during recording, unless you have pinned it to the screen. You will be able to click the "Pause" button to temporarily stop the recording (Windows + Shift + R), the "Record" button to resume recording (Windows + Shift + R) and the "Stop" button to end your recording (Windows + Shift + Q).
-
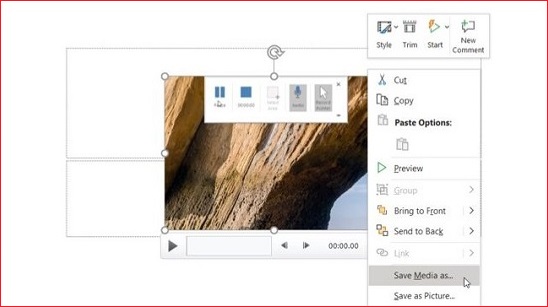
Step 4 Save the Recording
After finishing recording, the recorded video will be embedded on your PowerPoint slide. If you would like to save the recording as a separate file on your computer, you can right-click the recording embedded on your slide and select the "Save Media as" option. Having specified a file name and the folder location, click the "Save" button to save the recording to your computer.
Part 2. Best Screen Recorder to Record All Onscreen Actions
You may have realized that using PowerPoint to record screen directly has many limitations. For example, as we mentioned above, audio recording and full screen capturing can only be realized under certain conditions. What's more, users can not get the screen record to play during the slideshow, and the voice over will be played seconds ahead of the screen recording. Therefore, Joyoshare VidiKit - Screen Recorder is introduced here to meet all your needs in desktop screen recording.
With Joyoshare Screen Recorder, the most advanced video and audio recorder available today, you can record all onscreen actions with ease, such as virtual meetings, online movies, gameplay, streaming music, online lectures, etc. Just open the program on your computer, choose what you want to record and press the record button to begin. Then your videos will be saved in extremely high quality without any latency.

- Grab the entire screen or a particular area
- Record PowerPoint presentation with audio
- No watermark, no time limitation and no lag
- Record sound from the computer system or microphone
- Support a wide variety of output video and audio formats
- Offer two smart recording modes and additional features
-
Step 1 Install and Run Joyoshare Screen Recorder
After launching Joyoshare Screen Recorder, you can choose to use either the "Record video and audio" mode or the "Record audio" mode by clicking the camera-like button or the speaker-like button on the screen.

-
Step 2 Confirm Recording Settings
A little gear icon can be found easily on the lower-right corner of the main interface. Click it to do further settings. For instance, you are able to tap the "Format" button to select your output format. Add an image or text watermark if you would like to brand your video. If you plan to record movies or gameplay that would last for hours, you can preset the start/end time of your recording.

-
Step 3 Grab Recording Area
Go back to the main interface. You are free to press the "+" icon on them left side of the screen and then drag the adjustable frame to define your wanted area. You can also click the little triangle icon near the "+" icon to select area from a list of standards or choose the "Full Screen" option. Don't forget to turn on/off system audio and microphone.

-
Step 4 Start to Record Screen on Windows or Mac
After everything is set, you can now tap the "REC" button to let the program record screen for you. After a three-second countdown, a minimized toolbar will appear outside the frame. Once you click the "Stop" button on it, the "History" window will pop up so that you can manage your recordings, such as play, rename and trim recordings as well as their ID3 tags.

Part 3. More Tips about Microsoft PowerPoint
1 How to Set the "Start" Settings of Your Video on PowerPoint?
Certainly, you are allowed to pick how you want your video to start in your presentation. To do so, you are supposed to right-click the picture on the slide that represents the recording and then hit on the "Start" button. You will be able to choose to start your video either automatically when a slide appears or when you click the mouse.
2 How to Apply a Style to the Video Frame?
The steps are easy. All you need to do is to right-click the video frame and tap the "Style" button. Then you will be able to pick the style you like and apply it to your video frame.
3 How to Trim the Recording on PowerPoint?
Step 1: Right-click the picture and tap the "Trim" button;
Step 2: Drag the trim markers on the timeline to decide where you want to trim your video footage, and you can utilize the "Previous Frame" and "Next Frame" buttons to trim video accurately;
Step 3: Click the "OK" button.
4 How to Take a Screenshot Using PowerPoint?
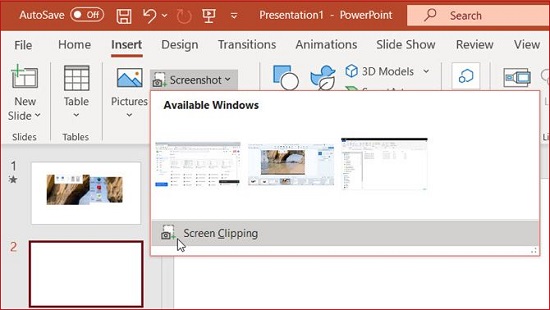
Step 1: Tap the "Insert" tab and expand the "Screenshot" dropdown list;
Step 2: If you want to capture the entire window, you can directly choose it from the list, and if you prefer to select a specific portion of the window, you can click the "Screen Clipping" button and then drag across it. The screenshot will appear on your current slide immediately.
