Quick Answer: How to Record Wii Gameplay
- Without a Capture Card (Software): Connect your Wii to your PC using a Wii-specific USB video adapter. Then, use professional game recording software like Joyoshare VidiKit to detect the feed and capture high-quality, lag-free footage.
- With a Capture Card (Hardware): Use an external capture card like the Elgato HD60 S. Connect your Wii's AV cables to a compatible converter/adapter first, then plug it into the capture card's input. The capture card links to your PC for recording and to your TV for passthrough, ensuring zero-latency playback.
- Which is better for you? Software is cost-effective and ideal for most beginner-to-intermediate users. A capture card offers superior 1080p60 quality and is preferred by dedicated streamers who need absolute real-time feedback on their monitor.
Wii, unofficially called Nintendo Wii, targets people of all ages. It becomes a great success after its release. Hordes of Wii gamers, vloggers and YouTubers now would like to share their gameplay with their best friends and fans. Do you want to bring interesting and exciting Wii game videos to yours as well? If the answer is yes but you are confused about how to record Wii gameplay easily, you can take a look at this article. It not only takes a comprehensive look at different methods but also tells you how to record step by step.
- Part 1. Record Wii Game Footage without a Capture Card [Hot]
- Part 2. Record Wii Game Footage with a Capture Card
- Part 3. Recommendation on More Wii Gameplay Recorders
- Part 4. FAQs on Recording Wii Gameplay
- Part 5. Conclusion
Part 1. How to Record Wii Gameplay without a Capture Card
When it comes to game video recording, we always recommend Joyoshare VidiKit (upgraded from Joyoshare Screen Recorder) without any hesitation. As always, this multipurpose video toolkit, integrating a strong game recording utility, enables you to capture any type of game with audio in a perfect way. Both voice from microphone and in-game system sound can be captured. There is no recording time limit and no latency. The whole process is smooth. What's better, if you live stream games frequently, you can even capture your face and interactions from webcam.

- Record Wii gameplay in HD or 4K quality with no time limit
- Output recorded game videos to any video/audio format you like
- Capture Wii game clips at up to 240 fps
- Grab in-game music and microphone voice
- Record webcam, screen, specific window
- Capture gameplay on Wii U, Switch, PS4, Xbox One, Xbox 360, etc.
Step 1Connect Wii to Computer
The first thing you need to do is to prepare a USB adapter that fits well with Wii. The Nintendo Wii uses standard RCA video/audio cables. Though most of them will be standard for other electronic devices, you still need a Wii USB adapter to convert the Wii's signal.
- Step 1: Unplug the AV cable at the back of your Wii;
- Step 2: Connect the Wii port on the end of the adapter to the back of your Wii;
- Step 3: Use a USB cable to link your computer and the other end of the adapter;
- Step 4: Double-click the adapter connection drive on your computer;
- Step 5: Click the Start button and choose My Computer.
Step 2Start Game Recorder in Joyoshare VidiKit

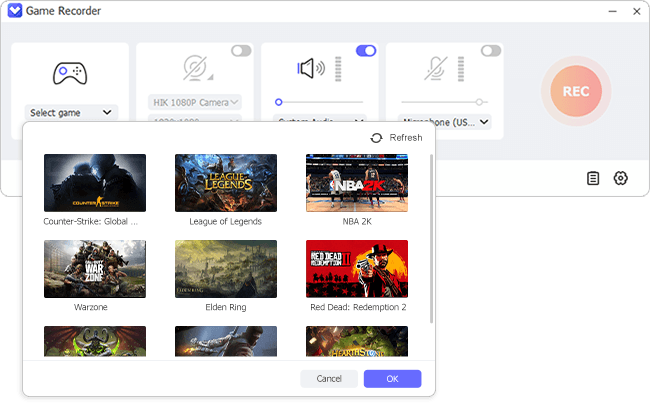
Run Joyoshare VidiKit on your computer after installing it. When you come to the main interface, go forward to the "Recorder" section and select "Game Recorder" to open the game recorder. Now you can prepare your desirable game on your Wii game console and click on "Select game" in the bottom left corner to choose it.
Step 3Adjust Game Recording Settings
You can enbale "System Audio" to grab in-game music and "Microphone Audio" to capture your own voice. Simply set the volume to an optimal value. Besides, it's handy for you to record webcam, especially when you make a live. You can turn "Camera On".
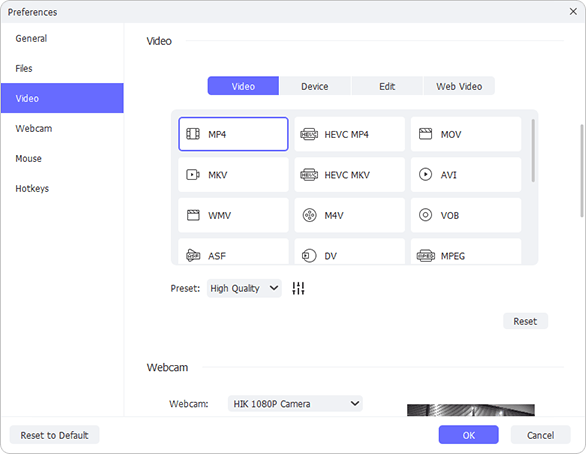
Find the gear-shaped Preferences icon at the bottom right of the interface. Click it and you will see a series of recording options. You can click the "Video" tab to select your wanted output format. To customize parameters such as frame rate to 240fps, you can hit the "Setting" icon next to "Preset". Then check other necessary options in the way you want.
Step 4 Start to Capture Wii Game
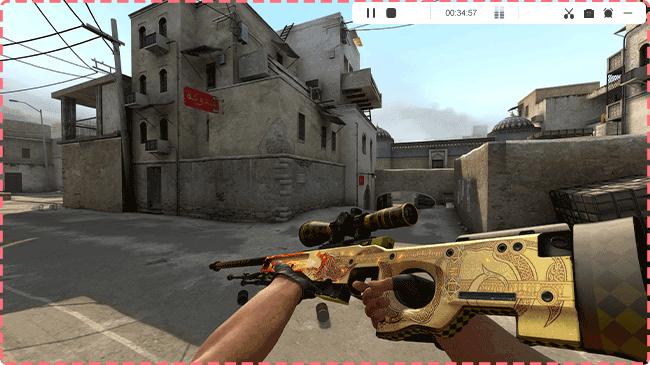
Now click the "REC" button on the right side of the main operation window. After a three-second countdown, Joyoshare program will help record your Wii gameplay. A toolbar will appear outside the dynamic capturing frame. You can use the buttons on it to stop recording and cut unnecessary game video clips at any time.
Step 5 Edit Wii Gameplay
After clicking the "Stop" button on the minimized toolbar, the "History" window will show up immediately. You are free to rename and play them one by one. Using the "Edit" icon, you can cut and trim your Wii gameplay so as to remove any content you don't want.
Part 2. Record Wii Gameplay with a Game Capture Card
Capture cards like the Elgato HD60 S offer hardware-accelerated encoding, freeing up your computer's resources for a truly lag-free experience. This session will focus on the exact, correct setup to record Wii game footage, as the Wii does not support native HDMI output and requires specific cabling.
Key Features:
- Stream and record at a fast speed
- Offer stunning 1080p-60fps quality
- Record Wii gameplay for hours seamlessly
- Have built-in Live commentary feature
- Support low latency technology to record
- Add overlays, webcam, alerts, and a whole lot more
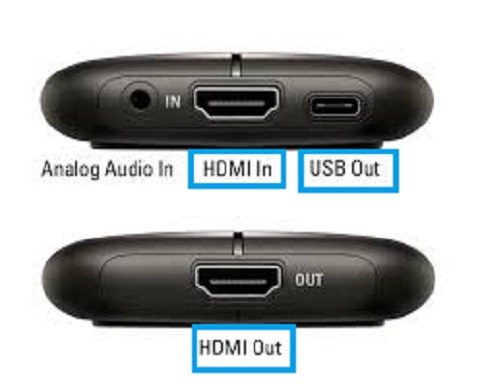
- Step 1: Use one HDMI cable to connect your Elgato capture card's "In" port and your Wii console;
- Step 2: Use one HDMI cable to connect the converter's output to the "HDMI In" port on your Elgato capture card.
- Step 3: Use a second HDMI cable to link your Elgato capture card's "HDMI Out" port to your TV or monitor. This is the 'passthrough' connection that eliminates all latency while you play.
- Step 4: Download the software for your Elgato Capture Card on gamingdownloads.com;
- Step 5: Run the software on your computer and then click the red button and start to record.
Part 3. More Tools to Capture Wii Gameplay
OBS
You may be familiar with its acronym, OBS. It is a free video streaming and recording tool. Featured with high performance, you can use it to create zero lag videos from images, text, webcams, browser windows, etc. This program also contains an audio mixer along with per-source filters. As powerful it is, it will take you some time to figure out how to use it correctly.
Key Features:
- Support Windows, Mac, and Linux operating systems
- Completely Free and open-source
- Allow for video recording and live streaming
- Excellent performance real-time audio capturing
- Use an unlimited number of scenes
- Easy to use configuration options
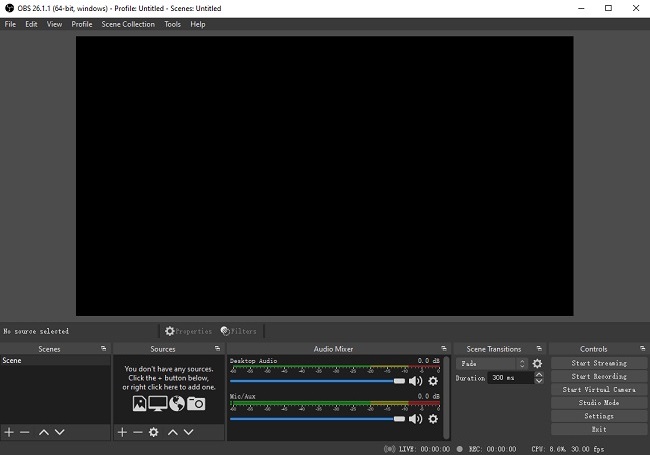
- Step 1: After connecting your Wii to computer, open OBS and click on the "+" button below "Sources" to add a new source for Wii gameplay recording;
- Step 2: Select the "Game Capture" option and type a name;
- Step 3: In the resulting window, expand the "Mode" list and choose the "Capture any full-screen application" option, which will enable you to capture any game you have opened; you can also select "Capture specific window" and then choose a specific game using the "Window" dropdown list;
- Step 4: Press the "OK" button to create the new capture source, then tap the "Start Recording" button in the panel to the right to begin to record gameplay from Wii.
-
EaseUS RecExperts
It is not surprising that you will be probably impressed by its intuitive interface at the first sight. EaseUS RecExperts is a user-friendly game recorder for beginners, supporting recording screen, audio, webcam, Wii gameplay, etc. As a powerful tool, it allows you to flexibly capture any screen size of your PC and Mac. Moreover, it allows you to save captured gameplay as AVI, MP4, WMV, ASF, MOV, FLV, etc.
Key Features:
- Support Windows and Mac operating systems
- Capture Wii gameplay in full screen and webcam
- Grab sounds from system and microphone
- Record computer sound and voice at the same time
- Enhance videos by adding text, lines, arrows, etc.
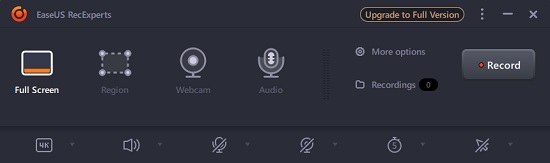
- Step 1: Install and run EaseUS RecExperts on your computer, then launch the Wii gameplay you are going to record, and don't forget to connect your Wii to computer;
- Step 2: To grab recording area, you can either click the "Full Screen" button to record the entire screen or the "Region" button to record a partial screen;
- Step 3: Click the "Webcam" button if necessary and the "Audio" button to adjust the volume. There are many more buttons at the bottom of the main screen such as "Recording quality", "Record microphone", etc., and you can also click on the "More options" button on the right side of the screen to customize your output format as well as bitrate, frame rate, etc.
- Step 4: Now you can hit on the "Record" button and start to record Wii gameplay easily.
Part 4. FAQs on Recording Wii Gameplay
We have compiled some frequently asked questions about recording Wii gameplay. If you still don’t make yourself clear enough, you can run through these answers.
Q1. Can you record Wii gameplay without a capture card?
A: Yes, you can use game recording software to record Wii gameplay without the capture card. Prepare a USB adapter and connect Wii to your computer. Then you can open the recorder to capture gameplay as you like.
Q2. What capture card works with Wii?
A: Capture cards could produce high-quality gameplay videos with low latency. When you select a capture card to record Wii, you need to focus on its maximum resolution and frame rate. Besides, the connection method and passthrough are important as well. Here are some recommended cards that work well with Wii: GOODAN capture card, LEADNOVO capture card, QGeeM HDMI capture card, Elgato game capture card, etc.
Q3. How do you stream Wii with a capture card?
A: If you want to stream Wii while playing, you can employ a capture card. After plugging the gaming console into the capture card, you’ll get two video feeds. It can send a converted video file to your computer so that you can stream and record. Also, your TV will receive a signal so you can continue playing Wii.
Q4. How do you connect a Wii to a computer?
A: You can connect a Wii to a computer through cables and follow the steps in Part 1. Apart from that, you can connect through wireless connection.
- Step 1: When the console is on, use the remote to go to the Channel Menu and locate Wii’s logo. Select it by pressing A key.
- Step 2: Follow the instructions to enable the connection: System Settings → Wii Settings → Internet → Connection Settings. Choose the first connection.
- Step 3: Head to the Search for an Access Point to find your WiFi connection and enter the password. Last, save the settings and click on Ok to test the connection.
Q5. How does Wii differ from Wii U?
A: Generally speaking, Wii U is sort of like a souped-up version of the Wii. Wii is the seventh-generation game console released by Nintendo while Wii U is the first eighth-general video game console. Wii’s primary controller is WiiMote and the latter is GamePad. Also, Wii U support new features like HD graphics and touchscreen.
Part 5. Conclusion
This article presents how to record Wii gameplay whether you are using a capture card or not. If you’d like to share your moments and achievements of Wii gameplay, a professional screen recorder and capture card could both accomplish that for you. Hope you can quickly record Wii gameplay with these methods and have a good gaming experience.
