Recording video from the computer screen has never been as easier as it is with the Bandicam! Today, anyone can record their computer screens to make YouTube tutorials or how-to guides for blogs. Moreover, students get an easy way to record their lectures for future use with few clicks. You must be thinking, 'how do I fix Bandicam not recording audio?' after multiple attempts to correct it. To ease things for you, here are 4 ways to solve your issue.
- Part 1. Use Bandicam to Record Sound from Computer
- Part 2. Record Sound from Microphone with Bandicam
- Part 3. 4 Methods to Fix Bandicam Not Recording Sound
Part 1. How to Use Bandicam to Record Sound from Computer
Here are the steps to follow to record sound from a computer using Bandicam.
- Step 1: Select Speaker or Headphone Device manually if your Default Output Device option doesn't work, and you'll be able to record the computer sound.
- Step 2: If your Bandicam audio not working problem still exists, try checking the Windows Sound settings.
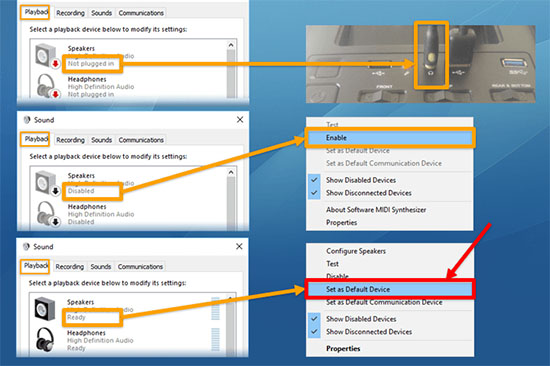
- ● Upon seeing Not Plugged in, connect the cable to the computer.
- ● Upon seeing Disabled, change it to Enable the audio.
- ● Upon seeing Ready, set Speakers (Headphones) as your default sound device.
- Now choose Open Volume Mixer from the system tray to set the Applications/Device sound to 70-90%.
- Step 3: If everything is done well, you will see the soundbar recording audio.
- Step 4: If the problem still exists, reinstall the Sound Card Driver to uncheck Run this Program in Compatibility Mode. Now try recording again.
Part 2. How to Use Bandicam to Record Sound from Microphone
Here are the steps to follow to record sound from the microphone using Bandicam.
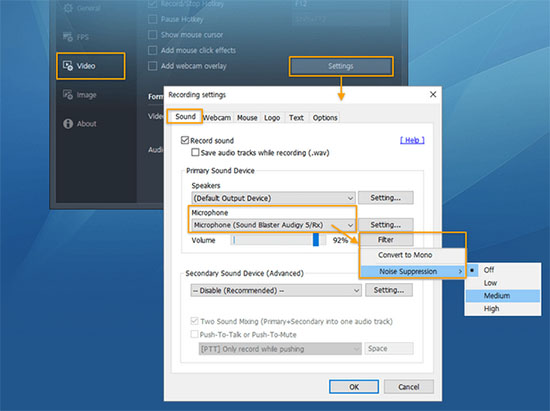
- Step 1: For recording both your voice and computer sound, select Default Output Device for your computer audio. Then select Your Microphone Device for your microphone.
- Step 2: For suppressing external noise such as keyboard and mouse noise, select Noise Suppression from the option.
- Step 3: If you hear echo sound/howling, go to Recording options of Windows. Double-click on the Microphone option to uncheck the Listen to this Device option.
Part 3. 4 Ways to Fix Bandicam Not Recording Sound
Solution 1: Check Bandicam Audio Recording Settings
To add sound to our Bandicam, make sure to check the record settings before you do anything else. Follow these steps to add sound to Bandicam.
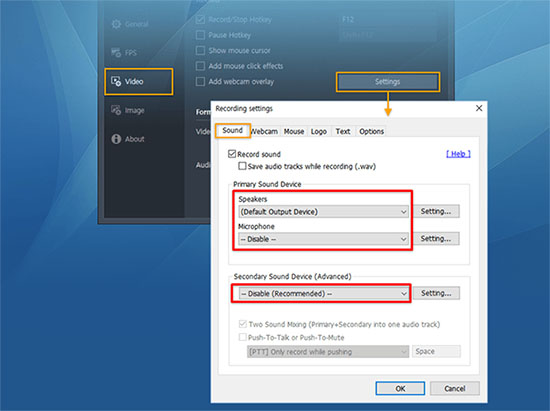
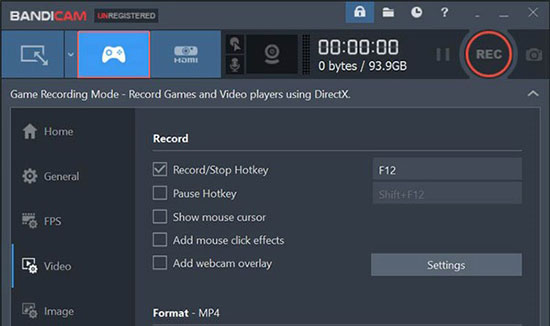
- Step 1: After installing Bandicam, launch the program to select Video on the left pane. Then click on Settings below the Record option.
- Step 2: After opening the Recording Settings window, select the Sound tab to ensure the Record-Sound option is marked ticked. Then select Default Sound Device below the Primary Sound Device area.
- Step 3: To add your microphone sound to Bandicam, go to the microphone in the Secondary Sound Device tab. Now record with your microphone.
Solution 2: Check Correct Primary Sound Device
To ensure your Primary Sound Device is working correctly, follow these steps to correct the primary sound device.
- Step 1: Firstly, check both Primary Sound Device and Secondary Sound Device options.
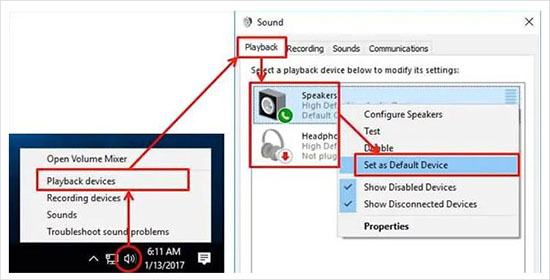
- Step 2: Follow the system trey to select Playback Devices option. Below that option, set Speakers as the default device.
- Step 3: Now select the Open Volume Mixer to change the sound of the 4 applications appearing between 70 and 90. This should fix your Bandicam audio not working.
Solution 3: Check Your Input Audio Source
Always necessary to check Bandicam Audio Settings first. Read through the below steps to solve your Bandicam not recording audio.
- Step 1: First and foremost, plug the audio jack into the desktop.
- Step 2: If the audio is Disabled, switch it to Enable.
- Step 3: Upon seeing the Ready option, set the device to Set Speakers (or Headphones) as your default option.
Solution 4: Use Joyoshare VidiKit as an Alternative
Joyoshare VidiKit - Screen Recorder is a great screen recording tool that can help you out. It can record any desktop activities, including video and audio, without causing any performance degradation on your system because it's a full-featured video recorder. It ideally enables you to record streaming videos, presentations, webinars, Skype video chats while offering flexibility to take snapshots, grab sound, highlight cursor, watermark, etc. Follow the steps below to use Joyoshare VidiKit to ensure audio recording on your desktop.

- Grab sound from system and microphone
- It is the best alternative to Bandicam
- Customize and edit videos and audio using ample tools
- Adjust frame rate, bitrate, codec, resolution, etc.
- Schedule tasks, trim video, customize capture area, etc.
Step 1: Download Joyoshare VidiKit
Download the right version of Joyoshare VidiKit on your computer by heading to the official website. Open it and select Screen Recorder. Then, you can hit the
 button next to the REC button on the right side of the interface to record audio only. You can also click the
  icon to choose "Record video and audio" mode. And don't forget to turn on System Audio.
Step 2: Alter Audio Recording Settings
Tap the gear icon near the REC button to unfold all hidden options. Here, you can customize output format and path. Click the Watermark to add your watermark like photo. You are entitled to schedule your recording task by setting Start time and End time. What's more, you can highlight your cursor and show your mouse movement by changing parameters on the right of the panel.

Step 3: Choose the Capturing Area
Upon selecting the "+" option under the Capture Area, adjust the designation to the width and height of the recording section. Otherwise, you can hit the triangle icon to choose the parameters that you want.

Step 4: Record and Edit Video
Press on the REC option to initiate recording. Take snapshots and skip the unwanted content with the use of Toolbar options. After hitting the Stop option, Edit the file by trimming, ID3 Tags info, previewing, etc. Then save your file.

Conclusion
Bandicam not recording audio can be a huge headache. And if you don't know how to fix it, you will be forced to sit idle for an indefinite time period. Therefore, it is vital for us to help you demonstrate the steps you can take. Thanks to Joyoshare VidiKit, we have also discovered a unique way to screen record your favorite videos. With the help of the brilliant software, you can grab sound from system and microphone.
