Like other applications on Mac, ScreenFlow fails to work at times. Recently, there has been a surge in complaints regarding the failure of recording properly and several functions not operating when recording. When you face ScreenFlow not working in recording issues, it is time to look for solutions that will help you attend to the problems. Most users complained that the recorded files were missing in the root directory when they wanted to edit a specific recorded video. In addition, there are other issues of the application, and learning how to fix them will prove to be a hassle-free journey while using the tool.
- Tip 1. Quit and Relaunch the Application
- Tip 2. Restart the Mac
- Tip 3. Clear ScreenFlow Cache
- Tip 4. Erase Old Version or Update the Current Version
- Tip 5. Work with an Alternative
- Tip 6. Fix the Sound Output
- FAQs about ScreenFlow Recording
Solution 1. Quit and Relaunch the Application
When you notice ScreenFlow internal error and the application stops working, the first and easiest solution to fix the issue is exiting the application and relaunching. You can use the keyboard shortcuts, the dock, or the Apple Menu to quit and relaunch ScreenFlow.
Solution 2. Restart the Mac
When ScreenFlow audio not working and a few other issues crop up, it is possible to solve them by restarting the Mac. There are different ways how you can restart Mac, which are:
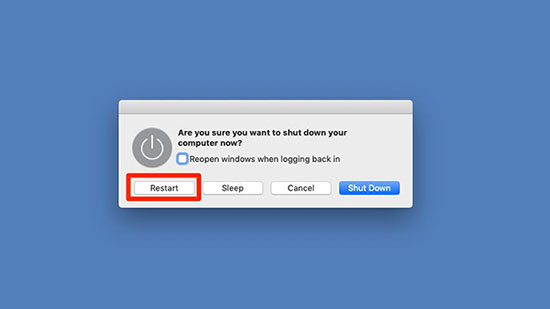
- Step 1: Through the menu bar.
- Step 2: Using the keyboard shortcut, where you press both the "Control" and "Eject" buttons together. When the pop-up screen appears, choose the "Restart" option.
Note: There are times when Mac fails to respond to the above commands. In such instance, turn off the Mac manually by pressing the power button.
Solution 3. Clear ScreenFlow Cache
When you find ScreenFlow is not functioning as it should, it is time to erase the cache. ScreenFlow not recording computer audio is the primary culprit and clearing the cache will fix the issue. Follow the below steps to erase files from the cache:
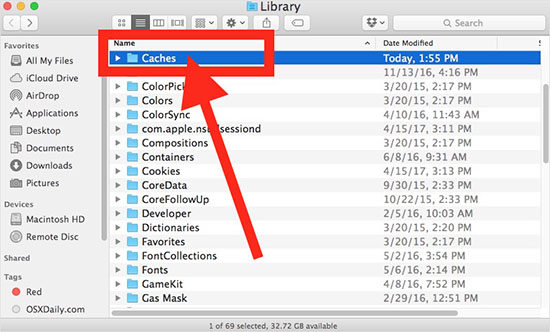
- Step 1: If the application is open, save any open project and close the application.
- Step 2: Click the "Go" menu at the top after opening a new "Finder" window.
- Step 3: Press the "Option" key on the keyboard and choose the "Library" from the menu bar that appears on the screen.
- Step 4: Search for the "Cache" folder and delete all the files within the "net.telestream.ScreenFlow".
- Step 5: Clear the files from the trash.
Solution 4. Erase Old Version or Update the Current Version
ScreenFlow not recording computer audio could be due to an outdated version of the software. A better way is to update the existing version, uninstall the older version and reinstall the latest version of the official website. Additionally, if you have older versions installed along with an updated version, the older files interfere and cause problems. The steps discussed below will assist you to remove the older versions from the system:
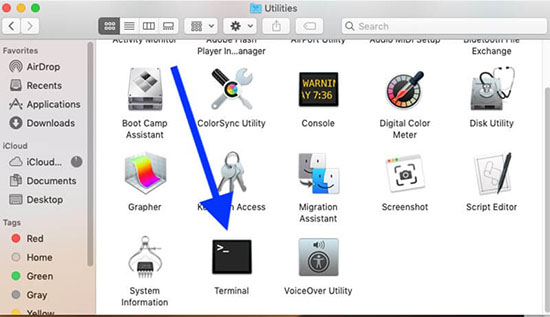
- Step 1: Ensure that the application is not running.
- Step 2: Follow the steps of erasing the cache as mentioned in the previous method.
- Step 3: Open the "Terminal" by clicking the "Finder - Applications - Utilities." Ensure that the application is closed and type the following commands in the Terminal window:
- ● defaults delete net.telestream.ScreenFlow4
- ● defaults delete net.telestream.ScreenFlow5
Solution 5. Work with an Alternative - Joyoshare VidiKit
Working with an alternative is another solution for your screen recording requirement and a permanent solution to fix ScreenFlow internal error. Joyoshare VidiKit - Screen Recorder captures the screen in 1080p at 60fps without any lag and supports multiple audio and video formats. The diversity ensures that it supports a broad spectrum of users, from content creators to teachers. The software is affordable and comes equipped with advanced features, making it a one-stop solution for all needs.
- Best alternative to ScreenFlow, OBS, VLC, QuickTime and more
- Highly customizable program for you to change parameters of video
- Dual mode to record screen and capture sound from your device
- Export your video and audio without losing quality
- Edit your video during the recording process
Step 1 Download and Run Joyoshare VidiKit
Go to Joyoshare VidiKit official website and choose the version available on your computer to download it on your screen. Double click program icon and navigate to the Record - Screen Recorder. Switch on the Record video and audio mode.

Step 2 Confirm Recording Settings
Press the gear icon to access more settings about this screen recorder. You can find a multitude of functions in the drop-down panel, including changing format, adding watermark, setting recording task, and highlighting clicks. The best part of this recording tool is that you can customize codec, quality, sample rate and more by navigating to Format and hitting the gear icon.

Step 3 Choose Recording Area
To get your desired capture area, you can tap the rectangle icon to get dashed blue box and drop or drag the edge of this frame. You can also select the standard ratio as you want.
Step 4Record and Edit Video
To start the recording process, press the blue REC button when you have done all settings and you will get a control bar beneath the recording area. Tap the stop recording button to get the well-recorded video and edit your video in the History window. You can also preview your video files.


Solution 6. Fix the Sound Output
You will sometimes notice the ScreenFlow internal error immediately after the countdown to recording the screen ends. A better way to fix the issue is by selecting the "recording from the desktop only" option from the configuration setting. Next, ensure to tick the checkboxes to see which recording source is causing the problem. Alternatively, ensure that the system preference for the audio is for speakers or headphones. Finally, if the error occurs, delete the following in the extensions, restart the Mac and try recording again:
- ● /Library/Extensions/TelestreamAudio.kext
- ● /System/Library/Extensions/TelestreamAudio.kext
- ● /System/Library/Extensions/VaraAudio.kext
FAQs about ScreenFlow Recording
1How to designate an area to record?
You can activate the preferred area to record using the dashed rectangle icon. The partial screen capture opens a rectangular selection box, which you can adjust using the cursor.
2 How to choose a graphics card?
You can select a graphics card approved by the Apple macOS. Please note that ScreenFlow does not support NVIDIA and eGPU workflows. Check the official website for a detailed list of the graphics card supported by ScreenFlow.
3 What to do if my exported video is blurry?
The following steps are advisable to ensure that the exported video is not blurry:
- Step 1: You can select the lossless uncompressed video format.
- Step 2: Ensure to reduce the display resolution before starting the recording process.
- Step 3: If you do not want to reduce the display resolution, use the zoom, and scale features in the application.
- Step 4: If a text is present in your recording, ensure to use the scale feature to increase the text size.
