As a leading video conferencing platform, Zoom has revolutionized digital communication. Trusted by individuals, businesses, and educators worldwide, Zoom delivers consistent performance across all use cases - from team collaborations to online classrooms. While Zoom's intuitive interface makes joining or hosting meetings effortless, many users need to preserve important discussions for future reference. Whether you're documenting client calls, saving training sessions, or archiving lectures, recording meetings become essential. This comprehensive guide will walk you through how to record a Zoom meeting on desktop and mobile devices without sparing much efforts.
- Part 1. How to Record a Zoom Meeting on Desktop App
- 1.1 How to Record Zoom Meeting as Host
- 1.2 How to Record a Zoom Meeting as a Participant (with/without Permission)
- Part 2. How to Record a Meeting on Zoom Mobile App
- Part 3. FAQs about Zoom Meeting Recording
Part 1. How to Record a Zoom Meeting on Desktop App
You can record Zoom meetings by drawing support from the built-in local recorder. This is a simple and straightforward solution available for both free and paid subscribers. You can record video and audio simultaneously, saving files directly to your computer or store on cloud storage.
1.1 How to Record Zoom Meeting as Host
📍 Prerequisites:
- An accessible Zoom account;
- Zoom desktop app (not Zoom web app);
- Enable recording permissions;
- Enough disk space for local recordings or Zoom cloud storage for cloud recordings.
- Step 1: Sign in to Zoom desktop app on your computer.
- Step 2: On the main interface, go forward to the upper-right corner and click on the Settings gear icon located below your profile picture.
- Step 3: Head to Recording tab in the left column and set where to store your recordings.
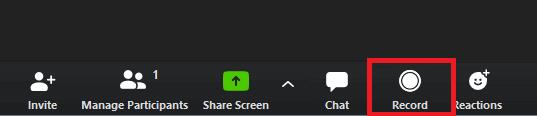
- Step 4: Start a Zoom meeting, go to the control bar at the bottom of the screen, and click the Record button to begin recording. You can decide whether to record on this computer or record to the cloud.
- Step 5: It is available to click Pause or Stop button during the meeting. Upon a Zoom meeting recording is completed, the destination file will automatically be saved as MP4 format.
| Types of recordings | Record on this Computer | Record to the Cloud |
|---|---|---|
| What to store | Standard MP4 video, M4A audio, chat text files | Standard MP4 video, M4A audio, chat text files |
| Where to save recordings | Computer's hard drive | Zoom's cloud server |
| Zoom account | All Zoom accounts | Only paid Zoom accounts |
| Best for | Offline access anytime | Sharable recording links |
1.2 How to Record a Zoom Meeting as a Participant (with/without Permission)
Recording Zoom meetings as a participant on the desktop app is a bit different from host recording, primarily offering two approaches: authorized recording through Zoom's native functionality (requiring host permission) or utilizing third-party screen recording software as an alternative solution when official recording privileges aren't granted.
Method 1. Record Zoom Meeting as a Participant with Permission
If you are a participant who wants to record a meeting on Zoom app, you have to get recording necessary permission from the host. Now look at how the host authorizes recording privilege to a participant.
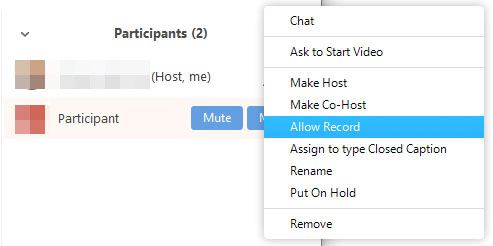
- Step 1: During a Zoom meeting, choose Participants.
- Step 2: In the list, hover over the name of target participant that you want to give recording permission and click on "…" icon beside it.
- Step 3: Simply select "Allow to Record Local Files" option from the drop-down menu.
After authorization, the selected participant will soon receive a notification of "Hosts allows you to record this meeting". If a recording task is initiated, there will be a recording icon near to the name of your appointed participant.
Method 2. Record Zoom Meeting as a Participant without Permission
Sometime, the host may miss your application of recording a meeting or reject to authorize. But luckily, a professional screen recorder like Joyoshare VidiKit comes to rescue.
This comprehensive Zoom meeting recorder features cutting-edge screen capture technology that simultaneously records both video and system audio along with external microphone input. Beyond basic recording functionality, it offers extensive customization options for Zoom meetings including webcam overlay, adjustable capture area, multiple output formats, screenshot capabilities, cursor highlighting, recording scheduler, and real-time annotations.

- Record meeting from Zoom, Google Meet, Microsoft Teams, and more
- Capture Zoom meetings in 1080p/4K with zero lag or compression
- Preserves original video/audio sync for professional results
- Add webcam overlay to show your reactions during the meeting
- Save captured meeting videos to MP4, AVI, FLV, MOV, MPEG, etc.
- Support multiple recording modes for you to flexible switch
Step 1Activate Screen Recorder in VidiKit
Finish the installation of Joyoshare VidiKit and then run it on your computer straightly. Go ahead to Screen Recorder under the Recorder panel.

Step 2Select a Recording Area
It is convenient to quickly pick up a systematic ration, like 1920x1080, 1280x720, full screen, etc, by clicking the drop-down menu in the bottom left corner. Of course, it is available for you to enter definite width and height number to the frame or drag the pop-up window to decide recording area by clicking "Select area to record".

Step 3Set Up Recording Preferences
You are entitled to enable both "System Audio" or "Microphone Audio" to capture computer sound and voices of all the participants during the meeting. Also, turn on your camera to include your face in the recording.
To take a close look at all options, you can simply click the "Preferences" icon on the right corner, which offers facility to choose desirable output format, customize parameters, utilize shortcuts, add effect to cursor, etc.

Step 4Get Ready to Record Zoom Meeting
To start or join a meeting, launch the Zoom desktop app or access the Zoom web app. In Joyoshare's main interface, simply click the "REC" button. You'll have a 3-second countdown to adjust your capture area. Once recording begins, a floating menu bar will appear, enabling you to annotate in real time, take snapshots, schedule the recording, and cut the video.

Step 5Save and Manage Zoom Meeting Recording(s)
Joyoshare VidiKit provides full support for managing your recorded Zoom meeting files. Simply click the Stop button, and you'll be directed to the History window, where you can preview your Zoom video, rename it, trim the recording, delete files, or clear the list entirely, among other options.

Part 2. How to Record a Zoom Meeting on iPhone/Android
Anyone who has a paid membership in Zoom, such as Business, Education, Enterprise or Pro account, can record Zoom meetings on the mobile devices, like iPhone and Android. However, the recorded files will be only saved to the cloud for view, sharing and downloading. Recording locally cannot be supported.
📍 Prerequisites:
- You're using a supported Google Workspace account;
- Paid Zoom Pro, Business, Education, and Enterprise plan subscribers;
- A licensed user with host or co-host privileges for the meeting or webinar;
- Cloud recording is enabled.
- Step 1: Open Zoom mobile app and sign in your account.
- Step 2: Simply start or join a meeting on your mobile device.
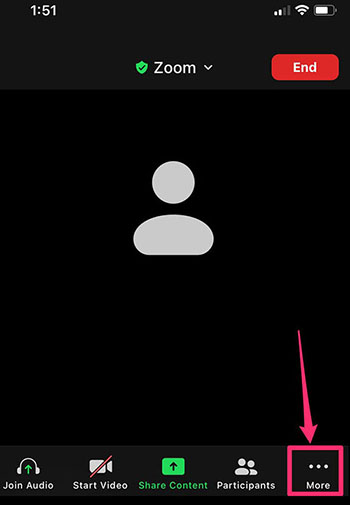
- Step 3: Tap the Record icon in the host controls.
- Step 4: Tap Start recording option to begin recording the Zoom meeting. You can see the recording status bar in the top-left corner.
- Step 5: To end the recording, tap the Record icon again and hit Stop recording → Stop to confirm.
Part 3. FAQs about Zoom Meeting Recording
Q1: Where to find recorded Zoom meetings?
A: For local recording, you can find computer recording files in the default Zoom recording folder (/Users/[Username]/Documents/Zoom) on your computer. For cloud recording, you can access your cloud recording in Recording Management in the Zoom web portal.
Q2. Does Zoom record your whole screen or just the meeting?
A: When there is no shared screen, Zoom will record gallery view, which shows all the people in attendance. Note that it won't record participants who don't turn on camera. When sharing, Zoom will record the active speaker with shared screen by default.
Q3. Who can record Zoom meetings?
A: Actually, both free and paid Zoom users have option to record meetings. The difference is that there are some limitations for free users, such as single local storage and disability to record on mobile phones.
Q4. How to record zoom meeting without host permission?
A: It's workable for you to record Zoom meetings without host permission by directly using a third-party screen recorder. However, it's better to inform all participants in advance or get permission first.
Q5: Why can't I record my Zoom meeting?
A: You cannot record Zoom meetings if you are not a host or have no recording permission from the host. Besides, if you are using a free Zoom account, it's impossible to record Zoom on a mobile device.
Conclusion:
With the comprehensive solutions provided in this guide, recording Zoom meetings has never been more accessible. Regardless of you are a host or participant, whether you're using a desktop or mobile device, you now clearly know how to record a Zoom meeting. These methods ensure you'll never miss crucial details from presentations, collaborative sessions, or client calls again. So, you can check the recorded videos for further review and sharing.
