Q:"How can we record classroom lectures?" - From Quora
Having a class lecture online plays influential roles in this fast-paced era, which brings large facility to people's life, especially for social groups who study after work. However, being same as traditional class, an online class lecture will be delivered at a fixed time that is informed by teacher to students in advance. There may be a case where you are busying with other urgent thing and miss your class lecture. How to deal with it? To provide substantial help, we'd like to share how to record lectures with no efforts here so that you can feel free to watch it offline anywhere at any time.
Part 1. Best Way to Record Lectures - Joyoshare VidiKit
Joyoshare VidiKit - Screen Recorder is a decent tool developed to record not only video but also audio activities on your desktop screen. With the most advanced screen capturing technology, it empowers you to record class lecture from any platform with high resolution and save it to popular output format, for instance, MOV, MKV, M4V, MPEG, MP4, AVI, etc. Aside from class lecture, Joyoshare VidiKit can come in handy when you'd like to record live streaming video, gameplay, GoToMeeting webinar, online movies, streaming music, etc.
Professionally, it's capable of creating lecture video with clear audio track in perfect synchronization, from which you can disable system audio or microphone sound to avoid noisy intervention. This smart video recorder features wonderful functionality in recording, such as, selecting capture area, schedulling capturing task, adding personalized cursor effect, correcting ID3 tags information, etc. Of course, it can do more for users as an independent audio capture as long as you want.

- Record lecture on Mac and PC in high quality
- Capture audio from sound sources like microphone, system
- Output lecture videos to M4V, MPEG, MP4, AVI, MOV and more
- Support screenshot-taking and task-presetting
- With options to adjust format parameters, trim, effect, add watermark, etc.
Step 1Launch Screen Recorder in VidiKit
Make sure to download and install Joyoshare VidiKit on your PC ahead of time. Double click the icon on your desktop to get it started. In the main interface, find and click Record > Screen Recorder. The program gets ready in "Record video and audio" mode by default.

Step 2Decide capture area
Joyoshare VidiKit allows you to select any region on your desktop screen to have a class lecture recording task. There is a "Capture Area" located on the left of main interface, which is designed with three different approaches to determine an area, including clicking "+" button to drag recording window, typing in specific number to "W" & "H" and choosing systematic fixed ratio from drop-down menu.

Note: Remember to open microphone sound if you would like to get a class lecture recording with both video and audio left. Certainly, if you prefer to capture video only, then it is your choice to close system voice or microphone sound.
Step 3Set recording options for class lecture
Make a better acquaintance with what this program can provide to you. It enables you to set preferences through "Basic record options", "Record time options" along with "Cursor options". Taking the middle one as example that is available to create a scheduled recording task in advance, it will start to work automatically when the designated time is up, being convenient enough especially when you go out.

Step 4Begin to record a lecture
Open your class lecture window. Then go for hitting "REC" button after the class lecture begins. There will be 3-second countdown on your screen, during which you have chance to make adjustment of recording area again if the previous capturing position is not proper enough. In the process of recording, it facilitates you to take screenshots at any time and split the video to different segments as you like.

Step 5Sort out captured lecture videos
Click on the Stop button and all finished lecture videos will be shown in the "History" list, which delivers a platform for you to preview, rename and revise ID3 tags information.
Part 2. How to Record a Lecture - Panopto
To record lectures and online courses online with ease, Panopto is a good option. It does well in recording audios, videos, screens and apps in SD, HD and Ultra HD. Making the most use of it, you're able to show two streams as side by side or picture in picture. Also, it's available to add custom background based on your own preference.
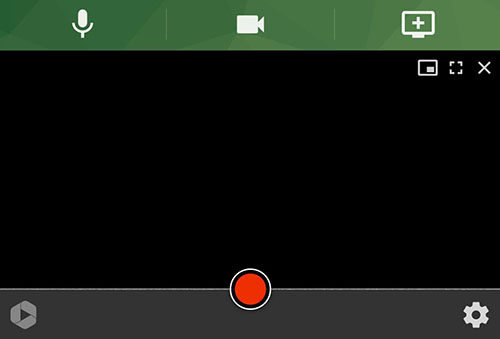
Step 1: Navigate to https://www.panopto.com/record/ and prepare your lecture;
Step 2: Click the gear-shape button in the lower right corner to set recording options;
Step 3: Afterward, you can press on the red recording icon in the center to start recording your lecture;
Step 4: Hit Stop button to end your recording and send it to Panopto, YouTube or Classroom.
Part 3. How to Record Class Lecture - Camtasia
Camtasia, working as an advanced video editor, is here another good choice for educators to record class lectures. It enables you to record the entire screen or capture a custom region. At the same time, it easily records audio and webcam. After the recording, you can perform a series of professional editing operations, such as trimming, annotating, adding transitions, etc. to make your lecture videos more engaging.
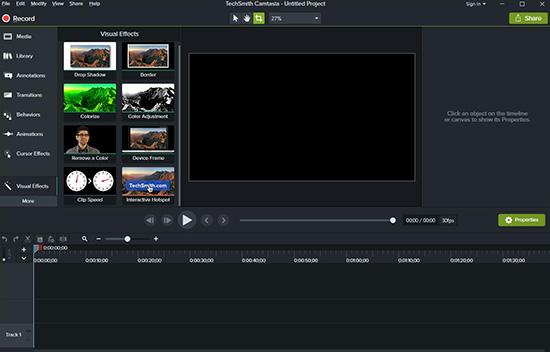
Step 1: Open your installed Camtasia and get started with "New Recording";
Step 2: Select area, turn on camera and choose audio source as per your actual situation;
Step 3: Prepare your online lecture and click on the "rec" button to begin recording;
Step 4: "Stop" when the lecture is over and you can then edit videos in Camtasia's project interface;
Step 5: Go for "File" > "Save" to save your project and "Share" > "Local File" to output it on your wanted location.
Part 4. How to Record Lecture - ApowerREC
ApowerREC is one of the most popular screen recording tools for teachers and students. It captures your lecture screen and audio from microphone simultaneously. Ideally, it supports webcam. You can simply apply it to schedule tasks, take screenshots, make annotations and share videos to desired social media.
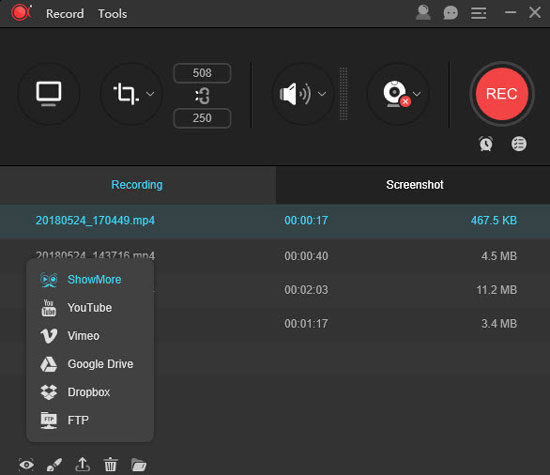
Step 1: Run ApowerREC on your computer and open the online lecture window in advance;
Step 2: Adjust "Settings", such as video format, parameters, audio source, etc.;
Step 3: Choose your recording mode and initiate your lecture recording with the "REC" button;
Step 4: Add annotations with the pen in the toolbar or take snapshots;
Step 5: Now finish your recording by using the "Stop" button and save it locally.
