
Do Not Disturb mode is a unique feature in iOS devices that prevents you from being disturbed. By enabling this feature, you can mute calls, notifications and alerts. Whether your iPhone is locked or on, you have the most freedom to decide what is silent and what is allowed. Unfortunately, many iPhone users have complained of being plagued by the "iPhone stuck on Do Not Disturb" issue after installing the new version of iOS. It can be pretty frustrating as no one wants to face this chaos. Luckily, you can solve the problem after reading this article as we're going to reveal the best solutions.
- Part 1. Why Is My iPhone Stuck on Do Not Disturb?
- Part 2. 11 Fixes to iPhone Stuck on Do Not Disturb Mode
- Fix 1. Disable Do Not Disturb
- Fix 2. Disable Sleep Mode
- Fix 3. Restart iPhone
- Fix 4. Adjust Do Not Disturb
- Fix 5. Close Do Not Disturb While Driving
- Fix 6. Disable Share Across Devices
- Fix 7. Delete Schedule
- Fix 8. Reset All Settings
- Fix 9. Restore iPhone via iTunes
- Fix 10. Update iPhone
- Fix 11. Use Joyoshare iOS System Recovery [No Data Loss]
- Part 3. FAQs about Do Not Disturb on iPhone
- Part 4. Conclusion
Part 1. Why Is My iPhone Stuck on Do Not Disturb?
iPhone stuck in Do Not Disturb mode is a common issue, and there are several factors that can contribute to this trouble. Here are the most prominent reasons behind the problem.
- 1. Software Glitch: A software bug or glitch can stop you from disabling Do Not Disturb mode.
- 2. Settings Conflict: Some of the options you set in your iPhone may leave it in Do Not Disturb mode.
- 3. Old iOS Version: If you don't install the latest iOS version, some function like DND may not work properly.
- 4. Wrong Operation: You haven't turn off Do Not Disturb on iPhone successfully by using the right method.
- 5. Activated Schedule: Your iPhone can get stuck in Do Not Disturb mode if you set a schedule to automatically turn on it under a certain condition.
Part 2. How to Fix iPhone Stuck on Do Not Disturb
Keeping stuck on Do Not Disturb mode can inevitably brings inconvenience. If you'd like to get your iPhone out of this mode quickly and use device normally without missing important information, you can take a look at the solution below.
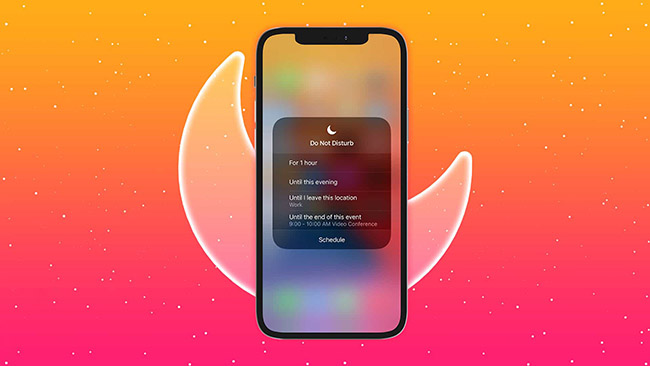
Fix 1. Toggle Do Not Disturb
If your iPhone is stuck on Do Not Disturb mode, the first thing you need to do is check if you have inadvertently enabled the feature. You can follow this guide to make sure Do Not Disturb mode on your iPhone is switched off. Or you can turn on it and turn off back for a refresh.

- 👉 Turn Off Do Not Disturb in Control Center:
- Step 1: Swipe up or swipe down as you usually do to open Control Center on your iPhone.
- Step 2: Tap the Do Not Disturb crescent button to turn off it.

- 👉 Turn Off Do Not Disturb on Lock Screen:
- Step 1: Find and tap the crescent icon on lock screen.
- Step 2: Unlock your iPhone and tap Do Not Disturb to close this feature.
Fix 2. Disable Sleep Mode
Sleep Mode can simplify your lock screen, darken the screen and automatically turn on Do Not Disturb to reduce possible distractions during the sleep time. Therefore, you can turn off Sleep Mode to solve problem related to Do Not Disturb.

- Step 1: Launch Health app on your iPhone.
- Step 2: In the Summary screen, find and choose "Sleep" section.
- Step 3: Tap on "Full Schedule & Options" under "Your Schedule".
- Step 4: Now toggle off "Sleep Schedule" option to turn off Sleep Mode.
Fix 3. Restart iPhone
The next thing you can do to fix the issue you're facing is restart your iPhone. It is a tested method used to eliminate many iPhone issues with minimal effort. Your device may carry some conflicts and bugs behind iPhone stuck on Do Not Disturb error. You can restart your device by following the guide below.
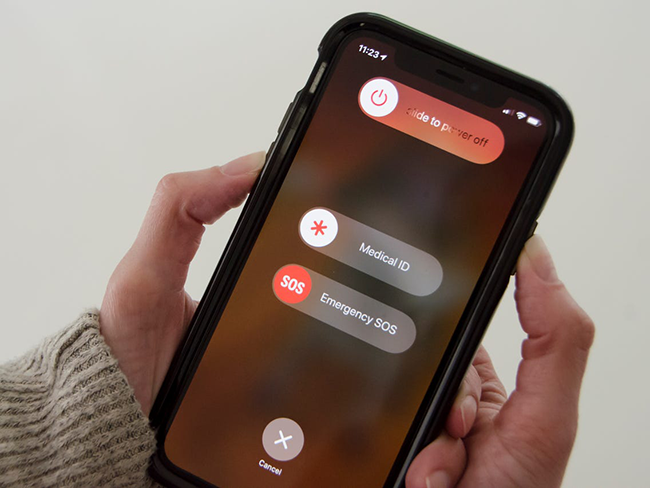
iPhone X and Later: Press and hold your iPhone Power and Volume button to bring up power-off slider. Simply drag it to the right side and turn the device off. Later, you'll need to press your iPhone's Power button to turn your device on again.
Other Models: Press and hold the iPhone's Power button until the power-off slider appears. Later, push the slider to the right to switch your device off. Next, you can press the Power button again to open your iPhone.
Fix 4. Adjust Do Not Disturb
Another appropriate thing you can do to get out of the trouble you're facing is to disable "While iPhone is Locked" or "Always" option. You can consider when to deactivate Do Not Disturb feature.

- Step 1: Navigate to iPhone Settings and then tap Focus option.
- Step 2: Tap "Do Not Disturb" option on the top.
- Step 3: Go to Options → Silence Notifications and Switch to While Locked. This can unmute notifications to you when your iPhone is unlocked.
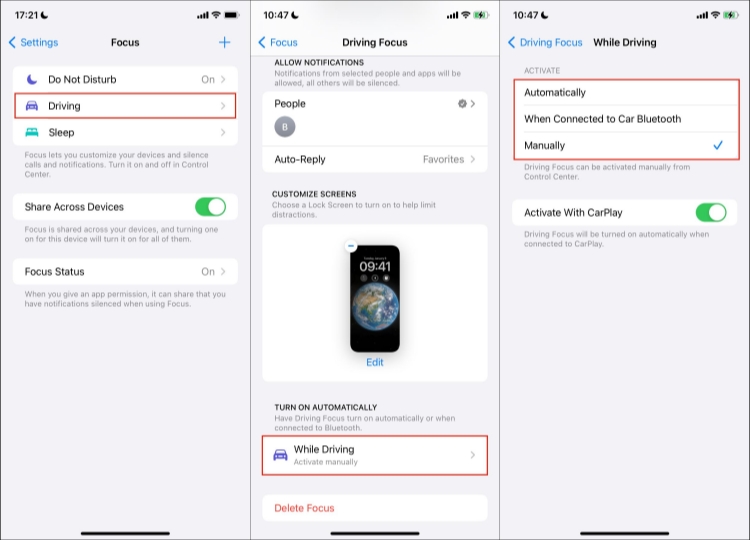
Fix 5. Close Do Not Disturb While Driving
It's possible that your iPhone gets stuck on Do Not Disturb mode due to some restrictions, like "Do Not Disturb While Driving", which limits your normal device use. Simply open Settings on iPhone, then go forward to Focus → Driving. You can scroll down to the buttom and tap While Driving. Make sure you check Manually option.
Fix 6. Disable Share Across Devices
If you own more than one Apple devices that all sign into iCloud account with the same Apple ID, Do Not Disturb option can be automatically activated on your iPhone. This is because you have enabled "Share Across Devices" option, so as soon as Do Not Disturb is open on one device, all the other devices will sync with this option in Focus. To avoid this, you'd better close "Share Across Devices" by following the steps below.

- Step 1: Tap Focus in Settings app.
- Step 2: Locate Share Across Devices and switch off it.
Fix 7. Delete Schedule
Have you set a shedule in Focus to turn on Do Not Disturb automatically at a certain time, when arriving at a designated location or while using a certain app? If this is the case, you will find that Do Not Disturb is always automatically activated. So, it's suggested to delete the schedule.

- Step 1: Open Settings on iPhone and go to Focus.
- Step 2: Tap on Do Not Disturb option.
- Step 3: Scroll down to find the schedule you created and click on it to see more details.
- Step 4: Tap on "Delete Schedule" button to stop turning on Do Not Disturb automatically.
Fix 8. Reset All Settings
Resetting all your iPhone settings can help you exit Do Not Disturb mode. It refreshes your iPhone by restoring your setting, and as a result, you can help yourself fix many iPhone issues. Luckily, you won't lose personal data by restoring settings to the factory defaults. Here's the quick guide for you to follow.
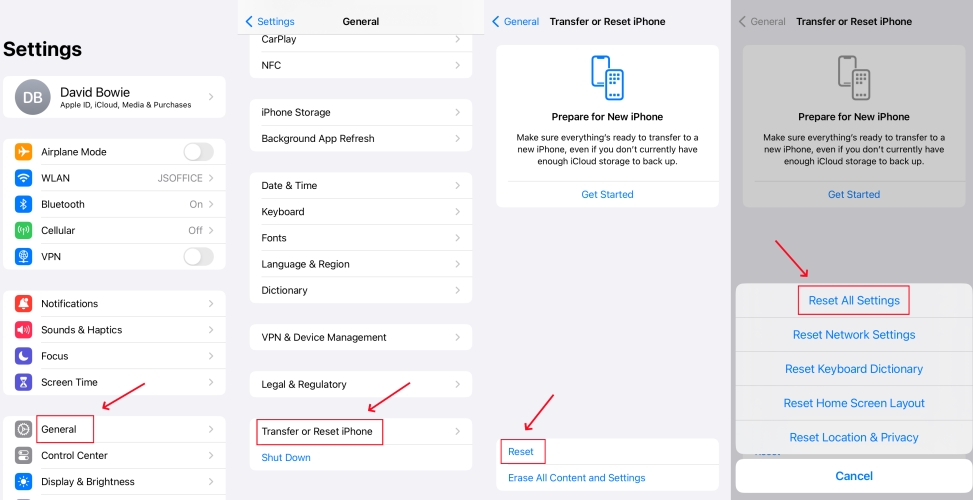
- Step 1: Access iPhone Settings and tap on the "General" option.
- Step 2: Tap on Transfer or Reset iPhone option.
- Step 3: Go to Reset → Reset All Settings to erase all settings and see if your iPhone gets out of DND mode.
Fix 9. Restore iPhone via iTunes
iTunes can be utilized to restore your iPhone to factory settings. It sets your device as a new one , erases all content and settings, including Do Not Disturb. Here you can do it on your own.
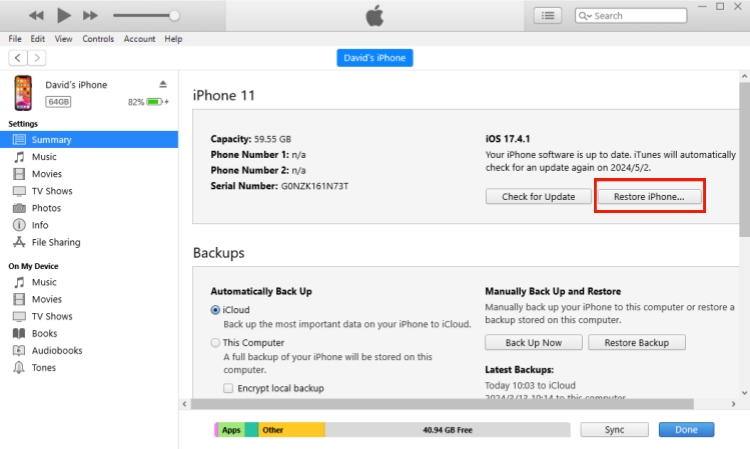
- Step 1: Open iTunes and connect iPhone to computer.
- Step 2: Now, iTunes will automatically detect your iPhone, and you can click on your device sign.
- Step 3: Click on "Summary" and then "Restore iPhone..." option to factory reset your device.
Fix 10. Update iPhone
Sometimes, potentical issues hidden on your iPhone can be fixed when the new update comes. If your device is running an old iOS version and there is an available update for you to check. You can do as follows:
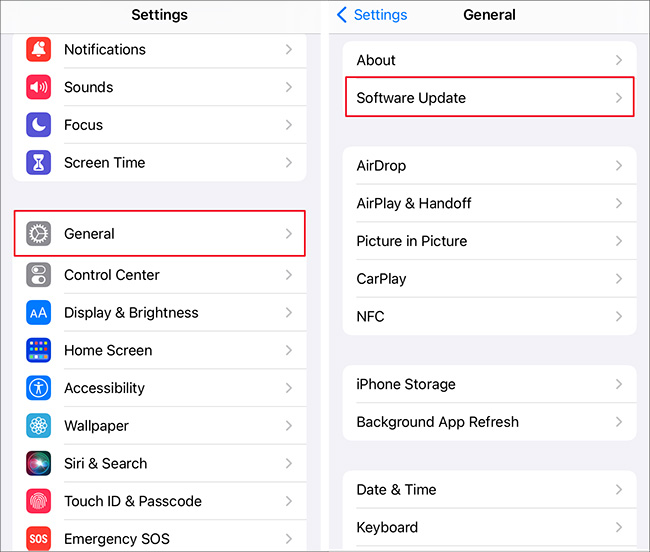
- Step 1: Lead yourself to Settings → General on iPhone.
- Step 2: Tap on the "Software Update" option to check for a new iOS version.
- Step 3: Equip your iPhone with the latest iOS version by tapping on "Download and Install" button.
Fix 11. Use Joyoshare iOS System Recovery
You can surely troubleshoot iPhone stuck on Do Not Disturb mode or Focus not working via a decent iOS system recovery tool. Here Joyoshare UltFix is a good tool worth your use. This unbelievable software allows you to get rid of more than 150 problems without sparing much effort. With an intuitive and simple interface, it is able to finish the repair process using few clicks. Best of all, there is no data loss and you can well safeguard all models of your iPhone, iPad and iPod.

- Fix 150+ software-related issues without data loss
- Enter or exit into recovery mode with one click for free
- Factory reset device in some special situations
- Upgrade and downgrade iOS without developer account
- Support nearly all models of iPhone, iPad and iPod touch
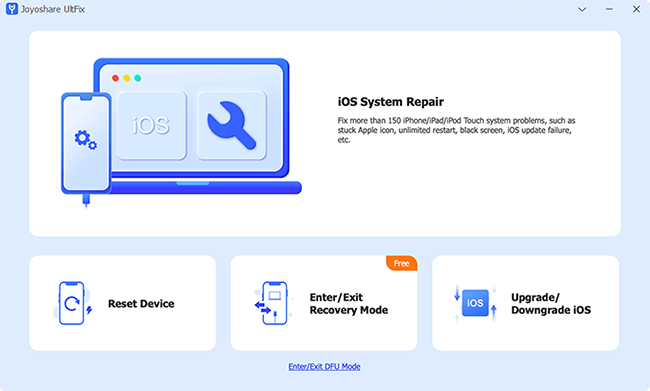
Step 1 Connect iPhone to the computer
Pre-install iTunes, get Joyoshare UltFix iOS system recovery launched on your computer and connect iPhone. Click on "iOS System Repair" for selection and then hit "Start" to go on.
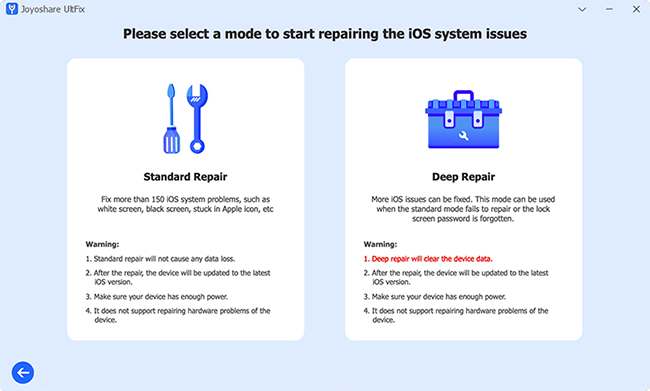
Step 2 Choose Standard Repair
You'll need to select Standard Repair mode if you want to troubleshoot your iPhone with no data loss. If this program prompts that your device is not detected, note to put it into recovery or DFU mode and then continue by clicking on the blue right arrow at the bottom.
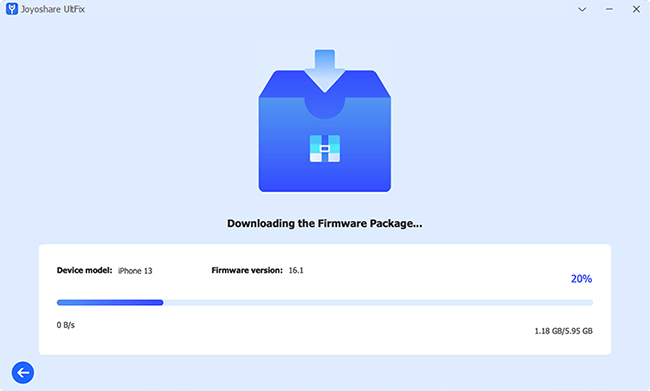
Step 3 Download Firmware Package
After selecting the matching firmware package and confirming the information about your iPhone on the interface, you'll need to click the "Download" button.
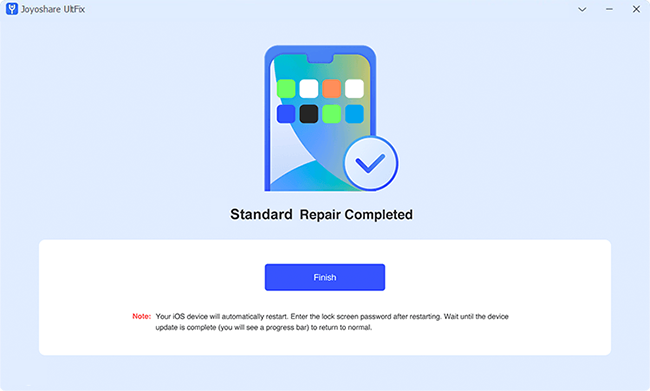
Step 4 Repair iPhone Stuck on Do Not Disturb
Click the "Start Standard Repair" button option, and the process of repairing your device will start. After a few minutes, the repair process will finish, and you'll be able to get rid of the issue.
Part 3. FAQs about Do Not Disturb on iPhone
Q1. How to Turn off Do Not Disturb on iPhone?
A: If you don't want to use Do Not Disturb mode anymore, you can turn it off. After navigating to iOS device Settings, tap the Focus option. Now, you'll need to move to the "Do Not Disturb" option and then toggle it off from there.
Q2. Why Does My iPhone Show a Half Moon?
A: This half-moon icon on your iPhone actually is related with Focus. This feature was introduced to silence notification, indeed a new version of "Do Not Disturb", and it has additional ability to customize calls & notifications. Similarly, to disable this half-moon icon, go to Control Center now.
Q3. How to Bypass Do Not Disturb on iPhone?
A: You can still get notofications despite you've enabled Do Not Disturb mode. Go to Settings → Focus → Do Not Disturb. Tap on People and Apps to seperately set who and what to allow.
Part 4. Conclusion
If you're facing iPhone stuck on Do Not Disturb mode issue, you can read this guide as you'll find reliable methods to fix your issue. All the issues we've discussed are fairly helpful and can get your job done effortlessly. However, if you talk about the high percentage of effectiveness, no method can beat Joyoshare UltFix. Besides providing quality services, it empowers you to settle series of matters without causing data loss.
