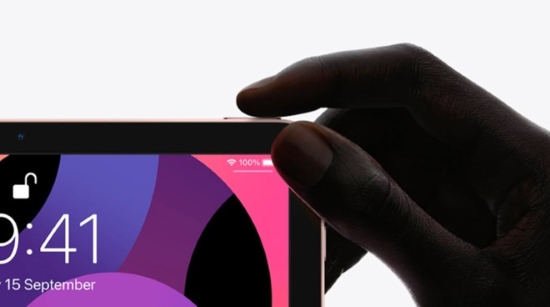
Touch ID could not only be used to unlock your iPad without hassle, but also to make purchases in the App Store, iTunes Store, and Apple Books instead of Apple ID password. Also, you can use it to make purchases in physical shops with Apple Pay. This feature does bring a faster and more convenient way for users. However, it turns out trouble when your Touch ID stopped working suddenly. Take it easy, you could find many solutions to fix iPad Touch ID not working in this article.

- Part 1. FAQs about iPad Touch ID Sensor
- Part 2. How to Fix iPad Fingerprint Stop Working
- Part 3. Best Tool to Fix Problematic Touch ID on iPad
Part 1. FAQs about iPad Touch ID Sensor
Q1: Why is my Touch ID not working on iPad?
A: The reasons consist of three aspects. No.1 external unlocking conditions, such as dirty finger or Touch ID sensor; No.2, system errors, including outdated software; No 3, hardware issue, which means your Touch ID sensor might be damaged.
Q2: Why should I enter passcode even though Touch ID is enabled?
A: Your passcode is required if you just restarted your device, fail to unlock with 5 failures, haven't unlocked more than 48 hours, etc.
Part 2. How to Fix iPad Fingerprint Stop Working
Method 1 Clean Up Touch ID Sensor
Your Touch ID recognition would be affected by moisture, lotions, sweat, oils, dry skin and so on. When you found that iPad Touch ID cannot detect your fingerprint, you could inspect the sensor whether it is interfered with any dust or debris. Take a clean cloth to wipe the Home button or the Top button on your iPad.
Method 2 Remove Screen Protector and Case
Even if you are using the original screen protector and case, it's still hard to rule out the possibility that these ornaments will hinder the detection of Touch ID and any other button-related feature. In this case, you'd better remove them and try to put your finger on the sensor again to unlock your iPad.
Method 3 Fully Cover the Touch ID Sensor
When you move your finger hastily and as a result, the Touch ID is not covered completely with your finger, the iPad Touch ID not working problem occurs. Thus, slow down your speed, and press the button longer. Alternatively, you could convert the angle and use different sides of your finger to get your iPad unlocked.
Method 4 Re-enable iPad Touch ID
The wrong settings on Touch ID have a great influence on this problem. To remedy them, you need to do the following steps.
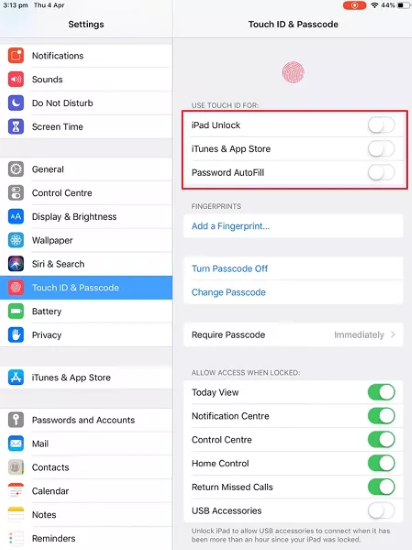
- Set up iPad Touch ID: Settings → Touch ID & Passcode → enter passcode → Add a Fingerprint → touch the Touch ID sensor many times until it is settled → tap Continue to complete
- Enable Touch ID on iPad: Settings → Touch ID & Passcode → toggle on iPad Unlock under USE TOUCH ID FOR (or turn on other options based on your needs)
- Turn passcode off and on: Settings → Touch ID & Passcode → Turn Passcode Off → Turn Passcode On
Note: Theoretically, you could only use Touch ID to unlock your iPad, but you have to set up a passcode in advance. And the truth is, as mentioned before, that you need to enter the passcode in some scenarios.
Method 5 Add Another Fingerprint
In case your iPad cannot recognize one of your fingerprints, you have a chance to set more fingerprints and there will always be a valid one. Go to Settings, find Touch ID & Passcode, type into your passcode, tap Add a Fingerprint and place your finger on the Home/Top button to set up a new fingerprint. Moreover, you could delete the not working Fingerprint and reset one.
Method 6 Update iPadOS
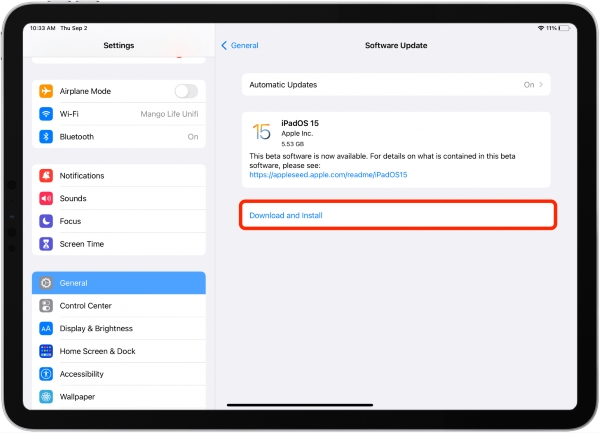
As the outdated iPadOS software exits several system errors, you are highly recommended updating the system on your iPad to the latest version. Open Settings, tap General, select Software Update, and hit Download and Install. When the updating progress completes, turn on your iPad and check if the Touch ID comes back to normal.
Method 7 Reset All Settings
Generally, your iPad Touch ID will work again after following all the foregoing methods. However, there are always exceptions. If your iPad Touch ID remains unworkable, try to reset all settings on your device. Head to Settings, choose General, scroll down to Transfer or Reset iPad, tap Reset, select Reset All Settings and your settings will be put into the default state.
Method 8 Force Restart iPad
iPad Touch ID not working issue could be fixed if your device is given a thorough refreshment, which could be achieved by force restart.
- iPad with Home button: simultaneously hold the Home button and the Power button and release them when you see the Apple logo
- iPad without Home button: press Volume Up and release it, do the same to the Volume Down button, and hold the Top button until the Apple logo emerges

Method 9 Factory Reset iPad
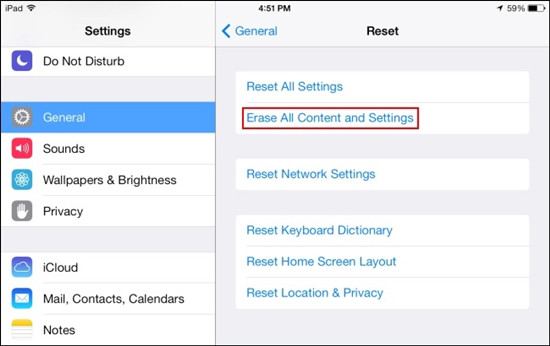
For severer situations, factory resetting iPad is effective but your data will be erased at the same time. If you want to adopt this method, please make sure you have backed up or there is nothing that needs to be reserved. Then, navigate to Settings, enter the General screen, scroll to Transfer or Reset iPad, select Erase All Content and Settings and confirm your action.
Part 3. Best Tool to Fix Problematic Touch ID on iPad
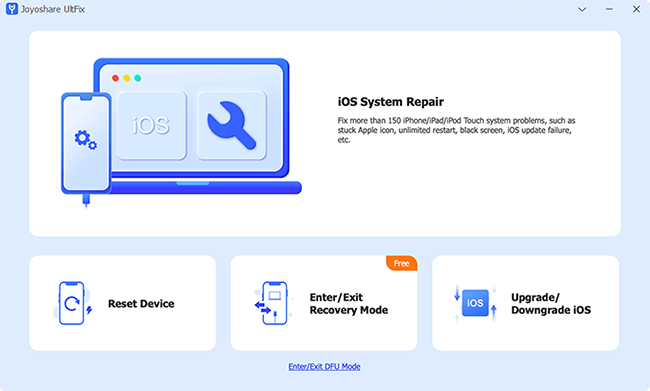
If you are worried that your data will be lost when you take the previous solutions, Joyoshare UltFix is more suitable for you to fix Touch ID that stopped working on your iPad. The standard repair mode specifically designed to fix more than 150 Apple-related problems will not cause any data loss when your Touch ID has something wrong. With the assurance of a high success rate, you could utilize this program to liberate your iPad with safety. Additionally, Joyoshare UltFix provides other amazing features – free to enter or exit recovery mode with one click, downgrade/upgrade the iOS system, and reset iPhone/iPad/iPod touch without effort.
- Fix unable to activate Touch ID issue
- Enter/exit recovery mode for free
- Downgrade iOS to the former version
- Compatible with iPhone/iPad/iPod touch/iOS 17/iPadOS 17
Step 1 Plug iPad into Computer
Install and run Joyoshare UltFix, and plug your iPad into a trusted computer. Choose iOS System Repair and click on the Start button.

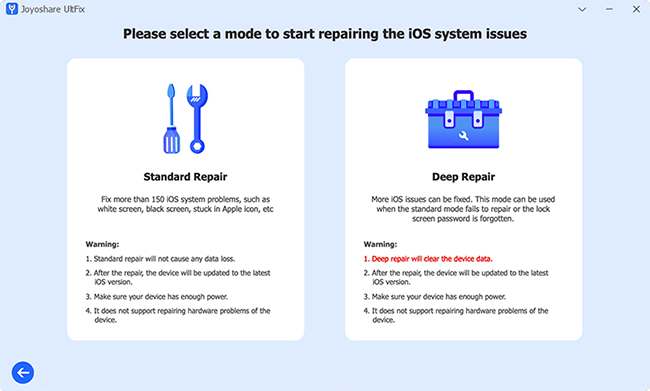
Step 2 Select Standard Repair Mode
Select standard repair and you will be guided to the next step if your iPad is detected successfully. If it fails to be recognized, you will see the instructions telling you how to enter DFU or recovery mode. Do as required, and you could click the right arrow when succeed.
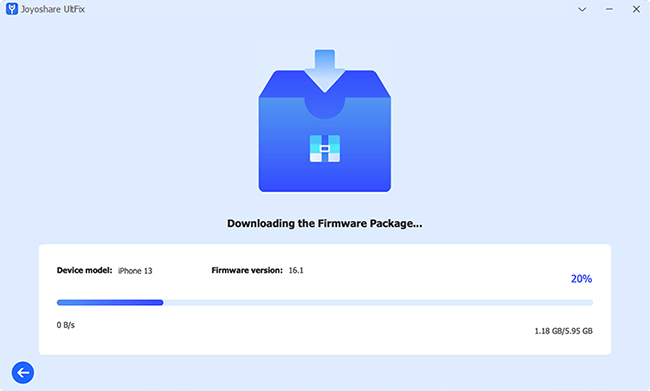
Step 3 Download Firmware Package and Verify It
Click the Download button if you are certain that your device information is correct. Then the firmware package will be downloaded and verified automatically.
Step 4 Fix iPad Touch ID Not Working
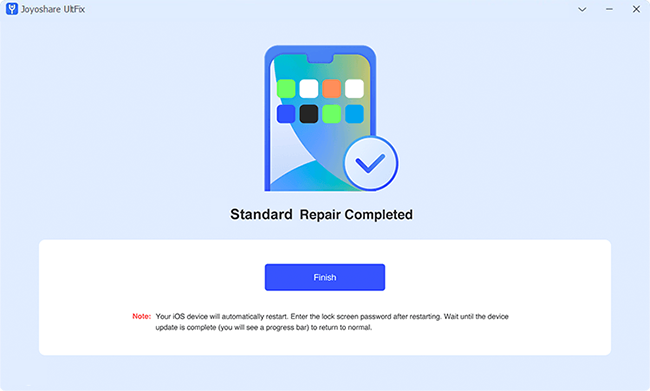
Click the Repair button to start repairing your iPad with an invalid Touch ID. Once you see the Finish button, your iPad will get restarted and the Touch ID is fixed.
Summary
In this article, you can learn in what situations your iPad Touch ID stops working. Depending on your understanding, the subsequent 10 methods can be operated one by one to fix your iPad's malfunction. If you have done all the solutions, your iPad Touch ID not working issue will be eliminated. Particularly, Joyoshare UltFix does well in these kinds of system errors, which guarantees to preserve your data by using standard repair mode. Hope the Touch ID on your iPad would be restored to its normal state.