Q:"My Apple ID shows verification failed how to solve it?" - From Apple Community
The Apple ID Verification Failed issue comes up frequently, accompanied by a prompt indicating "There was a problem connecting to the server". This annoying message usually pops up on your device when you're going to update Apple ID settings, download apps or listen to music. To be sure, if you fail to authenticate your identity and cannot successfully log in to your Apple ID, some Apple services will be unavailable, such as Apple Store, iMessage, iTunes, FaceTime, etc. Therefore, the most urgent thing for you at the moment is to find the causes behind this problem and take feasible measures to quickly fix it. You can follow us in this article to discover more details.

- Part 1. Why Does It Say Verification Failed on Apple ID?
- Part 2. Video Tutorial: Fix Verification Failed Apple ID Unknown Error
- Part 3. 10 Feasible Solutions to Repair Apple ID Verification Failed Issue
- Fix 1. Check System Status Page of Apple
- Fix 2. Check Internet Connection
- Fix 3. Check VPN Connection
- Fix 4. Reset Network Settings
- Fix 5. Update Date & Time
- Fix 6. Use a Professional Apple ID Removal Tool [Hot]
- Fix 7. Sign Out from iCloud, App Store and iTunes, Then Re-login
- Fix 8. Change Apple ID Password
- Fix 9. Force Restart
- Fix 10. Upgrade to the Latest iOS
- Part 4. Summary
Part 1. Why Does It Say Verification Failed on Apple ID?
Apple ID verification may fail for a variety of reasons. If you're forced to stop enjoying some Apple services or using key functions because of an unknown authentication error, checking main causes is necessary.
- 1. Incorrect Credentials Information
- Any information deviation will lead to your Apple ID verification failure, such as input errors or unrealized redundant spaces.
- 2. Unmatched Date and Time
- The date and time on your iOS device should be the same as that on the Cloud's server. Any difference can cause Apple ID validation issue when restoring or making a backup.
- 3. Network Connection Issue
- A strong and stable network connection is required when your iOS device verifies Apple ID. If the network connection is suddenly interrupted, or the WiFi signal is too weak, the verification process cannot proceed as smoothly as usual.
- 4. Apple Server Is Down
- There are something wrong with Apple servers and Apple ID verification service may be temporarily unavailable.
- 5. Problem with Two-Factor Authentication
- If you have enabled two-factor authentication on your device, a verification code will be required to complete Apple ID verification. If you cannot access the trusted devices or cannot get a valid verification code, verification failure can occur.
Part 2. Video Tutorial: Fix Verification Failed Apple ID Unknown Error
How to solve Apple ID verification failed problem? If you are troubled by this issue and want to grasp possible solutions in the shortest time, then this vivid YouTube video is just what you need.
Part 3. 10 Feasible Solutions to Repair Apple ID Verification Failed Issue
In most cases, when faced with the verification failed error on Apple ID, the first thing you want to figure out is the quickest way to make it go away. Here are outlined 10 feasible ways for you and you can follow them one by one.
Fix 1. Check System Status Page of Apple
Check Apple Support System Status Page, and make sure there is a green dot in front of "Apple ID". If there is a yellow or red dot, it is not your problem but the Apple server's. You can give feedback to Apple and wait for it going back to normal status. However, if there is nothing wrong with Apple system server, it will say that "All services are operating normally".

Fix 2. Check Internet Connection
The verification failure is sometimes closely related to your Internet connection. If you are using a Wi-Fi network, check whether your device connects to the router hotspot and whether your Internet router is trusted. If you are on cellular, check if it is active and the Low Data Mode is off. And there is another suggestion – if the Wi-Fi doesn't work, change to mobile data and vice versa. Ensure there is a stable network connection.
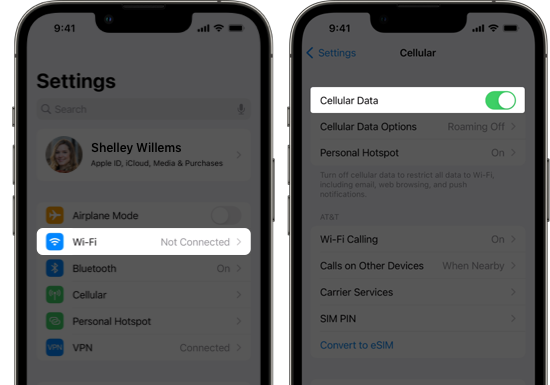
Fix 3. Check VPN Connection
Some of you may be using a VPN, which will hide your device's IP so that the information of your Apple ID cannot be scanned from the Apple server. Therefore, disable your VPN in Settings → General → VPN & Device Management. If you have to enable it, turn it off before logging in with your Apple ID and then you can turn it on.
Fix 4. Reset Network Settings
Resetting network settings can be a good solution to fix the Internet-related issues. This can help restore Wi-Fi, cellular, VPN and APN settings to defaults. If your Apple ID failure in verification stays on your device, try to do this by following steps below:
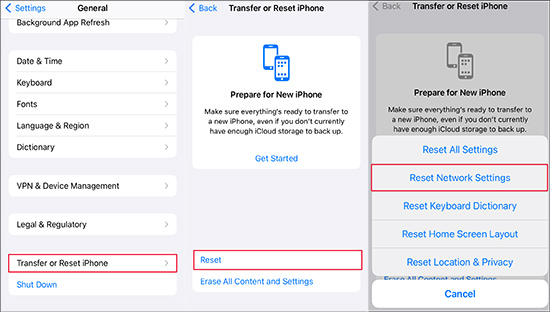
- Step 1: Fire up Settings app on your device and choose General option.
- Step 2: Move to the bottom of the screen and tap on Transfer or Reset iPhone option.
- Step 3: Tap on Reset → Reset Network Settings to restore network to factory status.
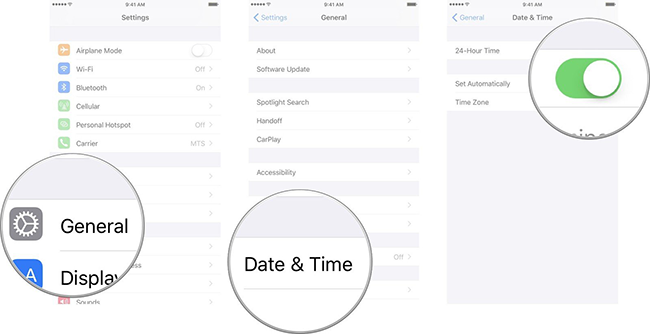
Fix 5. Update Date & Time
Many users in the Apple forums gave feedback, saying that updating Date & Time can effectively solve Apple ID verification failure. This is because the data, time and location set up in your device are different from the Apple server. You can head to Settings → General → Data & Time and enable "Set Automatically". This can make accurate synchronization and fix your issue.
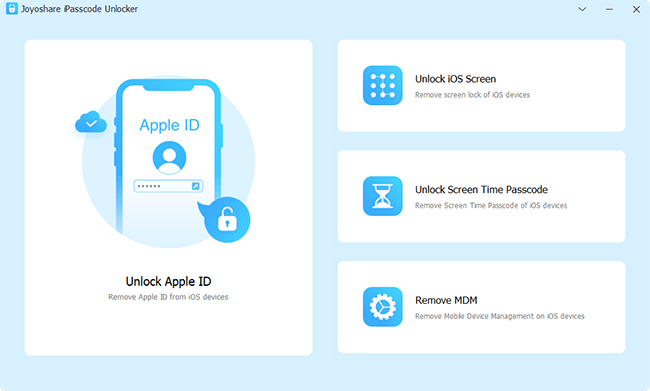
Fix 6. Use a Professional Apple ID Removal Tool
If the basic solutions don't solve your problem, or if you want to skip lengthy progress, you'll prefer an easy way to get you out of Apple ID verification failure. Here Joyoshare iPasscode Unlocker is a professional Apple ID removal tool. It can well tackle various Apple ID related issues, like Apple ID verification keeps popping up, Apple ID does not exist, Apple ID session has timed out for your security, etc. Aside from unlocking Apple ID, it can safely remove screen locks, MDM, and Screen passcode. No matter what kind of device model you are using, your problems will be solved within a few clicks.

- Unlock and remove Apple ID from iPhone/iPad without password
- Bypass MDM and turn off Screen Time passcode without data loss
- Unlock all type of locks, like 6-digit passcode, 4-digit passcode, Touch ID, and Face ID
- Support all models of iOS devices and the latest iOS versions
Here is the tutorial guide of Unlock Apple ID by using Joyoshare iPasscode Unlocker, so that you can resolve the Apple ID verification failure.
Step 1Connect Device to Computer
Please plug your iOS device into your computer, and launch the program. On the main interface, choose Unlock Apple ID feature and click the Start button to begin your operation.

Step 2 Check Connected Device Status
If you have turned off Find My feature and your connected device is running an iOS version that's earlier than iOS 14, Joyoshare iPasscode Unlocker can unlock Apple ID directly. Furthermore, it won't cause any data loss.
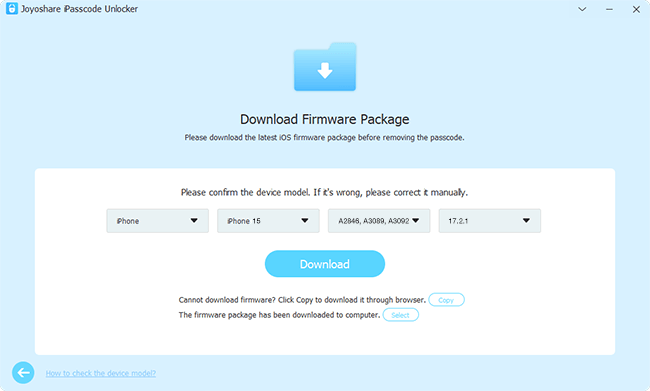
If Find My feature is disabled while the iOS version is iOS 14 or higher, you will come to the download interface. Your device model will be automatically scanned and the corresponding firmware package will be matched as well. After confirming the information, simply click the "Download" button.
Step 3Unlock Apple ID to Bypass Verification Failed Error
As the firmware package downloading finishes, click on "Unlock" to start removing your Apple ID. Once your Apple ID is unlocked, your device will be restarted. Therefore, the Apple ID verification failed error is fixed.

Fix 7. Sign Out from iCloud, App Store and iTunes, Then Re-login
Try to sign out from iCloud, App Store and iTunes, then re-login. This will reconnect your device to the Apple server so that the Apple ID verification failed error could disappear. But remember to disable the Two-Factor Authentication in Security settings before you sign out.
Fix 8. Change Apple ID Password
Since Apple ID is pretty crucial to users, Apple sets strict regulations for your security. Therefore, the failed verification of Apple ID occurs because of its new password policy. And resetting your Apple ID's password is a possible solution to help you get your Apple ID back.
Fix 9. Force Restart
So many checks and settings do not change the situation. It's time to give your device a new start. If your Apple ID verification failing clears after a force restart, it is necessary to do all the steps mentioned above to avoid the problem happening again.

| Models | How to force restart |
|---|---|
| iPhone 8 and later | Press Volume Up quickly → Press Volume Down quickly → Hold Side button and release it until the Apple logo appears |
| iPhone 7 or 7 Plus | Hold Volume Down and Sleep/Wake buttons → Release when the Apple logo appears |
| iPhone 6, 6s Plus, or iPhone SE (1st Generation) | Hold Sleep/Wake and Home buttons → Release when the Apple logo appears |
Fix 10. Upgrade to the Latest iOS
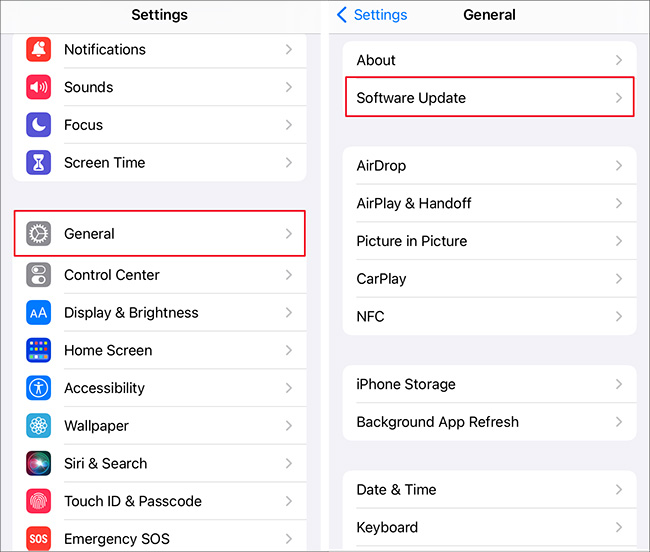
Maybe there is a bug with Apple ID in the older iOS version, and Apple repairs it and releases a new version. Or, some old functions of Apple ID in the previous version terminate their operation. Thus, you can upgrade to the latest iOS version, and your problem could be fixed. Simply go to iPhone → Settings → General → Software Update to download and install the available iOS version.
Part 4. Summary
Apple ID is pretty important to all iOS users. Without it, your iPhone, iPad and iPod touch will merely play a minor role in your daily life. If you fall into the Apple ID verification failed trap accidentally, this article provides many feasible solutions for you to try. Joyoshare iPasscode Unlocker will prevent you from endless checking processes, and recover your Apple ID without data loss. Regardless of your device model and iOS version, it shows a high success rate in Apple ID verification failed issues. After trying these methods, it is hoped that your Apple ID will be restored to its normal state.