No installation, immediate use, freeware, simple-to-operate media player and quality screen recorder, all of these advantages combine together to make QuickTime enjoy such a high reputation and popularity among Mac users. However, it's not as perfect as you might think and sometimes possibly gets into errors. Aside from the frequently-asked QuickTime screen recording not working, recent "can't stop screen recording" issue has also been reported often. To solve it soon and improve your recording experience, we're here to show different ways to stop QuickTime screen recording with great ease.

- Part 1. Stop Screen Recording with Keyboard
- Part 2. Quit QuickTime on Dock
- Part 3. Force Quit QuickTime Application
- Part 4. End Screen Recording in Activity Monitor
- Part 5. Use QuickTime Alternative to Record on Mac
Part 1. Stop Screen Recording in QuickTime with Keyboard
The easiest and most straightforward way to stop a recording assignment in QuickTime on your Mac is to click on the Stop button in the recording toolbar or top menu bar. However, if you cannot find your Stop button under normal recording conditions, you have to use keyboard to end screen recording.
- Method 1: press "Esc" key on keyboard to call out recording bar and find Stop button to stop recording with a quick click.
- Method 2: simultaneously press "Ctrl + Command + Esc" keys to stop a screen recording right away.
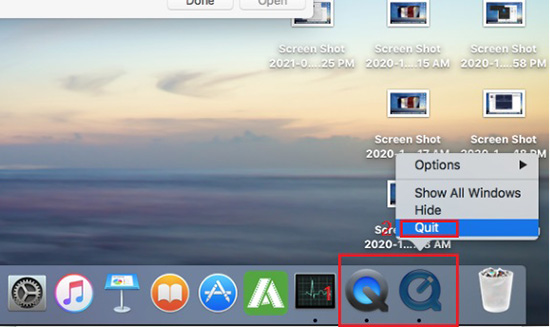
Part 2. Quit QuickTime on Dock
There is a Dock menu at the bottom of your Mac computer that puts all running programs with small icons in a row. If you don't know how to stop screen recording in QuickTime, you can find its icon, right-click on it, and simply choose "Quit" option to close this application. It's worth noting that you can also activate the "Force Quit" option within this same Dock menu. To do it, similarly right-click on the QuickTime icon from Dock, then hold down the "Option" key to change "Quit" option to "Force Quit". You can now click on it to forcibly quit the program.
Part 3. Force Quit QuickTime Application
Chances are your QuickTime program keeps freezing or the Stop button doesn't work as normal. In this case, to avoid unlimited screen recording and too much space to occupy, you have to force quit the application. This can be done with different operations, which however, will not save your recording after completely end QuickTime.
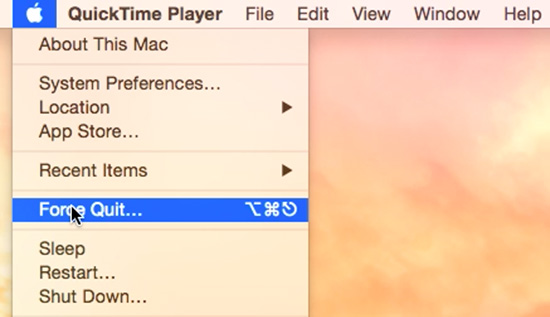
- Method 1: on the Mac computer, go ahead to Apple menu in the upper left corner and choose "Force Quit" option. In the pop-up "Force Quit Application" window, select "QuickTime Player" application and then click on the button of "Force Quit" to forcibly close it.
- Method 2: It's alternative to press "Command + Option + Esc" keys at the same time to bring up "Force Quit Application" window. You can see an application list that includes QuickTime Player. Find to click it and use "Force Quit" to stop screen recording and close QuickTime program.
Part 4. How to Stop QuickTime Screen Recording in Activity Monitor
Just as Windows provides a Task Manager, Mac has its own Activity Monitor to show all background applications and display detailed running information. As a result, you can conveniently find your QuickTime here and quit it to terminate the process. The operation is fairly simple and you can follow steps as below:
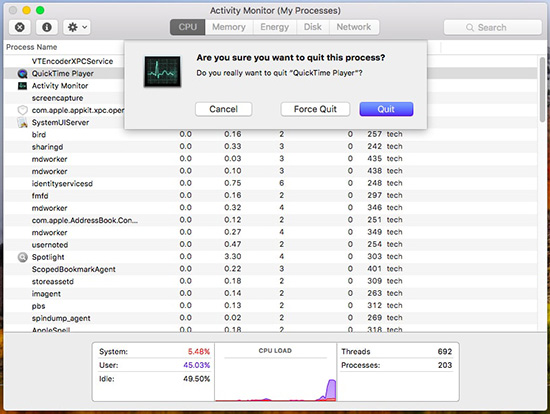
- Step 1: Go forward to Finder → Applications → Utilities on Mac and choose "Activity Monitor". Or you can search Activity Monitor with Spotlight Search tool.
- Step 2: Have a close check in the list and select QuickTime Player. Click on "Quit" option to stop its running and remove from Activity Monitor. Your screen recording will end as well.
Part 5. Best QuickTime Alternative to Record Screen on Mac
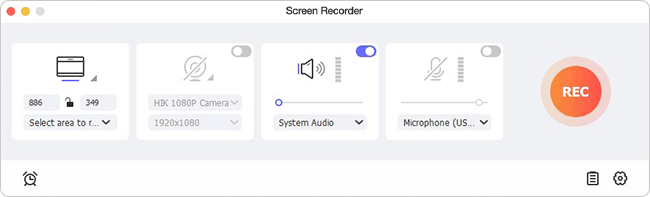
Although stopping screen recording in QuickTime can be solved with different ways, it still leaves our recorded files unsaved in most cases, which is unavoidable but frustrating. Therefore, applying an alternative to QuickTime is suggested and here we can give Joyoshare VidiKit - Screen Recorder a try. It carries out screen recording as assigned, captures audio from system and microphone simultaneously or independently. The resolution it supports can be high, up to 1080p/4K. Beyond that, we can use it to schedule task, select recording area, highlight cursor, and more.

- Record screen on Mac with unlimited time length
- Switch sound sources to record audio from microphone or/and system
- Support full screen recording and partial screen recording
- Output files to nearly all formats you want and allow parameter customization
- With toolbar and shortcuts to trim video, take snapshots, pause to skip content
Step 1 Run Screen Recorder in VidiKit on Mac
Get the newest compatible version of Joyoshare VidiKit for Mac on your computer. Quickly finish installation and launch. You can see a toolkit and choose it "Screen Recorder" to open. In the main interface, confirm that you are under the camera-shaped "Record video and audio" mode.
Step 2 Check Recording Settings
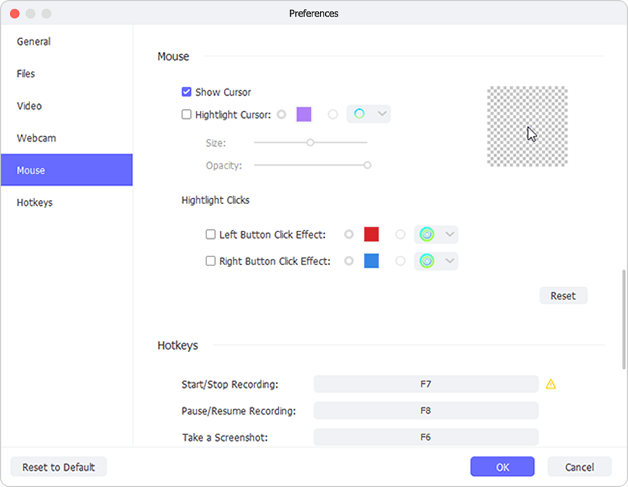
Click on the system audio and microphone sound buttons to enable and disable them. You can also change sound source and adjust the volume. Besides, don't miss more "Options" on the bottom right, which looks like a gear icon. Move your mouse to check what this program offers one by one, such as change file location, format settings, customize shortcuts, add watermark, specify recording time and show cursor.
Step 3Select Capture Area
You're entitled to decide where to record video and how large the screen is. To do it, simply go for Capture Area in this screen recorder. It's available to hit the "+" button and manually draw a recording region. Or you can directly preset both width and height. Surely, a systematic drop-down list with standard ratios is provided here.
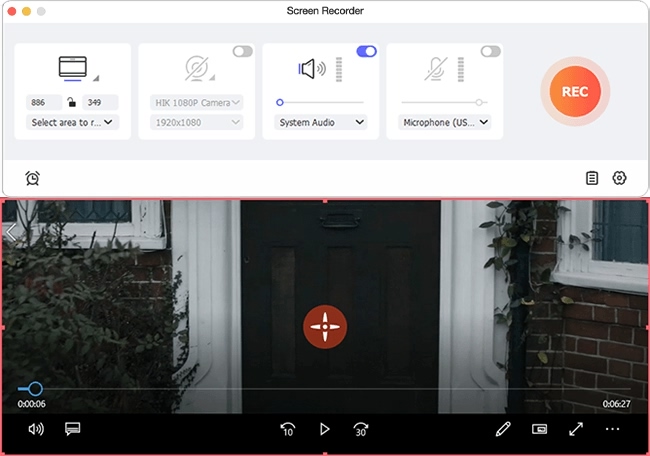
Step 4Begin to Record Mac Screen
A countdown with 3 seconds will show after you click on the REC button in this program. When the recording starts, you can see a toolbar with some buttons to pause, cut and stop. If you'd like to keep a wanted frame, handily use the shortcut you customized before.

Step 5Stop Recording
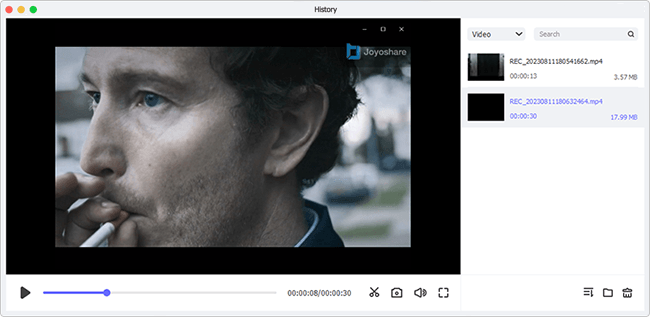
The recording can come to end when you click on the Stop button. Soon after, a window called History will be shown in your sight that allows you to preview, edit and rename files without hassle.
The Bottom Line
You can stop QuickTime screen recording using 4 best ways we mentioned above. Please note that you can use keyboard to end it and save your recordings. However, to quit or force quit QuickTime Player on Dock, Activity Monitor and the like, what you record will not be saved. Therefore, it's better to find a simple yet professional alternative to QuickTime, such as Joyoshare VidiKit, so that you can record kinds of activities on Mac without errors and lag.
