QuickTime Player is a Mac built-in program that enables you to edit, record, play, and share audio and video files. Many iOS folks prefer to record their screens using QuickTime Player. However, QuickTime screen recording does not always function on Mac. Sometimes, due to various problems, you will be unable to record the screens of your Mac, iPad, iPhone with QuickTime. Thus, in this article, we'll teach you how to fix those QuickTime screen recording not working issues and how to utilize QuickTime to record screens on a Mac step by step. Please read over these problems and remedies one by one to swiftly resolve your QuickTime problems.

- What Caused QuickTime Screen Recording Not Working?
- 5 Tips to Fix QuickTime Can't Record
- Record Screen on Mac Using QuickTime
- Use an Alternate - Joyoshare VidiKit to Record
What Caused QuickTime Screen Recording Not Working?
The following are some of the most common reasons why QuickTime screen recording is not working.
- The software is out of date
- An issue with the disk permission
- Screen recorder Plist issuing problem with file storage
- QuickTime stuck on the finishing process
- Problem with QuickTime settings itself
Part 2. How to Fix QuickTime Screen Recording Not Working?
There's a solution to every problem, and the same is the case with QuickTime. Now that we know the problems that lead to QuickTime player screen recording not working properly, we will look into how you can fix those problems.
Tips 1. Software Update on Mac
The first action you can take is if QuickTime isn't functioning on your Mac, you need to upgrade your software immediately. You can follow the steps below to update software.
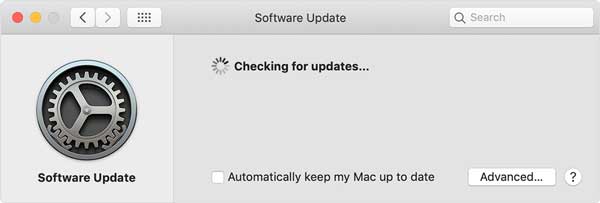
- Step 1: Select Software Update from the Apple menu, then System Preferences.
- Step 2: Select the Update Now option and download it according to the displayed instructions if an update option is available.
- Step 3: Allow the procedure to complete, restart your laptop or computer, and reopen your QuickTime recordings.
Tips 2. Delete Screen Recorder Plist File from Library on Mac
Alternatively, reboot your Mac and inspect it to ensure that it is fully functional. Follow the steps below to delete Screen Recorder plist file from Library on Mac.
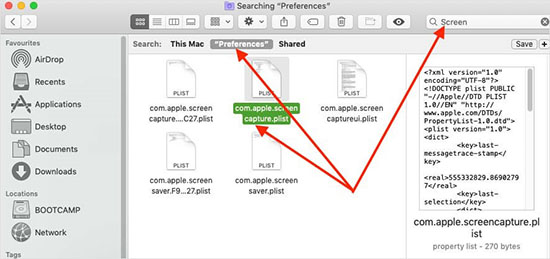
- Step 1: On your Mac, click Finder, go to the main menu, and select Go - Folder from the drop-down menu.
- Step 2: Tap on the Go option to search /Library/Preferences.
- Step 3: Using the Search box, locate the Screen file, choose Folder Directory, and quickly locate your find.
- Step 4: Copy and Save this file to a different folder or location as a backup.
- Step 5: Remove this file from your Library folder. Check whether or not screen recording works right now.
Tips 3. Repair Disk Permission
Another option to fix screen recording not working in QuickTime is to repair your disk permission. You can do that by implementing the steps shown below:
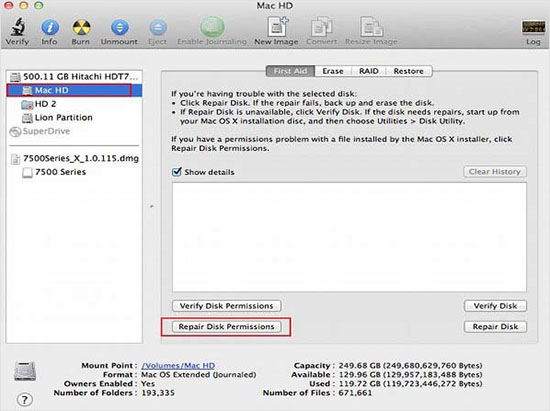
- Step 1: Go to the Disk Utility program if you get the message that QuickTime Player terminated suddenly while it isn't operating.
- Step 2: Choose your boot volume, which contains the operating system and pre-installed applications.
- Step 3: Select the Repair Disk Permissions button under the First Aid menu on the right-hand side. Now, you should sit back and wait for it to complete.
- Step 4: Reload QuickTime and try it all again.
Tips 4. Open Terminal and Find Finished Videos
It is necessary to retrieve the recorded file even though QuickTime abruptly stops operating and becomes stuck in completing. Follow the simple steps outlined below.
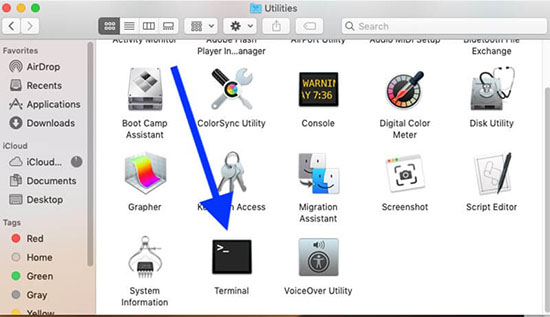
- Step 1: Access Utilities by going to the Applications folder. Double-click on Terminal after searching for it.
- Step 2: Hit the Enter key on your laptop.
- Step 3: Make a note of the program ID for your QuickTime. Press Enter after switching to Terminal and typing sudo kill process ID.
- Step 4: Locate the screen recording from the previous step.
Tips 5. Set-up QuickTime Properly to Fix QuickTime Cannot Record
If you believe your QuickTime software simply isn't operating correctly, it's better to re-do all the settings to fix the issues once and for all. Here's how you can do it:
- Step 1: When mirroring an iPhone to a Mac, keep in a few things. If QuickTime isn't working, turn off all of your devices. After that, connect them and launch QuickTime.
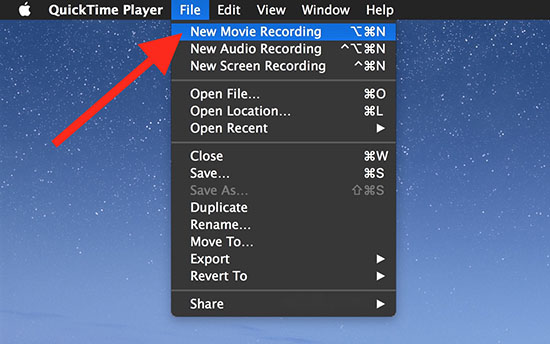
- Step 2: Choose New Movie Recording from the File menu. The New Screen Recording captures everything that happens on your display.
- Step 3: To access the context menu, select the Arrow symbol and pick iPhone under Camera and Microphone. Adjust the Quality and other parameters after that.
- Step 4: Then press the Record button, and QuickTime will function properly.
Part 3. How to Record Screen on Mac Using QuickTime?
With this built-in screen recorder, you can play and create ample media and enhance your recording easily. The best way to record screen on Mac using QuickTime is shown in these steps below:
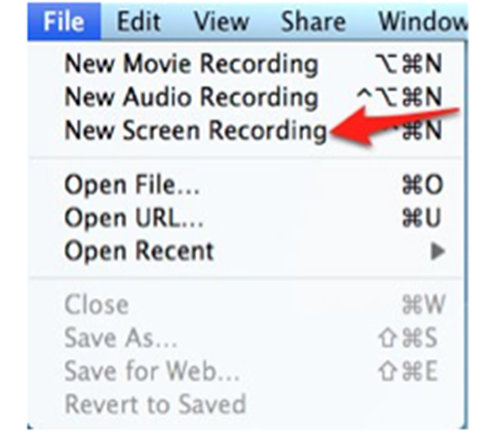
- Step 1: Launch QuickTime software on your Mac computer. Select File - New Screen Recording from the menu bar.
- Step 2: Choose microphone and pointer from the drop-down menu to the right of the recording button. Run the program you wish to record the display of.
- Step 3: To capture the entire screen, simply press the screen or draw a box around the area you wish to record.
- Step 4: Start your screen recording by pressing the record button on your computer (including your voice). Once you're done recording, go to the Menu taskbar to click the stop button.
- Step 5: QuickTime will show the screen recording footage when it has been processed. You can save and export the video later.
Part 4. Use an Alternate - Joyoshare VidiKit to Record
Joyoshare VidiKit - Screen Recorder, one of the easiest and best applications for seamlessly recording screen and audio on Mac and PC, is the magical recording option we suggest. This fantastic utility uses the most modern screen recording technology to capture any video and audio activities on the desktop computer in high definition. As complete as it is, online recording conversation, webinars, tutorials, live-streaming videos, games, and more is a breeze. It lets you select which audio tracks to record, including system and microphone audio.

- Customize shortcuts and watermark based on your need
- Dual mode to record your computer
- Provide resolution, sample rate options list
- Function to show and highlight your clicks and cursor
- Record video from website, program and more
Step 1Run Joyoshare VidiKit on Computer
After downloading and launching the screen recorder, select Record - Screen Recorder to open this tool and get ready on Record video and audio mode.

Step 2Customize Relevant Settings
On the left side, beneath Capture Area, click the Plus button. You'll notice a pop-up box where you can select the screen size you want to record from. To even further modify the screen recording, locate and press the gear icon. You may alter the output format, plan a function, add a watermark, and highlight the pointer, among other things.

Step 3Start Recording and Save Videos
By pressing the blue REC button, you may start capturing screen and audio. You may capture screenshots, trim movies, stop and skip anything that you don't want to see during the filming. You can also examine all recordings in the History window following capturing your computer screen and synchronized audio.

Conclusion
The article discussed how to resolve the issue when QuickTime screen recording not working on Mac. If the issue continues after you've tried the typical troubleshooting steps, you should try a substitute to QuickTime, such as Joyoshare VidiKit - Screen Recorder. It's not only simple to use, but it also operates on Mac and Windows. It has many advanced functions. We are hopeful you will be able to solve your QuickTime not working issue after implementing one of the solutions recommended here. Good luck!
