Whether creating tutorial videos, broadcasting a live video game, having an online meeting, or documenting new things learned, we sometimes need to record our computer or mobile screen and audio together. Recording a video and audio will always ensure that no point or comment is missing, and the video will be lively to watch again. This article will walk you down on apps to screen record with microphone on Windows, Mac, iPhone, and iPad. Keep reading to know how to do that easily.
- Part 1. Capture Screen with Microphone on Windows
- Part 2. Capture Screen with Microphone on Mac
- Part 3. Capture Screen with Microphone on iPhone/iPad
Part 1. How to Record Screen with Microphone on Windows
Follow these steps to screen record with a microphone on Windows. You will need to download the corresponding app to enjoy this tutorial.
Joyoshare VidiKit
Joyoshare VidiKit - Screen Recorder is an amazing screen recorder tool that allows users to record videos and audio in many formats like 4K video, HD video, MP4, AVI, and more. Users can also record Windows screen in 1080p 60FPS without any hiccups and specify multiple parameters like quality, codec, sample rate, bitrate, resolution, and more to enhance the video. Also, customizing the output destination makes it easy for you to choose the desired folder to store exported 4K videos. To know how to record screen on Windows 10 with microphone in a few clicks, you can scroll down and keep reading.

- Record screen video with audio or without audio on PC/Mac easily
- Customize microphone volume according to your need
- Add information about audio to video by customizing ID3 tag with "record audio" mode
- Change channel, codec, quality, resolution, sample rate, and more
- Compatible with a majority of formats like AVI, MP4, MKV, MOV, WMV, etc.
- Step 1: Install and Run Joyoshare VidiKit for Windows
- To get started, you should download Joyoshare VidiKit from the authority website. Launch this screen recorder, choose Record - Screen Recorder and the following window will popup. Select Record video and audio mode, click the inverted triangle button underneath the mic icon and choose Microphone to capture screen with your microphone.
- Step 2: Customize Recording Settings
- In the bottom right corner, choose the "Options" icon to change the recording settings before recording the screen. You can change the cursor pointer, add a watermark, create a schedule recording task, and other options based on your needs.
- Step 3: Select Recording Area
- To start recording, click the "+" button in the Capture Area tab. You may then change the recording window to match your needs, either for a full screen or a custom recording size. You may also use the drop-down menu to select a specific recording window size, such as 320x240, 640x480, and so on.
- Step 4: Start Recording Screen with Microphone and Edit It
- Open the app that you want to record the video from. Then hit the REC button to start recording. At any time throughout the recording, you can take a screenshot by clicking the scissor button. To stop the recording, use the "Stop" sign beside the Pause button. Find all recorded videos in the History window. You can make any changes to the video title.


PowerPoint
If you are looking for a faster way to record screen with microphone on Windows and probably add to your presentation, PowerPoint screen recorder should be your go-to recorder. With PowerPoint screen recorder, you can record your screen video and audio, and even hear what you record. Before starting, you will need a microphone, speakers, and an audio card. Here is how to record your screen with microphone on PowerPoint.
- Step 1: Design your presentation.
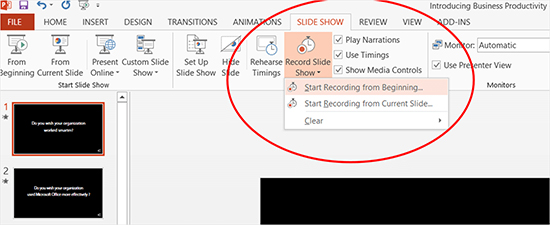
- Step 2: Click the Slide Show tab - Record Slide Show. Audio will automatically record with the video.
- Step 3: Depending on the slide you want to start recording from, select "Start Recording from Beginning" or "Start Recording from Current Slide".
- Step 4: Click the Start Recording button. PowerPoint will give a three-second countdown before it starts recording.
- Step 5: Click the Stop Recording icon to end the recordings. Use the Esc key or "X" button located at the top right of the screen to close all recordings.
- Step 6: Save the audio recordings by clicking File - Save As. Save the file as a regular PowerPoint document before exporting to other apps.
- Also Read:
- How to record PowerPoint presentation with audio
- How to fix PowerPoint not recording audio
Part 2. Tips to Screen Record with Microphone on Mac
Follow these steps to know how to screen record with a microphone on Mac. You will need to download the corresponding app to enjoy this tutorial.
QuickTime
You can use QuickTime Player, an Apple pre-installed player, to record, play, edit, and share audio files. With QuickTime, users can record and edit easily at any time from anywhere. Here is how to record your screen with microphone by using QuickTime.
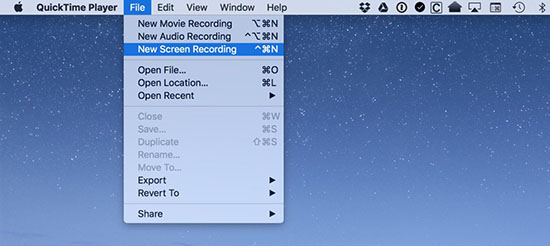
- Step 1: Open the QuickTime app. Click File - New Screen Recording.
- Step 2: Select the microphone and cursor option using the down arrow to the right of the record button.
- Step 3: Open the app you want to screen record. Click the red button to start recording. This will start the screen recording process.
- Step 4: Click on the stop button after you finish recording. QuickTime will show the recorded video.
- Step 5: Save or export the recorded screen video.
EaseUS RecExperts
Recording screen with microphone has been made easy with EaseUS RecExperts. With this recorder, users can record video with audio in 4K and 1080p in addition to built-in tools to edit the recordings. Here is how to record screen with microphone by using EaseUS RecExperts.
- Step 1: Install and run EaseUS RecExperts on your Mac.
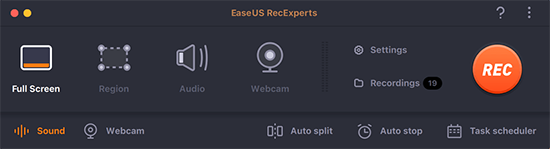
- Step 2: Select the Sound icon from the toolbar's bottom-left corner to record the screen with audio.
- Step 3: From the main interface, select "Settings" to modify the output format of the recorded video before recording.
- Step 4: Click the REC button to start recording when you're finished. Click the Stop button after you're finished.
Part 3. How to Screen Record with Microphone on iPhone/iPad
TechSmith Capture
TechSmith Capture is one of the amazing iPhone/iPad screen recorder apps. With TechSmith Capture, users can record screen, use camera, and still record audio at the same time. You need to download TechSmith Capture and follow these steps.
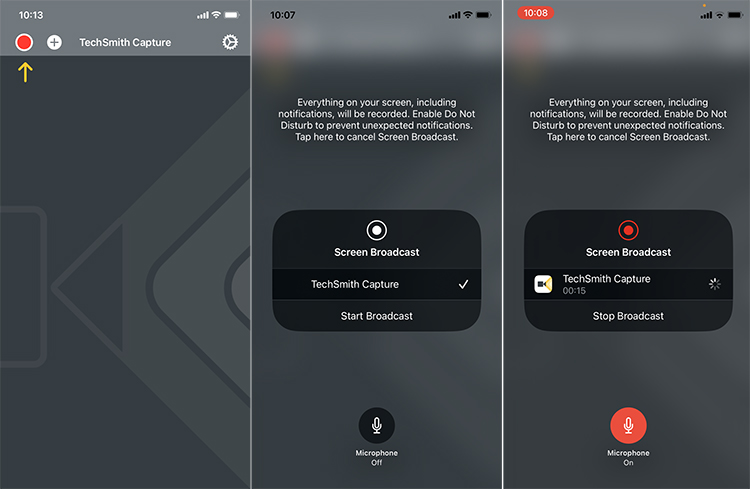
- Step 1: Go to your device Settings - Control Center. Scroll down and tap the + next to the Screen Recording.
- Step 2: Swipe down from the top of your screen and touch Screen Recording. Select TechSmith Capture. Tap the microphone audio button.
- Step 3: Tap the start broadcast icon to start recording. Close the Control Center and open what you want to record. To stop the recording, tap the red status bar at the top of the screen to finish the recording process. Your recording is saved automatically.
Built-in Screen Recorder
Users can also record directly from iPhone/iPad. Although the sound quality is not as great as using third-party apps, users can still record their screen and audio as they wish with just a few steps. Here's how to screen record on iPad with microphone.
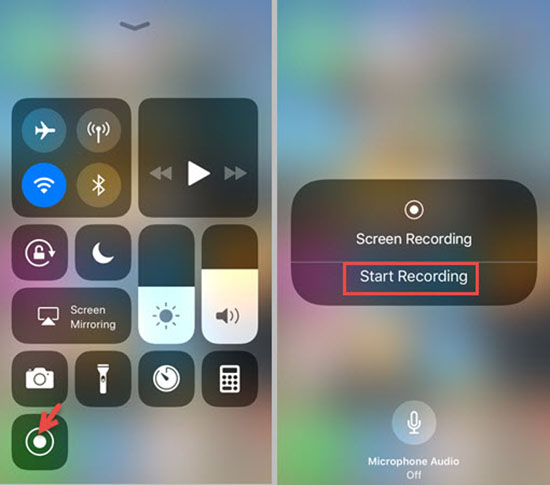
- Step 1: Go to Settings - Control Center on your iPhone/iPad, then tap the "+" button next to Screen Recording.
- Step 2: Open the menu by swiping down from the top of your screen and touch the Screen Recording button. After a 3-second countdown, the screen begins recording (the status bar turns red).
- Step 3: Hit the red status bar at the top of your screen to stop recording. Alternatively, you can reopen the Control Center and touch the (red) recording button.
Conclusion:
It's a wrap! If you read from the beginning, you will know how to screen record with microphone on Windows, Mac, iPhone, and iPad with 6 meaningful solutions. To export a 4K recording and edit your recorded video with built-in tools, Joyoshare VidiKit is the best screen recorder for you to choose from as it is featured with a multitude of functions. Not only is this knowledge useful to you, but some other people will also definitely need this information, so please share this article.
