With the popularization of electronic communication devices and the rapid development of the information age, most of us seem to be addicted to our mobile phone, so is the iPhone. Actually, no matter what you do with your phone, mastering the screen recording function and utilizing it tactfully can help you a lot, like saving a live stream, capturing a game you're playing, creating tutorials for sharing or making a video to upload on TikTok. If you'd like to go through the whole process on how to screen record iPhone, don't miss complete guide here.
- Part 1. Turn on Screen Recording
- Part 2. Record Your iPhone Screen
- Part 3. Save and Edit Recorded Video
Part 1. How to Enable Screen Recording on iPhone
Apple has developed screen recording as an in-built function on iPhone, which however, doesn't display in the Control Center by default. For those who have an iPhone 8 or the earlier, you can check it by swiping up from the bottom of your screen (or swiping down if you have an iPhone X or the later) to call out Control Center. If no recording-shaped icon is added out there, it means that it is not activated. You can follow steps below to turn it on.
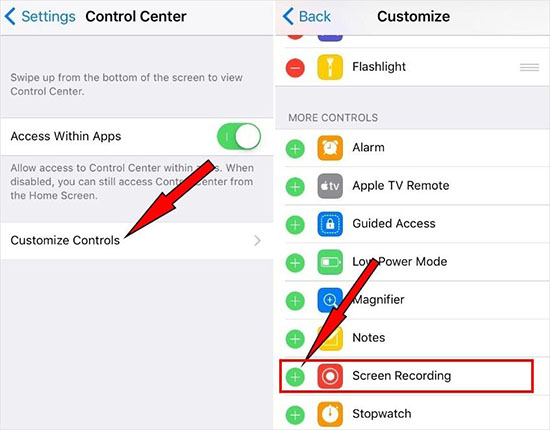
Step 1: Open "Settings" on your iPhone, click to enter "Control Center" and then tap on "Customize Controls";
Step 2: To add and organize additional controls for further appearing in iPhone's Control Center, you should press on the green "+" button in front of "Screen Recording" under "More Controls" section. Soon, it will be moved to the "Include" section above it.
Step 3: Go back to the home screen on iPhone and access to the Control Center again. You'll see the recording control show there.
Part 2. How to Screen Record iPhone
Now, you're able to make preparations for what you're going to record on iPhone. Before recording, you're suggested to enable "Do Not Disturb" by clicking on the moon-shaped button in Control Center. It can silence your iPhone's calls and notifications, so you don't get a sudden interruption during on-screen recording. This fuss-free function allows you to temporarily avoid being disturbed for 1 hour, until tomorrow morning or other scheduled time. Afterward, you can screen record on iPhone step by step.
Step 1: Get your target website or application launched on iPhone screen first.
Step 2: Go into the Control Center by swiping down with your finger on iPhone X and the later (or similarly swiping up on iPhone 8 and the earlier).
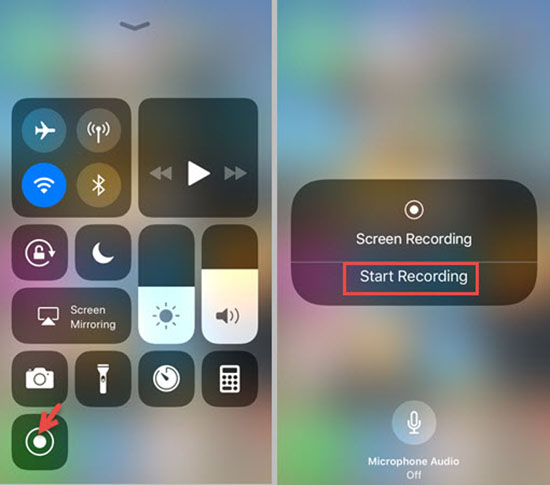
Step 3: To confirm and enable audio setting, you have to find, press and hold the Screen Recording button. In the pop-up screen, simply tap on the microphone to turn it on. This easily helps you capture sounds outside iPhone, including your own voice and those from your surroundings.
Step 4: Having activated microphone, click on "Start Recording". After 3-second countdown, iPhone will begin record screen with both internal and external audios. It's available to close and hide the Control Center menu.
Step 5: Once you get desired content recorded on iPhone screen, you can stop recording by accessing Control Center and hitting the recording button again. If there is a running media, like YouTube, on the screen, you can alternatively click on the top red bar or red time indicator at the top left to end your recording process with "Stop" button.
Part 3. How to Edit iPhone Screen Recordings
By default, when you stop recording, you will get a message, showing that "Screen recording video saved to Photos". Therefore, head to Photos app on iPhone and you can edit or share the completed video in the way you like. Here are detailed steps for you to check.
Step 1: Find and open your recorded video on Photos app;
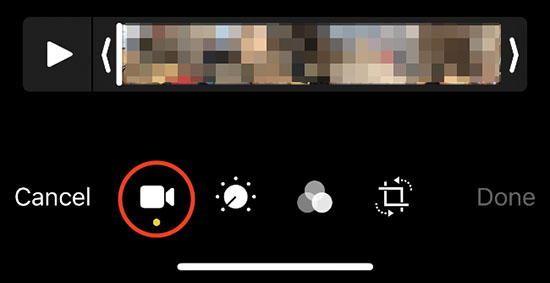
Step 2: Click the "Edit" option;
Step 3: Under "Video", you can press audio icon to mute it, or drag the yellow sliders to trim and shorten your video;
Step 4: Under "Adjust", you can change exposure, highlights, shadows, contrast, brightness, black point, saturation, vibrance, warmth, tint, sharpness, definition, noise reduction and vignette;
Step 5: You can additionally add filter or crop video to save a partial region of it;
Step 6: Click on "Done" and you can "Save Video as New Clip" or "Save Video". Then share it if you want.
- Screen record on Mac and PC with optimal quality
- Capture internal system audio and external microphone sound
- Support high resolution and frame rate in 1080p 60 FPS
- Offer unlimited recording duration and create videos no lag
- Schedule recording, add cursor and click effects, trim, take snapshots, etc.
