Q:"How do I record a Webex recording?"
Webex, a celebrated web meeting and video conference application that enjoys high popularity, is devoted itself to providing individuals as well as enterprises with the best web meeting and video conference service. By means of it, you can readily hold meetings, conduct negotiations and make deals in an elastic manner without region restriction. However, when you initiate a Webex meeting, a notable thing is to keep a complete record for the whole process in case some details are missed at a later time. Now you might wonder how to record Webex meeting without hassle. Just refer to what we share here.
- Part 1. Record a Webex Meeting - Webex Built-in Recorder
- Part 2. Record a Webex Meeting - Joyoshare Screen Recorder
- Part 3. Record a Webex Meeting - Apowersoft Free Online Screen Recorder
1. How Does Webex Record Meeting? Built-in Recorder!
As is often the case, not everyone is willing to download third-party program on computer. It doesn't matter. You can directly record Webex meeting locally without software installation using its built-in recording function. Nevertheless, you should keep in mind that only host and an alternate host have right to record a Webex meeting. Meanwhile, only the presenter's voice can be grabbed in the recording.
Step 1: Start a Webex meeting;
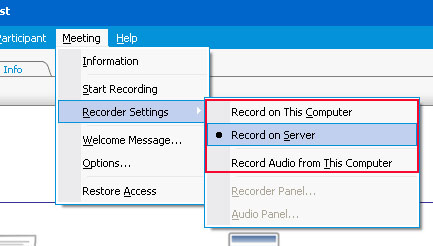
Step 2: Navigate to Meeting > Recorder Settings > Record on This Computer;
Step 3: Go back to the main Webex meeting interface and click "Record" button to record meeting in Webex;
Step 4: Once the meeting is over in Webex, stop recording, choose storage location and hit "Save" option to export it.
2. How to Record Webex Meeting: Joyoshare Screen Recorder
Joyoshare Screen Recorder is such an outstanding tool to offer you a one-stop solution to capture Webex meeting videos with related audio in perfect synchronization. Other than that, it skips any needless parts, like discussion or dispute section during the meeting. According to the meeting content, you're able to cut your recording to different segments.
This excellent software can really have high performance in what it does. To match your expectation, it records meetings from not only Webex but also Microsoft Teams, Zoom, Skype, GoToMeeting and more. Thanks to its broad compatibility, you can save your recording to a wide range of popular formats and portable devices, like ASF, MOV, M4V, MP4, WMV, MKV, AVI, FLV, F4V, SWF, MP3, AAC, iPhone, Android, Xbox 360, smart TV, etc.
Key Features of Joyoshare Screen Recorder:
Record Webex meeting without time limit and watermark
Support multiple widely-used formats and devices
Skip any needless sections during recording process
Cut recording and take screenshots quickly
Make task-creating and configuration-customizing possible
Record webinar, radio station, video call, etc.

Step 1Run Joyoshare and choose recording mode
Simply launch a downloaded Joyoshare Screen Recorder on your computer and go forward to opt for "Record video and audio" mode next to the red "REC" button.

Step 2Confirm recording settings
Next, go to press the gear "Options" icon at the lower right corner to bring up all accessible settings. To record Webex meeting with audio, you should turn on system audio & microphone sound. Then continue to decide storage location, output format, required shortcuts, cursor effects, etc. If you'd like to specify configuration info, hit the "Format" panel to customize resolution, codec, channel, bit rate, etc. in the way you like.

Step 3Begin to record Webex meeting
Now open Webex and clickthe "+" icon under Capture Area to set a pop-up adjustable window or directly choose a preset fixed ratio from drop-down menu. Click the "REC" button in Joyoshare when you get started to have a meeting. There is 3 seconds countdown provided to re-adjust previous selected capturing area, after which your recording task will be executed officially. During that, you can hit the "Pause" button to skip any unwanted sections, click the "scissors" icon to cut the ongoing recording or take snapshots as per actual needs.

Step 4Manage captured Webex meeting
The "History" window will appear soon as long as you end the recording process. With it, you can preview a recorded Webex meeting, change file name, trim unnecessary content and browse local recording.
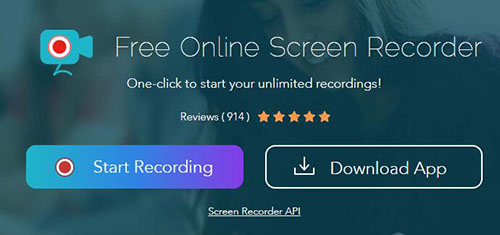
3. Record Webex Meeting: Apowersoft Free Online Screen Recorder
Because of the convenience Apowersoft Free Online Screen Recorder brings to users, it's highly used to capture a meeting from Webex. By means of it, you are handy to change mouse style, audio quality and output format. Also, it's useful to customize codec, frame rate and bitrate before your recording.
- Pros:
- With quick access to record meetings from Webex
- Adjust audio quality and video settings
- Output recordings to different formats
- Cons:
- Require downloading a launcher first to activate the online app
- Guide:
- Step 1: Visit Apowersoft Free Online Screen Recorder and click "Start Recording";
- Step 2: Set options and configurations in its pop-up window;
- Step 3: Open your Webex, initiate a meeting, choose a recording area and click "REC" to begin capturing;
- Step 4: When your Webex meeting comes to end, you can simply press on the pause button to save it.
