Do you ever wonder how to record a certain part of your screen? Perhaps you're a businessperson who has to record your screen for a conference, a software engineer creating a how-to video, or someone who wants to share something entertaining on YouTube. Built-in capabilities in Windows & macOS enable you to record your on-screen activity. Still, there are numerous third-party screen-capture tools that you can utilize to record part of screen. They offer plenty of customizable features while you record. Therefore, this article will introduce you to these recorders and provide a step-by-step guide to make it easier for you!
- Part 1. Record a Specific Part of Screen on Windows
- Part 2. Record a Part of Screen on Mac
- Part 3. Conclusion
Part 1. Record Part of Screen on Windows
Joyoshare VidiKit
Joyoshare VidiKit - Screen Recorder is an impressive and simple-to-use program. This one-stop shop comes with a superb recording optimizer and versatile settings like Custom Region, which allows you to record specific part of screen. Moreover, This robust screen recorder tool has super powerful function, enabling you to creat scheduled task, take screenshots and customize output formats. It outperforms in recording and makes it possible to grab sound, trim video, highlight cursor, embed watermark, etc.
- Best Screen Recorder for Windows 10
- Preset codec, resolution and more for format
- Get sound from microphone and/or computer system
- supports scheduled task to start/end recording
- Record video in full screen, standard ratio or customized size
Step 1: Download and Operate Joyoshare VidiKit
Download Joyoshare VidiKit app by heading to Joyoshare website. Choose the Windows version based on your computer system. The free version gives you totally access. However, it will leave a watermark on your recorded video. You can remove watermark by registering the program.

Step 2: Adjust Recording Area
Tap on the Record menu to open Screen Recorder. You can enable or disable "System Audio" and "Microphone Sound" according to your requirements by clicking appropriate options. Use the "+" option on the Capture Area of the software to drag and adjust the screen size to what you preferred. You can also hit the triangle button to choose recording area from the pre-existing list.

Step 3: Record and Edit Your Video
Press the REC option to begin recording in high quality. In the process of recording, you can split recording, skip content and quit recording with the minimized toolbar below the capturing frame. Upon completing the recording, save the recorded clips. Here, you can rename and trim your video.

Video Tutorial
The following is the corresponding video tutorial. You can refer to this video to make an eye-catching video faster. Don't forget to follow our YouTube channel.
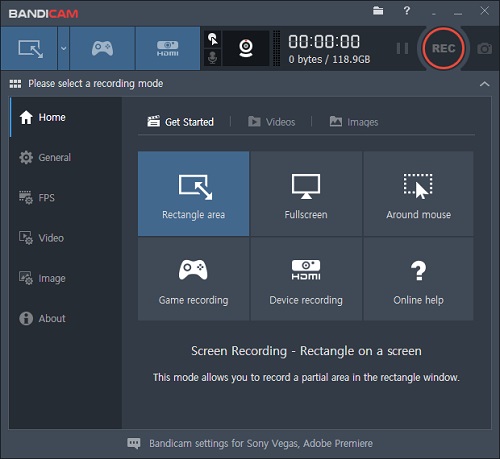
Bandicam
Bandicam allows you to record screen videos on Windows. It captures everything on your computer screen in a high-definition quality video. This program also allows you to capture a game that uses the DirectX/OpenGL/Vulkan graphics technology or record a specific region on a PC screen.
Bandicam will assist you in capturing a screen with a high compression ratio while maintaining the video integrity of the image work. And guess what? With the Add Webcam Overlay feature, you can add a webcam video of yourself while recording a screen part. Here are the steps below to guide you to record a part of your screen using Bandicam.
Guide:
Step 1: Download Bandicam from the official website.
Step 2: Run the app and select Rectangle on a Screen or Select a Recording Area.
Step 3: Now select the REC option to begin the recording process.
Step 4: Click on the Home - Video tab to edit, play, or upload your recorded video.
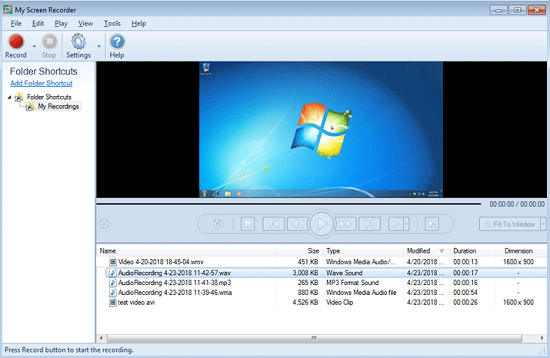
My Screen Recorder
My Screen Recorder records your computer's desktop activities and saves them as standard AVI or WMV video files. The software generates high-quality video files that are minimal in size. It captures everything on your computer screen, including the whole desktop, windows, cursor, menus, and even a video with sound.
With this screen recording program, you may quickly and easily capture movies, webinars, games, and much more. It captures everything on your computer screen. You can even use the Add Audio feature to insert your audio narration into the recorded videos. Here is the step-by-step guide to enable you to record certain part of screen with My Screen Recorder.
Guide:
Step 1: Click on Record to choose the dimension of the screen.
Step 2: Click on the Custom Region option to begin customizing the recording screen.
Step 3: Select the Recording Area using your mouse to drag and adjust the Capture Area of the rectangle window.
Step 4: Select the options like Preset Dimension, Region Selection, Lock Selected Area to Window, Clear Area, Lock Aspect Ratio for further customization. Now click on Start Recording.
Part 2. Record Part of Screen on Mac
EaseUS RecExperts
It is an all-in-one screen recorder software. This software can help you record part of screen and full screen with the help of this software. You need to click on that specific region of the screen and customize the recording. You can adjust the settings as per your requirement. This software also helps you in getting videos at 4K quality. You can screen record video without lagging in audio. You can also record your audio separately to merge it with the video. Also, you can edit the video later by using the built-in Media player and cut the unnecessary parts.
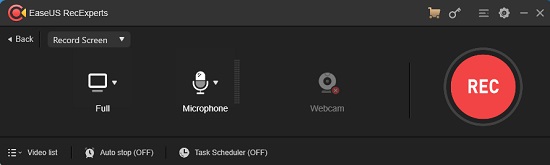
Guide:
Step 1: Download and launch the app; now select the Record Screen button.
Step 2: Select the Size option for choosing the recording area. You can also customize the recording by selecting the Custom button.
Step 3: You can also record the audio simultaneously by selecting Audio sources.
Step 4: Now, click on the big Red Button to start the recording and then click on the Stop button.
OBS
This is one of the most popular open-source tool for broadcasting in the market. Besides all the modern streaming features, it comes with different screen recording options. This software helps you record a specific part of screen instead of recording the whole screen for that particular part. This software supports several operating systems, including Linux, Mac, Windows, and many more. OBS Studio is user-friendly, so it has almost the same procedure for screen recording all the operating systems. Since we are focusing on recording a part of the screen on Mac, the following steps can help you record part screen Mac.
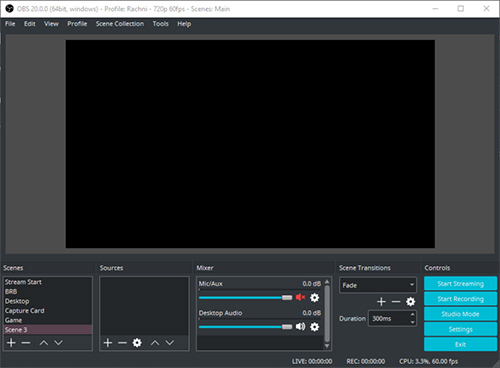
Guide:
Step 1: Click the Plus button from the Sources and then select the Display Capture.
Step 2: Now enter the Title for it, or you can choose an existing one.
Step 3: The display screen is outlined with red lines; you can manually crop the parts you wish to record.
Step 4: Start the recording now.
QuickTime
QuickTime is one of the most under-used apps to record part of your screen. It comes pre-installed in your macOS. It has a powerful ability to record your Mac's display, but people tend to forget about it. You can use the software to play videos, images, audios, and some other content. This software also has a Basic editing feature that lets you edit pictures as well as videos. You can also stream live videos by using the QuickTime Broadcaster feature of this software. You can upload all the media you captured with QuickTime to social media websites.
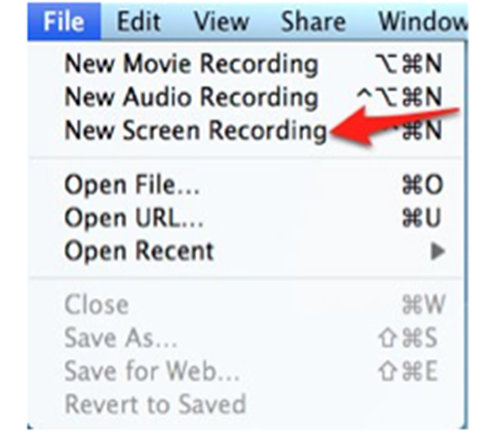
Guide:
Step 1: Launch the app, and then go to the menu bar and select New Screen Recording from the File option.
Step 2: Click on the Red button to start the recording.
Step 3: Drag and crop to select the screen you want to record, and then start the recording.
Step 4: Stop the recording by selecting the Stop button from the menu bar.
Part 3. Conclusion
Video editing and uploading are trending these days. Everyone wants to record part of screen and upload it on their social media for their friends and relatives to see. However, to share these videos, it's vital to record them effectively on Windows or Mac. To ease things for you, this guide introduced six efficient software that will not only allow you to record a specific screen of your Window or Mac but will also offer a ton of other features like add audio or customize video to edit your recordings. We strongly recommend using Joyoshare VidiKit, thanks to its fantastic video editing features!
