Q:"How to screen record on Chromebook?"
Once upon a time, recording a screen was a tricky and frustrating task for Chromebook users. Due to the lack of native recording support and the non-ubiquity of Chrome OS, it takes time to find the decent tool and ask around for a possible solution. Luckily, the arrival of Chrome OS 89 has put an end to that misery. It has developed built-in Chromebook screen recorder to help us directly and quickly complete a recording task, without downloading third-party software and installing extra plug-ins. If you are interested and want to take a crack at recording with it, don't hesitate to create tutorials, make videos, or share presentations by drawing native support now.
- Part 1. How to Screen Record on a Chromebook
- 1.1 Keyboard Shortcut (Ctrl + Shift + Show all windows)
- 1.2 Screen Capture (for Chrome OS 89 or newer)
- 1.3 Screencast (for Chrome OS 103 or above)
- Part 2. FAQs about Screen Recording Chromebook
- Part 3. Bonus: Best Chrome Screen Recorder
- Part 4. Conclusion
Part 1. How to Screen Record on a Chromebook
1.1 Screen Record on Chromebook Using Keyboard Shortcut
Without extra software to download and install on your Chromebook, the most effective way is to use keyboard shortcut. It permits you to record the full screen, a part of screen, or a specific window. Here you can follow the steps below to screen record ongoing activities on Chromebook.
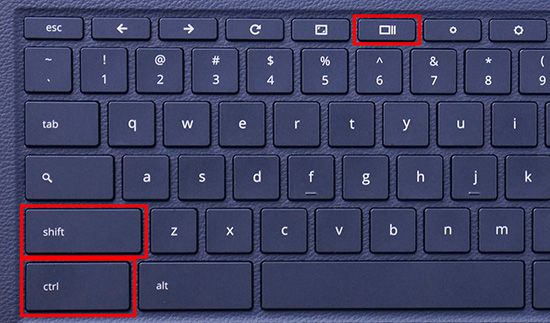
- Step 1: Hold and press the shortcut Ctrl + Shift + Show all windows
 on the keyboard. (If there is no "Show all windows" keyboard on your Chromebook, you can try to press Ctrl + Shift + F5 to directly start a screen recording.)
 - Step 2: A toolbar will appear at the bottom of the screen. Simply click Screen Record option in the menu.
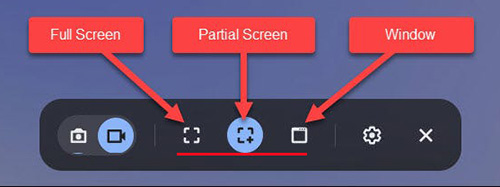
- Step 3: Choose whichever recording mode you want, such as Full Screen, Partial Screen, or Window. Once you click on it, the screen recording task will automatically start.
- Step 4: To end the screen recording process, simply click on Stop Recording icon.
1.2 Record Screen on Chromebook with Screen Capture
There is a built-in Chromebook screen recorder in Chrome OS 89 or newer versions. It helps you make screen recordings quickly and at the same time captures audio from microphone.
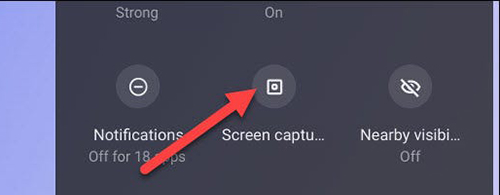
Step 1 Enable Screen Capture on Chromebook
Open your Chromebook, head to the lower right corner of the desktop, find and click the clock on the Shelf. You can click its arrow-shaped icon to fully expend all options in the menu. You can see Screen Capture located there. Simply hit it to make the recording toolbar appear on the bottom of your Chromebook desktop.
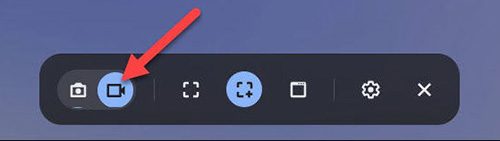
There are two recording mode in the Screen Capture toolbar. The first one is camera-shaped that allows you to capture static images and take screenshots on your Chromebook. The second one is video-shaped that enables you to record screen video, which should be chosen by us now.
Step 2 Choose Recording Area
Chromebook has provided three ways for us to record the screen, including Full Screen, Partial Screen and Window. According to the content you'd like to record, choose an appropriate way.
Step 3 Start to screen record on Chromebook
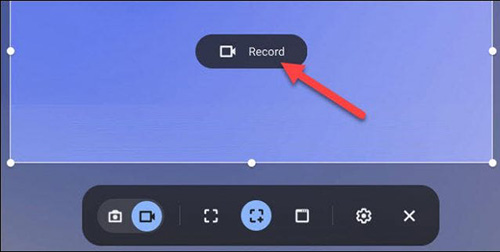
Depending on the type of area you choose, the operation to start recording will also be slightly different. With Full Screen, you should click anywhere on the Chromebook desktop to initiate a recording assignment. For Partial Screen, you should manually drag with the mouse to draw a region you want and then click the "Record" button. For Window, select a specific window that you desire to record. Afterwards, you can see a 3-second countdown on the desktop and the recording will soon start.
Step 4 Save and check recorded file on Chromebook
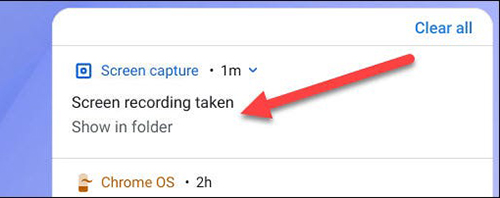
As long as the screen activity is recorded, you can click on the red recording button to end it. A notification will display showing "Screen recording taken". Click "Show in folder" and you'll be led to your local "Downloads" folder on Chromebook. The video will be saved in WEBM format only and you can open to check it as you want.
Note: Don't ignore the gear-shaped icon in the toolbar. You can click on it and turn on Record microphone to get desired sound and make voiceover.

1.3 How to Record Screen on Chromebook - Screencast
If your device is running Chrome OS 103 or later, you can find a new screen recording app on Chromebook named Screencast. It is mainly aimed at students and teachers. What's better, it comes with advanced recording features, such as add your face to video via webcam, make annotations, generate a transcript, do translations, etc. However, one thing you should pay more attention to is that Screencast can currently only functions when your device is set with English (US) language.
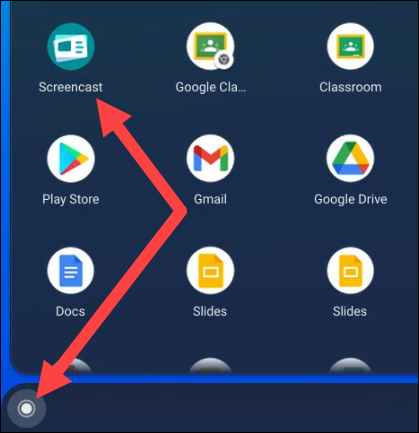
- Step 1: In the app launcher, find and click Screencast app to let it run on Chromebook.
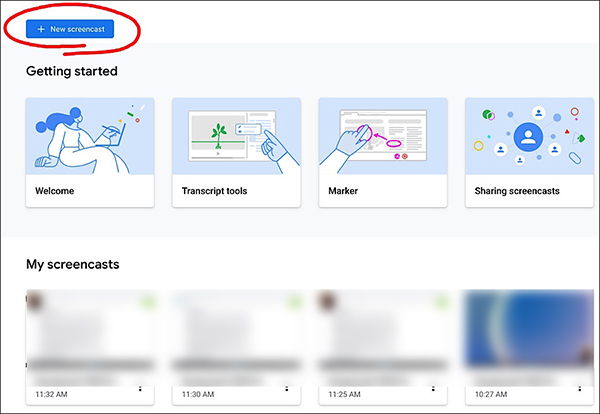
- Step 2: Simply click on "+ New screencast" in the upper left corner of Screencast.
- Step 3: Based on your actual need, choose a full screen, a target window, or a partial area to record. (By default, both webcam and microphone are activated; if you don't need them, then go to settings to disable.)
- Step 4: To begin screen recording on Chromebook, click on the red recording icon.
- Step 5: To add annotations to your recorded video, you can use the pen tool. Besides, it's handy to adjust the webcam position as you want.
- Step 6: Click on the red stop button on the Shelf to end screen recording.
- Step 7: What you recorded will be saved to My screencasts by default in Screencast application. However, Screencast doesn't help save the recorded video locally. So you have to click Share at the upper right corner to get a link for futher playback.
Part 2. FAQs about Screen Recording Chromebook
Q1: How to access screen recordings folder after the recording?
A: If you forget to access Downloads folder by clicking on the notification after stop the recording, you can also go to run Launcher on the Shelf of your Chromebook and check Files - My File - Downloads. You can also go ahead to My Files - Videos to find your completed video files.
Q2: Can you upload recorded videos to Google Drive?
A: You can see Google Drive tab in the left column when you enter your screen recording folder as we said above. Then simply drag the video to it. Or you can open Google Drive first, go for New - File Upload to upload your wanted videos.
Q3: Why is there no sound when I screen record Chromebook?
A: By default, the inbuilt screen recorder on Chromebook will record screen without audio. You have to go for the gear-shaped Settings to enable microphone for capturing. But if you need to grab the internal audio from system, it can do nothing.
Q4: How to save the recorded video in MP4 or other formats?
A: Chromebook can only save the recorded video as WEBM file. Though this format is compatible with lots of device and player, you may prefer to save it to other desired one. In this case, you can only convert it using a video converter. Or you can record your Chromebook screen with other Chrome extensions or 3rd-party screen recorder if you don't mind.
Part 3. Bonus: Best Chrome Screen Recorder
Want to capture something you like from Chrome browser? Here Joyoshare VidiKit is a perfect option. It works as a piece of professioanl recording software offering a one-stop solution for you to keep whatever you want, including screen, audio from system and microphone, specific window, webcam, and even gameplay. The whole recording process is laggy-free. Also, the video you create can be saved in high resolution, up to 1080p/4K. With the assistance of it, you don't have to worry about recording duration and the time scheduler provides you with a high-efficient recording experience.

- Decent Chrome audio recorder and screen capture
- Professional 1080p 60FPS screen recorder for Mac and Windows
- Support MP4, MOV, HD MKV, MP3 and more mainstream formats
- Record part of screen, full screen, window, webcam, etc.
- Capture sounds from microphone and system
- Show cursor movements, schedule recording, specify parameters, etc.
- Record anything in high quality without time limit
Part 4. Conclusion
After having a complete learning in this post, you should figure out how to screen record on Chromebook. As you can see, there are different screen recording solutions for different Chrome OS. Just check which operating system your device is running and then select whatever suitable for you. If you need a Chrome screen recorder or audio grabber, try the recommended Joyoshare VidiKit.
