Roblox is a popular online game platform and game creation system that has taken the world by storm. Well developed by Roblox Corporation, it allows you to play and program games, being a great place to give the rein to your imagination. Irrespective of your status, an aspiring content creator or an avid gamer, it is imperative to know how to record Roblox. This skill enables you to share your achievements on social media, create instructional guides for other players, or just discuss game details with your friends. If you are going to produce a high-quality Roblox video by capturing your gameplay, here is the right place to pay attention to.
- Part 1. How to Record Roblox with Built-in Recording Feature
- Part 2. How to Record Roblox on Windows and Mac
- Joyoshare VidiKit [Hot]
- OBS
- Part 3. How to Record Roblox on iPhone/iPad
- Part 4. How to Record Roblox on a Chromebook
- Part 5. FAQs about Recording Roblox
Part 1. How to Record on Roblox with Inbuilt Recorder
Luckily, Roblox comes with a built-in recorder to capture your gameplay. If you don't want to install third-party software, resort to this simple and straightforward recording feature. But its limitations cannot be ignored. It's only possible to capture the whole screen rather than a certain part. Also, there are no editing tools and the video quality is not satisfactory enough. If you are a new beginner without high recording demands, you can follow the full guide below to capture Roblox now.
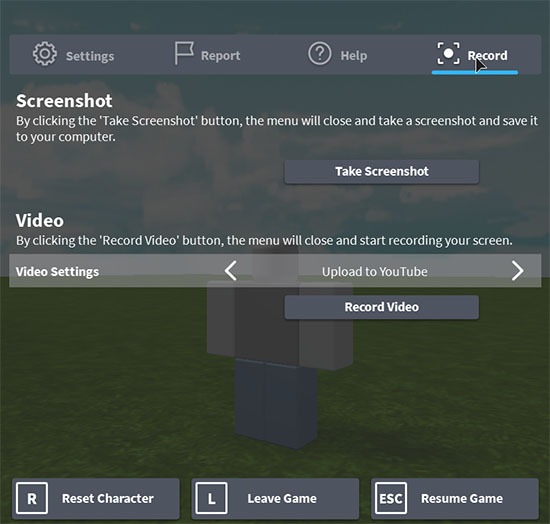
- Step 1: Open Roblox and find the Menu button at the upper-left corner.
- Step 2: Then you will see the "Record" tab at the upper-right corner.
- Step 3: Under Video Settings, you are available to save the video to your computer or "Upload to YouTube" for sharing.
- Step 4: To start recording the gameplay, simply click the "Record Video" option. Then play the game on Roblox. You can click the stop recording button to stop recording.
- Step 5: Click the Stop Recording button to end your game recording, which will be saved in My Videos folder.
Part 2. How to Record Roblox on Windows and Mac
Are you looking forward to higher Roblox video quality and richer recording capabilities? Don't miss some third-party Roblox game recorders with high popularity here.
2.1 Joyoshare VidiKit - Best Roblox Recorder
Joyoshare VidiKit is a comprehensive toolkit. It can record text, video, audio, image, camera and more things on your computer, ideally for you to capture Roblox gameplay. With an intuitive interface, it doesn't require any learning curve. While recording a video in Roblox, you can grab voice from microphone and sound from system simultaneously. Inportantly, there is no lag during the game recording process. You can adjust related parameters in advance, such as frame rate to 240fps, resolution to 4K, etc.

- Record Roblox in high quality, up to 4K or standard 1080p
- Capture game videos smoothly without lag
- Reset codec, quality, bit rate, frame rate, resolution, and many more
- Auto-stop game recording to improve the efficiency
- Record game, system audio, mic voice, and camera together
Step 1 Fire Up Game Recorder in VidiKit

Install Joyoshare VidiKit and run it on either Mac or Windows. Navigate to Recorder and choose "Game Recorder". Then load Roblox gameplay on your desktop. In the main interface of Joyoshare program, locate and click "Select game" to lock Roblox.
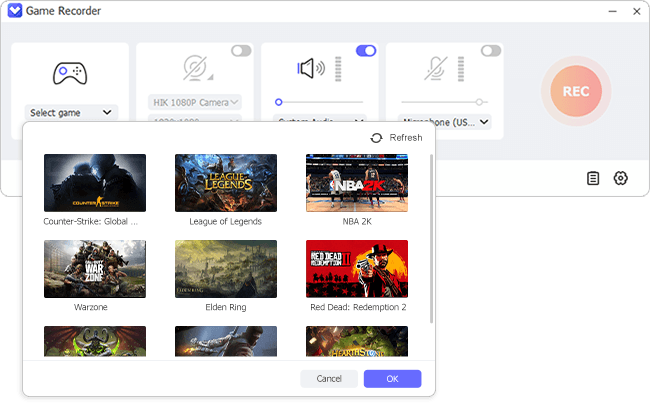
Note: If what you need is a screen recorder for Roblox, you can click on Screen Recorder in VidiKit. This allows you to record a full screen or a specific area on your computer.
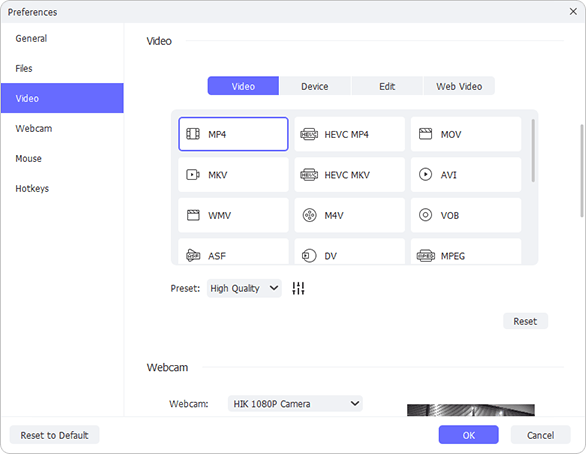
Step 2 Set Up Recording Preferences
If you want to record Roblox with voice and in-game audio, you can activate both Microphone Audio and System Audio. To add an overlay of yourself in the corner of Roblox video, you can enable "Camera".
Take yourself to the Preferences window by clicking on the gear-shaped icon on the bottom right. In the left column, find Video to set an output format for your Roblox video, like YouTube, TikTok, or Instagram. If you prefer to record your gameplay with no FPS drops, it's suggested to further click "Setting" icon near to "Preset", customizing the frame rate to 240fps. To record Roblox in the way you want, it's available to check more recording options.
Step 3 Start to Record Roblox with Voice
Once you click on the "REC" to start capturing the Roblox gameplay, the interface of Joyoshare VidiKit will minimize. Then you will see a small toolbar under the recording. It's convenient to use scissor to trim game footage or click "Pause" to skip the unnecessary section.

Step 4 Check and Edit Recorded Roblox Video(s)
The "History" window will display as soon as you click the "Stop" button. Here you can preview the final Roblox game video file, cut out unwanted segments, rename, etc.
2.2 How to Record Roblox with OBS
OBS, Open Broadcaster Software, is an acclaimed Roblox game recorder that offers you free service to record screen and designated game. It works well on Windows, Mac and Linux. Besides recording, it supports live streaming, which is great for content creators in YouTube and Twitch.
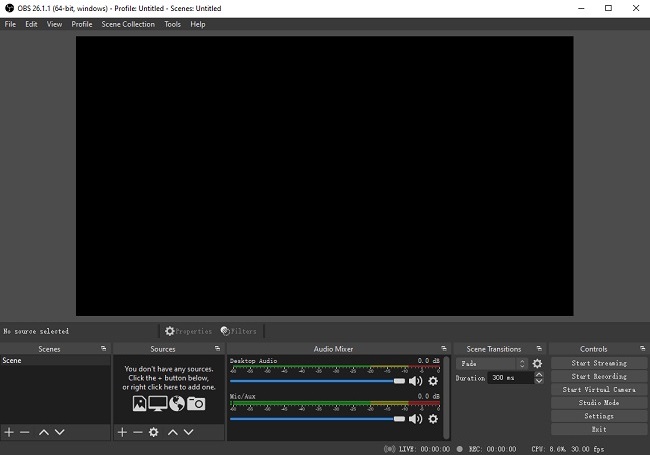
- Step 1: Download and install this open-resource program on your computer. Then log in Roblox game.
- Step 2: Open OBS on your desktop. Then click on the "+" button at the "Scenes" section to create a new scene.
- Step 3: Click the "+" icon at the "Sources" section, choose Game Capture, and select Roblox from the list.
- Step 4: Simply click "Start Recording" to begin record Roblox.
- Step 5: Click the "Stop Recording" button to end the recording. Then you click the "File" on the top left corner and select "Show Recordings" to check your game videos.
Part 3. How to Record Roblox on iPhone/iPad
3.1 iOS Default Screen Recorder
Roblox is available to use on mobile phones. If you like playing games on your iPhone or iPad, then you can make full use of the default screen recording feature. This helps you to create high-quality game videos with ease. Here's how to do that.
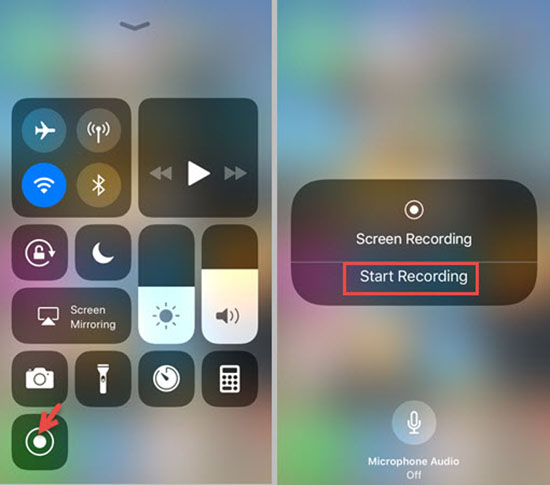
- Step 1: Download and install Roblox from App Store to your iOS device.
- Step 2: Start playing Roblox on your iPhone/iPad and swipe up or down as you usually do to call out the Control Center (You can go to Settings → Control Center to add Screen Recording if it is not shown on Control Center.)
- Step 3: Tap on the recording icon and confirm Start Recording option.
- Step 4: Once you have captured what you want in Roblox, tap on Stop button to save it to your device's Photos app.
3.2 TechSmith Capture
Compatible with iOS 14.5/iPadOS 14.5 or late, TechSmith Capture enables you to capture various on-screen activities quickly on iPad and iPhone, including Roblox gameplay, training and app demo videos. By using it, you can capture voice from microphone and record Roblox screen at the same time. The finished recording file can directly be sent to Camtasia, Snagit, TechSmith Knowmia for further editing. However, if you'd like to use familar editor for post-proceeding, share to wherever you want. You can firstly preview your recorded gameplay video for quality check.
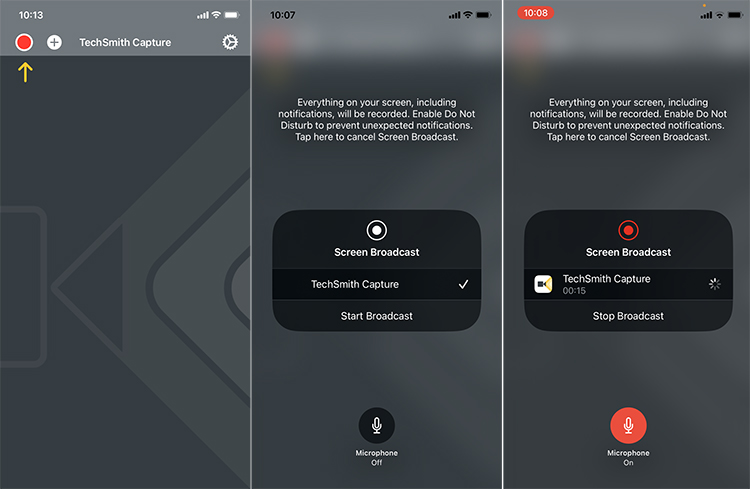
- Step 1: Download TechSmith Capture from App Store and sign in with your account.
- Step 2: Open the Roblox game and get ready. In the upper left corner of TechSmith Capture, tap on the red recording button.
- Step 3: Tap the microphone to grab Roblox voice and click on "Start Broadcast" button to initiate a recording process.
- Step 4: Now, you can find the red status bar on the top. When you have recorded what you want in Roblox, tap on the Stop Broadcast button to save the recorded video.
Part 4. How to Record Roblox on Chromebook - Screen Recorder
To record Roblox on Chromebook, you should choose an HD gameplay recorder in advance. Here Screen Recorder, a free Chrome extension to capture video from camera or screen, can be a good choice. It gives you the power to record specific window, desktop, or Chrome tab as you want. Featured with multiple functions like auto-saving videos, grabbing sound from mic and system, it can ensure you a nice recording experience.
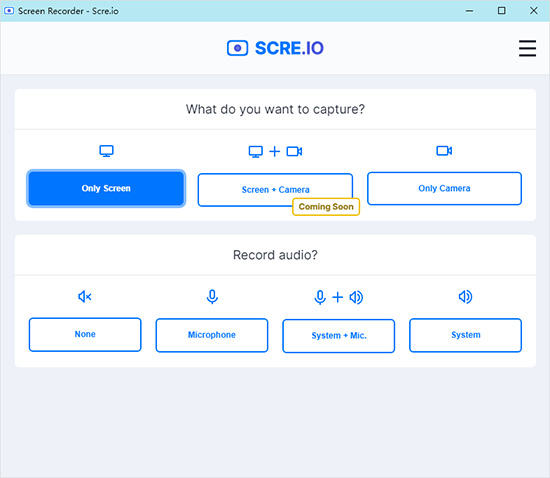
- Step 1: Search and add Screen Recorder extension to your Chrome.
- Step 2: Choose the recording mode you need and confirm audio capture in the way you like.
- Step 3: Then, click the Start Recording option to begin the recording process. To skip unwanted content, just click the Pause option.
- Step 4: Use Stop button to end the Roblox recording process.
Part 5. FAQs about Recording Roblox
Q1. What do Roblox YouTubers use to record?
A: For Roblox YouTubers, they always choose a screen recorder that comes with function to export high quality video like OBS, Joyoshare VidiKit and many more. Also, they prefer to record Roblox on computer as it is convenient for them to edit and enhance Roblox video after the recording process.
Q2. How do you record while playing Roblox?
A: For many users, screen recording on Roblox with inbuilt recording tool while playing this game is enough. Just go to Menu and click the Record tab. Also, some users may want to get more advanced functions like changing codec, resolution, bit rate, frame rate, etc. to help them get high quality Roblox video. Then, an advanced screen recording tool, like Joyoshare VidiKit, is the best option.
Q3. How do you record yourself while playing Roblox?
A: You can open Camera on your computer and use the inbuilt recording tool to begin the Roblox recording process. Alternatively, choose a game recorder that is featured with webcam recording function is also available.
Q4. How to record Roblox with voice?
A: To record your voice on Roblox successfully, just open your desired Roblox screen recorder and turn on microphone. This helps to record screen and voice at the same time.
Q5. What is the best screen recorder for Roblox?
A: It depends on your actual needs. For basic recording, the built-in recording feature in Roblox is sufficient. If you prefer a multitude of functions like webcam recording, scheduling task, configuring parameter, highlighting cursor and more, Joyoshare VidiKit can be taken into your consideration. It is friendly for beginners as it is coming with intuitive and simple interface.
Conclusion:
This post shows you how to record Roblox gameplay on various devices. As you can see, the Roblox built-in recorder is a simple recorder without other functions. It only allows you to start and stop the game recording. OBS is free and popular, but its interface and operation make itself a bit difficult to master. Joyoshare VidiKit is easy to use and fully-featured to record various gameplays in high quality without frame drops.
