Q:"How do you record Minecraft?" - From Reddit
Minecraft, a well-known 3D sandbox game, offers players immense freedom to express creativity and imagination. It allows you to construct a pixelated, blocky, three-dimensional world with endless possibilities. From building intricate structures to exploring vast terrain, Minecraft provides countless opportunities to create a unique space. Recording your Minecraft gameplay can be a great way to showcase your impressive builds, document the construction process, or make how-to tutorials for sharing. If you're interested in learning how to record Minecraft, check out this post to explore some best Minecraft recorders. We will guide you through various methods to help you capture your gameplay effectively. Join us for a closer look.

- Part 1. How to Record Minecraft Gameplay
- Joyoshare VidiKit (Windows, Mac) [Hot]
- Xbox Game Bar (Windows)
- Bandicam (Windows)
- OBS (Windows, Mac, Linux)
- ShadowPlay (Windows)
- Fraps (Windows)
- Part 2. FAQs about Recording Minecraft
Part 1. How to Screen Record Minecraft
Recording Minecraft gameplay is an exciting way to capture your adventures. If you're unsure how to get started, follow our complete guides for step-by-step instructions. Follow us to learn more.
👣 Joyoshare VidiKit - Best Minecraft Recording Software
Joyoshare VidiKit is an all-in-one toolkit designed to help you capture everything on your PC, including screen, videos, audio, webcam footage, and images. Its user-friendly interface makes it easy to use, even without technical knowledge. It supports various games, such as Minecraft, League of Legends, PUBG, CSGO, Roblox, etc. With this software, you can create smooth game recordings without any lag or interruptions, ensuring 4K 240fps high-quality video output. Additionally, it offers excellent features like an auto-stop timer, cursor highlighting, in-game voice capture, and webcam recording.

- Record gameplay on PC without lag and glitches
- Record Minecraft in up to 240fps and 1080p/4K
- Capture in-game music from system and voice from microphone
- Add a webcam to Minecraft game video for better social sharing
- Offer common and popular format parameters to configure
- Provide comprehensive recording options to set up
Step 1 Run Game Recorder in VidiKit

Open the most recent version of Joyoshare VidiKit on your PC. Navigate to Recorder and select Game Recorder. Start the Minecraft game application on your computer, then click on Select game on the far left side of the main interface to lock the target game.
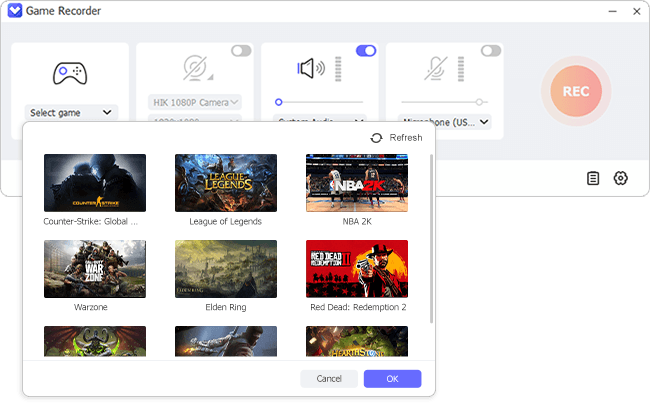
Step 2 Confirm Recording Preferences
You can enable both "System Audio" and "Microphone Audio" in VidiKit to capture in-game sound and microphone voices. Then adjust the available sound sources and set the volume as needed. To add a face overlay to the game video, ensure the Camera is turned on.
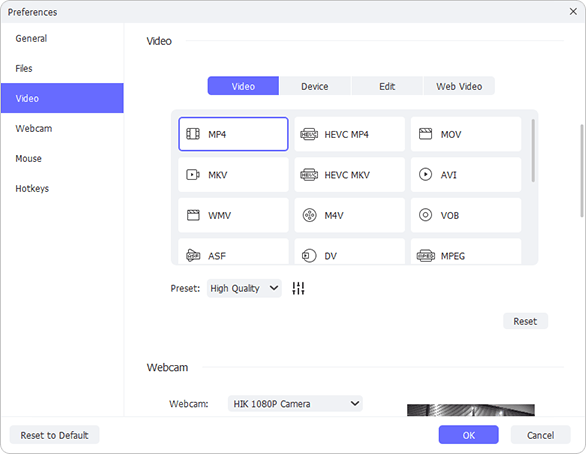
Locate the gear-shaped Preferences icon at the right bottom and click on it to access additional recording options. Under the "Video" tab, you can choose your preferred output format, such as YouTube, TikTok, or Instagram. To record Minecraft without frame drops, click the "Setting" icon next to "Preset" and set the frame rate to 240fps. It's handy for you to check all remaining options and confirm your selections.
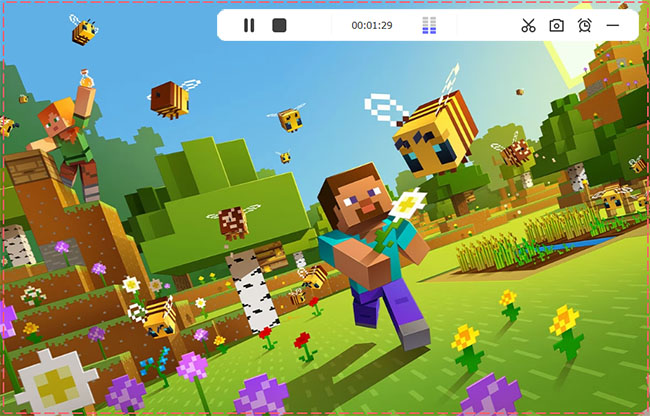
Step 3 Start to Record Minecraft
Click the "REC" button in Joyoshare VidiKit to start recording your Minecraft gameplay on PC. You can skip parts, cut segments, or take snapshots during the recording.
Step 4 Save Recorded Minecraft Video(s)
After the recording stops and completes, you'll be directed to the History window, where all your recordings are listed. Preview and edit the Minecraft video to enhance it for saving and sharing.
👣 Xbox Game Bar — Default Minecraft Screen Recorder
Another popular method to record Minecraft videos is by using Xbox Game Bar. This default tool on Windows 10 provides quick access widgets, making it easy to record gameplay, microphone audio, and webcam footage. However, it's only suitable for users playing Minecraft on Windows. Here is a brief guide on how to record Minecraft videos:
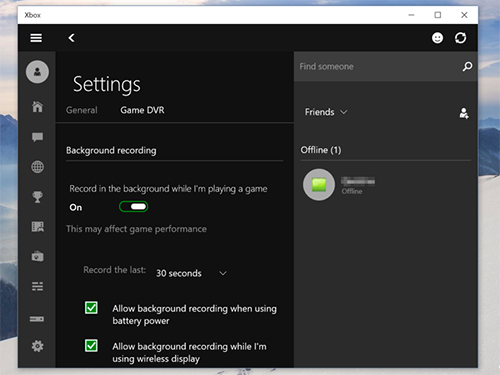
- Step 1: Load the Minecraft on your desktop and then click "Windows" icon → "Settings" → "Gaming". Ensure the toggle of Xbox Game Bar is On.
- Step 2: In the left column, choose Captures section and then set recording options like maximum recording length, audio quality, video frame rate and more.
- Step 3: Press "Windows + G" to call out Game Bar and tick "Yes, this is a game".
- Step 4: Start recording Minecraft by pressing "Windows + Alt + R" or by clicking the "Start Recording" button.
- Step 5: Press Win + Alt + R to end the recording and save Minecraft videos.
👣 Bandicam
Bandicam offers a game mode to capture any gameplay and a "Screen Recording" mode to record video and audio without lag. It's a lightweight screen recorder ideal for gamers, capable of recording Minecraft at 480fps in 4K UHD. It also supports webcam recording, allowing you to easily add your face to the footage. Additionally, with its well-designed DirectX/OpenGL/Vulkan graphics technologies, Bandicam enables high-resolution recording.
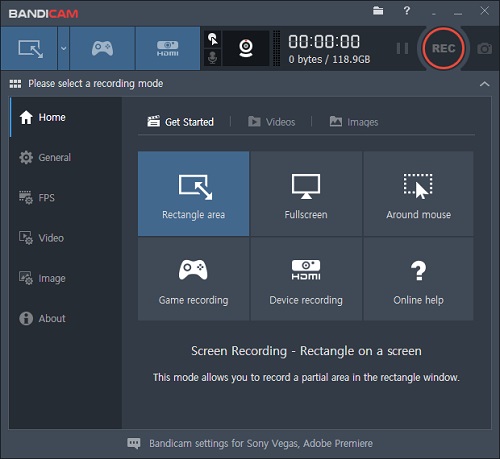
- Step 1: Open Bandicam on your computer, choose "Game Recording" mode, and then run Minecraft game.
- Step 2: Select the recording area. Then you will see a green number on the top left corner.
- Step 3: Click "REC" or press "F12" on your keyboard to start capturing Minecraft. At the same time, you will see the green number changing into the red. Press the same button to complete the recording.
- Step 4: Select "Home" → "Video". In this tab, you can play, edit, upload and delete the videos.
👣 How to Record Minecraft with OBS
OBS Studio excels in both recording video and live streaming. As an open-source software, it's widely favored by a large number of users. There are handy options this freeware offers to set and capture unlimited scenes and sources. What makes it outstanding is its capability to configure parameters, such as FPS, resolution, etc. Nevertheless, in terms of its product interface and function, OBS is more suitable for professionals or users with certain software operation experience.
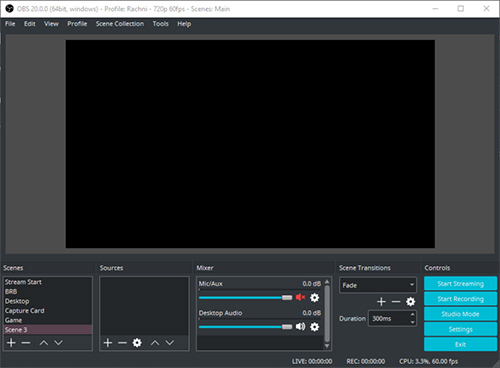
- Step 1: Open OBS on your computer and click on the "+" under Sources.
- Step 2: Select "Game Capture" → "Capture Specific Window" and then choose Minecraft.
- Step 3: Go back to check whether Minecraft appears in OBS and you can click Start Recording to capture your game.
👣 Record Minecraft with ShadowPlay
Based on user feedback, there is a known issue with the ShadowPlay feature in Nvidia Experience when recording Minecraft videos. ShadowPlay directly supports games using Direct3D but struggles with those using OpenGL, like Minecraft. To fix this issue, follow the steps we provide. Keep in mind that recording with ShadowPlay can affect game performance, so ensure your computer meets the necessary requirements.
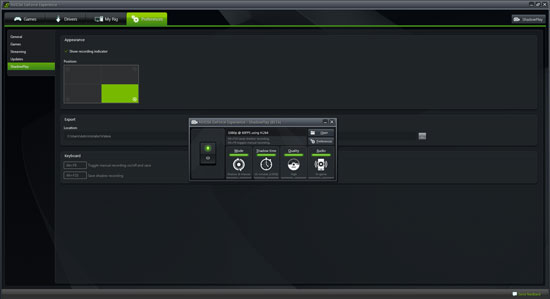
- Step 1: Run ShadowPlay and go to NVIDIA GeForce Experience - Preferences - ShadowPlay to enable "Allow Desktop Capture" option.
- Step 2: Then you can open your Minecraft in windowed mode and click on Record → Start button in ShadowPlay to begin recording your Windows desktop in fullscreen.
- Step 3: When your game gets over, simply press Alt + F9 or click Record - "Stop and Save" to complete recording. Your recorded game videos will by default be saved to your user account's Videos folder.
👣 Record Minecraft with Fraps
Fraps is a well-known tool with full support for games using DirectX and OpenGL graphic technology, such as World of Warcraft, Far Cry, Ballance, and Trackmania Sunrise. It allows you to easily record movies and take screenshots, offering professional options to set hotkeys, customize frame rates, and capture sound. However, it requires high CPU usage and can cause significant frame drops when recording Minecraft. To mitigate this, you may need to use Optifine and defragment your disk.
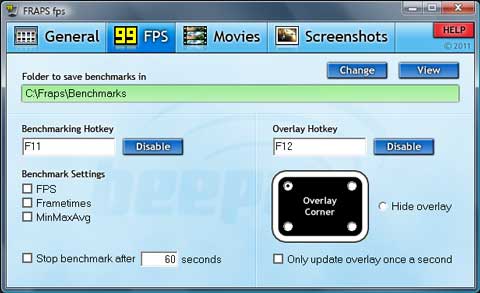
- Step 1: Get Fraps downloaded, installed and launched on your Windows.
- Step 2: Go for "General" option on the top of the main interface to confirm basic settings.
- Step 3: Then check "Movies" tab and select video capture & sound capture settings, like the frame rate, capture size, and more.
- Step 4: Open Minecraft game on your computer and click the recording button in Fraps to start the process.
Part 2. FAQs about Recording Minecraft
Q1. Does Minecraft have a built-in recorder?
A: No, Minecraft does not come with a built-in game recorder. However, if you prefer not to download and install third-party software, you can use the Xbox Game Bar to capture your Minecraft highlights easily. It is straightforward to use.
Q2. Can I record Minecraft on consoles?
A: Yes. Minecraft is available to use on a wide range of consoles, such as PlayStation, Xbox One, Xbox 360, etc. You can use the Share button on PlayStation consoles or the Capture button on Xbox consoles to record Minecraft.
Q3. Can I reduce lag when recording Minecraft?
A: Your Minecraft recordings can be choppy if your computer's hardware cannot reach the minimum game recording requirements or you set inappropriate recording options. Here're what you can do before recording Minecraft gameplay.
- ● Check computer system first and ensure it can meet the minimum game recording requirements.
- ● Lower recording perameter configuration, such as resolution, frame rate and bitrate.
- ● Quit unnecessary apps in the background.
Conclusion:
This article presents various methods to record Minecraft on a PC. OBS Studio offers a free recording solution, while Xbox Game Bar works directly without needing installation. Although ShadowPlay and Fraps are often mentioned by users, they may not be the best choices for recording Minecraft. Fortunately, Joyoshare VidiKit allows for lag-free, unlimited game recording, making it a more user-friendly option. Regardless of which tool you choose, we hope you enjoy both playing and recording Minecraft.
