Everyone likes appreciation of some kind whether it is in the sports arena or areas leading to daily life. Online gamers are no exception as they thrive on the approval of an audience. One of the most popular ways to win followers and fans alike is through the medium of YouTube. Among the games to record for YouTube, Overwatch is extremely popular with fans. In this online shooter, players are divided into two teams for a match. Gamers will be keen to record their performance for later analysis to improve or even to make a tutorial to share on social media later. Want to know how to record highlights in Overwatch? Learn with us here.

- Part 1. Record Overwatch Highlights on PC
- Part 2. Record Overwatch Highlights on Mac
- Part 3. Save Overwatch Highlights on PC, PS4, and Xbox
- Part 4: Where are Overwatch Highlights Saved
Part 1. How to Record Overwatch Highlights on PC - Joyoshare VidiKit
Joyoshare VidiKit - Screen Recorder is a professional and advanced screen capture. It's capable of recording online music, lectures, meetings, online movies and popular games like Overwatch, RuneScape, Pokemon, etc. This excellent tool is available for Mac and Windows, meaning that whether you are a Mac user or a Windows user, you can use it easily. With flexible features, it enables you to customize recording area, select video format and output path, add watermark, schedule recording task, specify resolution, bit rate and record Overwatch in 1080p.

- Record highlights in Overwatch with just a few clicks
- Can record game, music, movie and lecture on Mac and PC
- Record Pokemon, RuneScape, Battlefield gameplay quickly in 1080p
- Customize your recording area and skip unwanted content
- Specify resolution, create recording task and select watermark
- Step 1: Download and Open Joyoshare VidiKit
- First, begin Overwatch on the PC, after downloading Joyoshare VidiKit. Choose Record section and hit Screen Recorder in the pop-up window. Choose the Record video and audio mode by pressing the camera icon near the REC button.
- Step 2: Customize Recording Parameters
- Once the recording mode is on; select the gear icon on the corner at the right. There are three options seen "Basic record options", "Record time options" and "Cursor options". They can be used to change the shortcut keys and save format with the start and stop time of the recording. The cursor can be hidden or shown. You can even add a watermark to copyright it. Next, click the plus (+) icon to select the screen area to record. The captured area can be adjusted by dragging the frame, entering the value, or choosing the preset option from a drop-down list. Subject to requirements the audio can be enabled or disabled.
- Step 3: Start Recording and Save Video
- As everything is in place, hit the "Record" button. There will be a countdown of 3 seconds and the recording will start. Any unwanted portions can be trimmed or skipped. Once done, hit the "Stop" button. You then may choose to make any editing changes and later preview the recorded video.


Part 2. Best Way to Record Overwatch Highlights on Mac - Command+ Shift + 5
The OS of Apple has a cool screen record feature. To access it, a keyboard shortcut is used that allows to record a screen or take a screenshot. The hitch is that external software is needed for a speaker. After the speaker is linked to the software, the latter can be used for recording audio.

- Step 1: Open Overwatch highlight and ready to play. Click simultaneously Command+ Shift + 5 to open the recorder. Choose the video record icon and then click the Overwatch video tab.
- Step 2: Press the video record button and begin playing Overwatch. Create a time delay of some seconds to have time to play the video.
- Step 3: After the recording of the video highlight is completed, stop the recording and save it on internal storage or online.
Part 3. How to Save Overwatch Highlights on PC, PS4, and Xbox
How to Save Overwatch Highlights on PC
Windows 10 users can use the default DVR feature for recording. For the overlay, press the Windows logo key + G key. For those that do not have Windows 10, they can use third-party recording software or use built-in options found with AMD and NVIDIA GPUs.
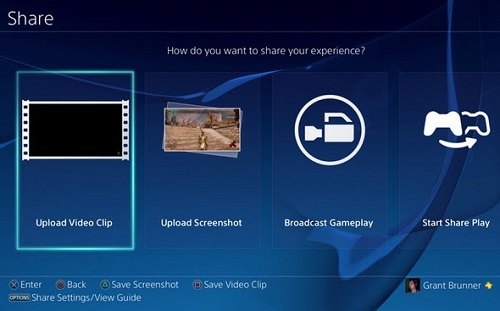
Save Overwatch Highlights on PS4
For a PS4, use the 'Share' icon on the touchpad left to save highlights. Check the time, it will record when the save video icon is clicked. It can be programmed from seconds to 60 minutes. For recording a pre-made highlight from the highlight's menu, view the video and then use share to save the footage you need. After saving the clip, it can be trimmed to the time you want from the "Settings - System Storage Management - Capture Gallery". Select the clip followed by options and trim. After saving the clip, click on options and copy to a USB drive or share on social media.
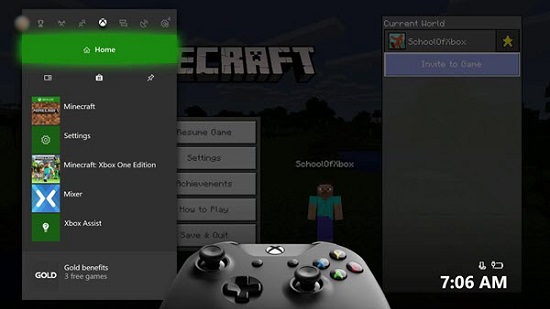
Best Way to Save Overwatch Highlights on Xbox One
- Solution 1: For the last 30 seconds: Double-tap the Xbox button and then click X.
- Solution 2: Manual recording: Double tap the Xbox button followed by "Snap an app" and choose "Game DVR". Select "Start Recording", double tap the Xbox button, move to the screen bottom and select Overwatch. Play the highlight, double tap the Xbox button, move to the game DVR app and click "Stop Recording". Choose "Recent Captures - Show all". Once the clip is found, trim it and upload it to One Drive from which it can be accessed on your mobile phone to post on social media.
Tips: Where are Overwatch Highlights Saved?
By default, Overwatch highlights are saved in the Documents folder of a PC. The location can be saved at the user's discretion.
- Step 1: Close Overwatch.
- Step 2: Hit Windows Key.
- Step 3: Type %Documents% and hit enter.
- Step 4: Move to \ Documents \ Overwatch \ Settings.
- Step 5: Open the 'Settings_v0.ini' file by resorting to a text editor (Notepad, etc.).
- Step 6: Find the [ MovieExport.1 ] section. You need to manually add it to the end of the document.
- Step 7: Add this line under [ MovieExport.1 ], with your custom file location between the quotation marks: VideoPath = " ".
- Step 8: Save your changes and launch the game by pressing Enter.
Conclusion:
If you are a fan of Overwatch, you would most definitely want to know how to record highlights in Overwatch. Although there are various methods to record highlights, the best way is with Joyoshare VidiKit software as it is 100% safe and secure. So do not wait anymore and download the software now.
