Recording voice is of great importance in current digital life. By creating a voice recording, you can effectively capture good thoughts in a flash of inspiration, improve the speaking skills of non-native language, sing your own song for better evaluation, or make a voiceover for a video. To be surrounded by so many benefits, more and more people want to achieve this convenience on the computer. If you are the one but don't know how to record voice on Mac, this article is where you need to stay. You can follow us to learn both built-in and third-party voice recording solutions on Mac.

- Part 1. Best Way to Record Voice on Mac [All-in-one Recording Toolkit]
- Part 2. How to Record Voice on a Mac for Free
- Part 3. Conclusion
Part 1. Best Way to Record Voice on Mac - Joyoshare VidiKit [Hot]
Joyoshare VidiKit (21-in-1 toolkit) is a mighty audio recorder that is able to capture sound from the microphone, the speaker or other audio devices connected to the computer. The recording is of excellent quality and can be converted to multiple popular formats, including MP3, FLAC, AAC, WAV, AC3, AIFF, MP2, APE, AU, AMR, M4A, M4B, M4R, MKA, OGG, WMA. It allows you to schedule a time to automatically stop the recording, and change parameters. Also, it has a multi-functional audio editor that is able to trim the recordings, edit ID3 tags, and rename the voice files.

- Record system audio and microphone sound in high quality
- A wide range of mainstream audio formats available to save recordings
- Support self-customizing encoder, sample rate, channel, and bitrate
- Practical audio editor to trim audio, edit audio tag, and rename
- One-stop solution to record screen, webcam, target gameplay and window
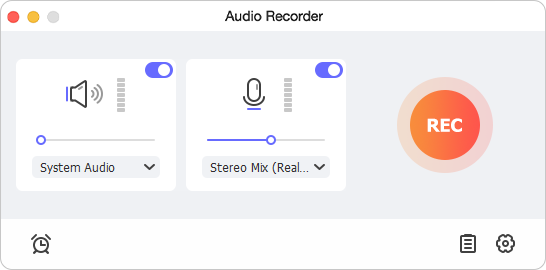
Step 1 Launch Audio Recorder and Set Sound Source
Download Joyoshare VidiKit for Mac from the official website and run it on your computer. Go to the Recorder section and click to open Audio Recorder. You can here set the Microphone Audio as the input source and disable system audio. In this way, only your voice coming from the microphone can be captured.
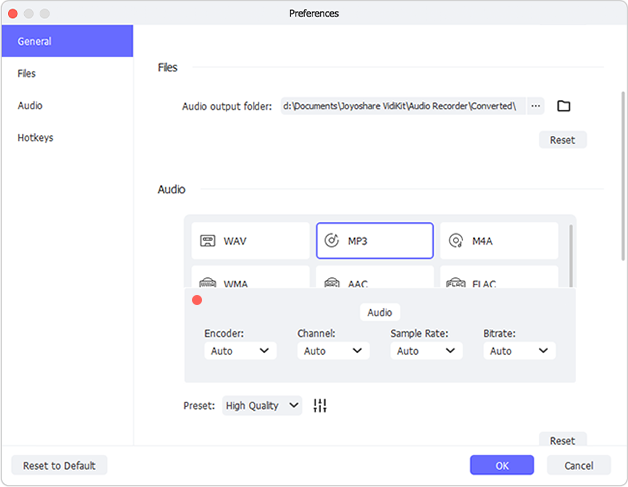
Step 2 Confirm Output Settings
Click on the Preferences icon to open a new window. Here you can choose a desired format, adjust codec, channel, bitrate and sample rate based on your need. If you are a newbie, just leave parameter configuration; Joyoshare VidiKit will automatically set up the optimal parameters for your voice recording.
Step 3 Start to Record Voice on Mac
Now, click on the REC button and then start to speak to the microphone. Joyoshare VidiKit will begin to capture your voice and surrounding sounds from the microphone. If you need to split the recording into different tracks, just hit the scissor-shaped icon in the floating recording menubar.

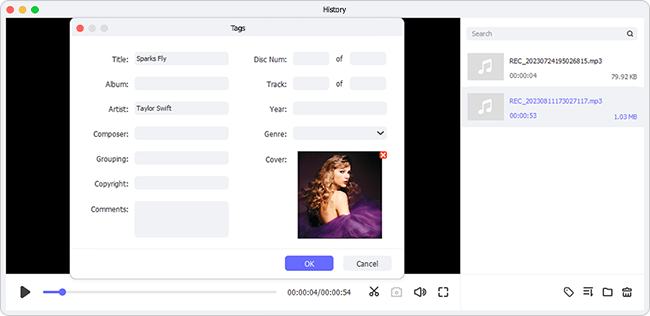
Step 4 Edit Final Voice Recordings
When you finish recording your voice on Mac, click the Stop button to end the recording process. You'll then be taken to the History window. If you want to edit the recordings, right-click each track and select Edit option. With this tool, you can trim the tracks. Besides, it's handy to manage the audio tags on your own.
Part 2. How to Record Voice on a Mac for Free
Luckily, some free voice recorders are available to use on your Mac. If you prefer to record voice on your computer completely for free, don't miss the following good solutions. All of them are classic, well-known and trusted.
2.1 QuickTime
Are you unwilling to install third-party voice recording software for Mac? It doesn't matter. You can use QuickTime, a built-in tool preinstalled on each Mac. It's simple to operate and comes with basic features. By means of it, you can grab voice from any available microphone and at the same time set sound quality as you wish. However, it saves whatever you record in M4A format by default, making audio conversion a necessity if you want playback anywhere.
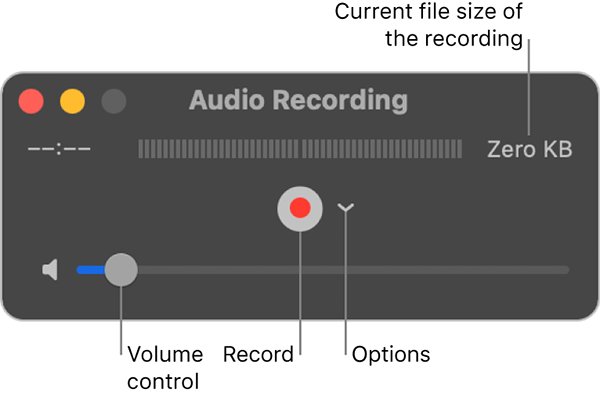
- Step 1: Run the QuickTime app on your Mac, then choose File → New Audio Recording at the top menu.
- Step 2: Click the Options pop-up menu. Afterwards, you can choose either built-microphone or other available option under the Microphone section.
- Step 3: Select the recording quality (High or Maximum) and adjust the volume to an optimal level.
- Step 4: Click the Record button to start recording your voice, and when you finish recording, click Stop button.
- Step 5: Head to File and then Save to store your voice recording file on the local folder.
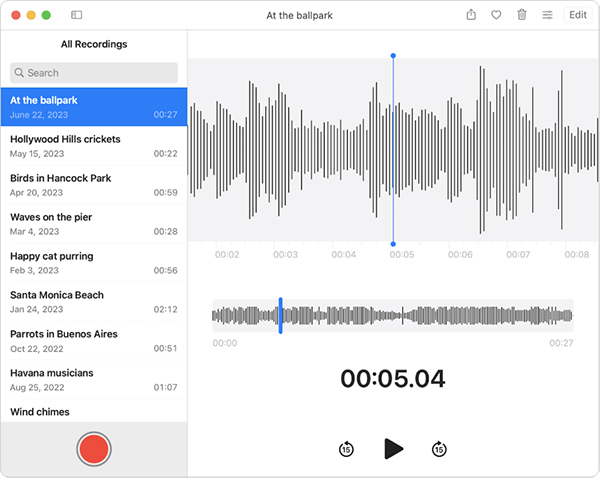
2.2 Voice Memos
The same as iPhone, Voice Memos is a default recording tool on your Mac computer. It enables you to grab your voice from the built-in microphone, an external microphone or even a supported headset. Expediently, the completed voice recording files are playable on any Apple devices where you have signed in using the same Apple ID. For quick sharing and better management, Voice Memos additionally empowers you to trim and rename the recordings.
- Step 1: Open Voice Memos app on your Mac computer.
- Step 2: Click the Record button (or use Touch Bar) to start recording your voice from microphone.
- Step 3: You can use the Pause button to pause whenever you want or continue with the Resume button.
- Step 4: Simply click on the Done button to stop your voice recording process and you can use the Edit button to trim your recording file.
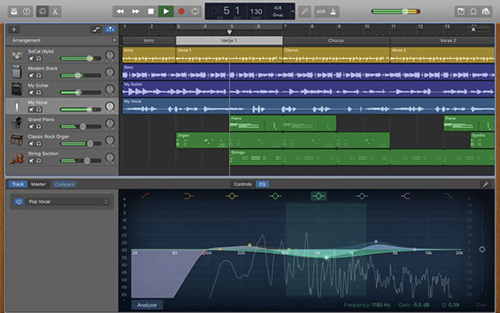
2.3 GarageBand
GarageBand is a voice recorder developed with professional-level features for experts. It always be regarded as a dedicated music creation studio, allowing you to play, record, produce and share your hits all over the world. You can make full use of it to capture your singing, create your song, or simply grab what you say into the microphone. To delight you, it can support both internal and external microphones.
- Step 1: Use the built-in microphone on your Mac or connect an external one by plugging it into the line-in port.
- Step 2: To set input sound device, you can go to Apple menu → System Preferences → Sound. Then choose whichever you want.
- Step 3: Open GarageBand on your Mac computer and start a new project by clicking New Project.
- Step 4: To choose a track type, select "Record using a microphone or line input" under the Audio section.
- Step 5: Hit Details to unfold all options. Here you can choose to record from internal microphone. (If you'd like to record voice from the external microphone, go to GarageBand → Settings → Audio/MIDI tab.)
- Step 6: After clicking on Create button, you can open a new project in GarageBand.
- Step 7: Now click on the Record button in GarageBand and speak to your microphone. Once done, simply click on the Stop button.
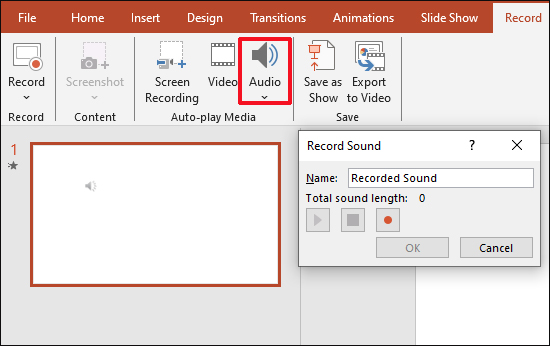
2.4 PowerPoint
A large number of users wonder how to record voice on PowerPoint Mac. Happily, PowerPoint can do this for you. It has the ability to not only record screen with audio but also record audio only by using a microphone. The recorded file can be exported as an independent media file to save on your local computer. You can also insert it to your slide for presentation.
- Step 1: Download, install and open PowerPoint on your Mac computer.
- Step 2: Create a new PowerPoint presentation and choose Record at the top menu.
- Step 3: Select Audio → Record Audio... option.
- Step 4: Name the sound recording file and click on the red Record button to start recording your what you speak into the microphone.
- Step 5: Click on the red button again to stop capturing your voice.
- Step 6: Right-click the audio in the slide and click "Save Media as..." to store your voice recording as an independent file on your Mac computer.
Part 3. Conclusion
As you can see, there are different solutions to record voice on Mac. You can use either the built-in or third-party voice recorders to get this simple task done. If you want to take more control over what you're recording and what you can do after recording, Joyoshare VidiKit can be an optimum option to consider. It record your microphone voice as well as system audio in high quality.