
Q: "Hi guys, have an issue I can not fix. A large amount of my pictures in the photos app are greyed out. Done a repair, backed-up my pictures deleted the library and added the library again. Noting seems to be working, it stays greyed out. Anyone has an idea?" - Dewald from Apple Community
Nowadays, we are more likely to capture and share our moments on social networks. So, choosing the mobile device with a high-quality feature is a common wish. That's why iPhone has long been favored by most users due to its remarkable Camera. However, some may meet the situation when they are passionate to select the pictures for sharing with others, only to discover the phenomenon that iPhone photos greyed out. Why would this upsetting situation happen and can we recover our photos? The post will give you an accurate, detailed, and practical answer.
- Part 1. Why Does iPhone Photos Grey Out?
- Part 2. Fixes to iPhone Photos Greyed Out
- Method 1. Take Photos Slowly
- Method 2. Redownload the Photos
- Method 3. Check Storage of iPhone
- Method 4. Save Photos in the Editor
- Method 5. Force Restart iPhone
- Method 6. Repair Storage Device
- Method 7. Unhampered Fix to iPhone Photos Greyed Out [Zero Data Loss]
- Method 8. Recover Photos with iPhone Data Recovery
- Method 9. Restore iPhone via iTunes
- Part 3. FAQs about Greyed Out Photos on iPhone
- Part 4. Final Words
Part 1. Why Does iPhone Photos Grey Out?
Various reasons have contributed to this photo issue. The most possible reason is that the pictures are corrupted because of iOS system bugs or hardware problems. Or photos fail to transfer completely due to an abrupt system shutdown or power shutdown. Besides, the storage space is also a limited factor, making sure your device has enough storage space. And don't overlook that taking photos too quickly and unsafe photo recovery tool are both contributing factors.
Part 2. Fixes to iPhone Photos Greyed Out
The following methods are tested useful to fix greyed out photos on iPhone. You could flip through each of them and find the best fit for you.
1. Take Photos Slowly
You may not anticipate that taking photos too quickly would cause photos shown as gray boxes. This is what actually happened to some of iPhone users. Taking photos slowly could give camera more time to respond to our instruction. If you find that your iPhone photos are unable to show normally, you could open the camera and take photos at a low speed again to fix the problem.
2. Redownload the Photos
If your greyed out photos are downloading from websites or a computer, the abrupt shutdown, accidental disconnection, or unstable internet state could affect the display of photos. In this case, you can download the photos again to check whether they can return to normal
3. Check Storage of iPhone
iPhone photos showing up as gray boxes may also be associated with the storage. So, ensure your iPhone has enough storage, especially if you want to preserve many high-quality photos. To check and clean storage, you could:
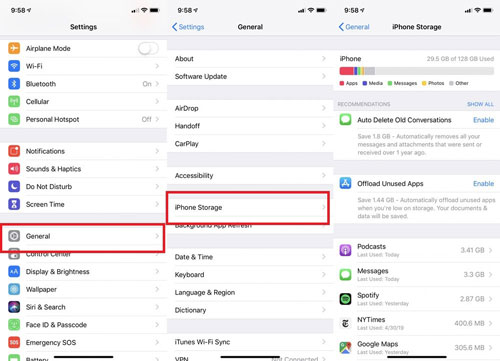
- Step 1: Open Settings on iPhone, and select General.
- Step 2: Open iPhone Storage. You'll see how much space occupied by each app and choose to offload or delete the app that you rarely use to have more storage space.
4. Save Photos in the Editor
There is also another less-known method to recover greyed out photos on iPhone, which needs the help of the editor. You need to open your broken photos and tap the edit. Then you could make a slight adjustment to the original photos and save them in your photo collection. There is a big chance that your photos would appear without gray boxes.
5. Force Restart iPhone
Force restart your iPhone can always fix some small glitches of iPhone while cleaning up iPhone's memory. If the pictures covering with gray box still remains unsettled, you can try this method with the following instruction:

- For iPhone 8 or iPhone SE (2nd generation) and later: Give a quick press on Volume Up button and release it, give a quick press on Volume Down button and release it. Then long press and hold the Side button till the screen shows the logo of Apple.
- For iPhone 7: Prepare to press and hold both buttons at the same time-Volume Down button and Sleep or Wake button. Then release them when you see the logo of Apple.
- For iPhone 6s or iPhone SE (1st generation): Prepare to press and hold both buttons at the same time-Sleep or Wake button and Home button. Once the logo of Apple shows, release both of them.
6. Repair Storage Device
The damaged photos could also be caused by corrupted storage device. To repair storage device, you could:
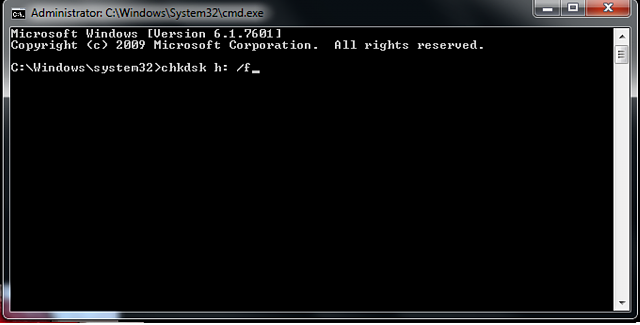
- Step 1: Connect your SD card or other storage device with your computer via a card reader.
- Step 2: In start menu, you need to type "cmd" in a search bar and click on enter. Then select Run as Administrator.
- Step 3: Enter the command in the picture above to start repairing corrupted storage device.
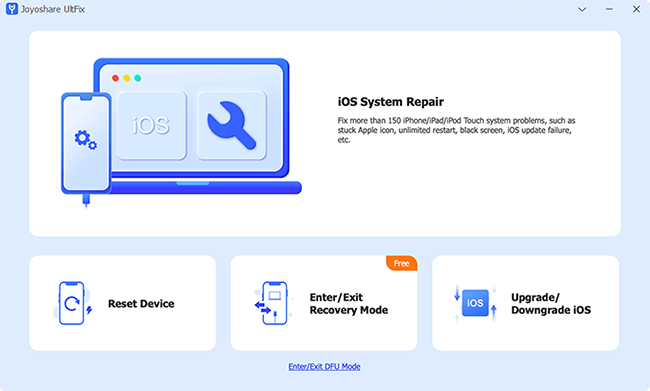
7. Unhampered Fix to iPhone Photos Greyed Out [Zero Data Loss]
Well, if greyed out photos issue still hasn't gone away, you may resort to more proficient and efficient tool. And Joyoshare UltFix is the one that quite satisfies your needs. As a powerful iOS system repair tool, it can not only deal with the photo issue, such as iPhone unable to share photos or photos appearing as gray boxes, but also fix more than 150 iOS-related system issues at ease. More importantly, it won't cause any data loss and protect your privacy in a secure way. It is also equipped with many enhanced features waiting for you to explore, and you don't have to worry about compatibility issue at all since it runs well with the latest version and models.

- Fix photos greyed out on iPhone in simple steps
- Dual modes to achieve comprehensive repair
- Free for you to get in and out of recovery mode
- Upgrade and downgrade iOS as you wish
Step 1 Plug iPhone into PC
Making sure you have installed the software on your computer ahead. Then plug your iPhone with the photo issue to the computer. Open Joyoshare iOS system repair tool, you need to click on iOS System Repair and followed by Start button.
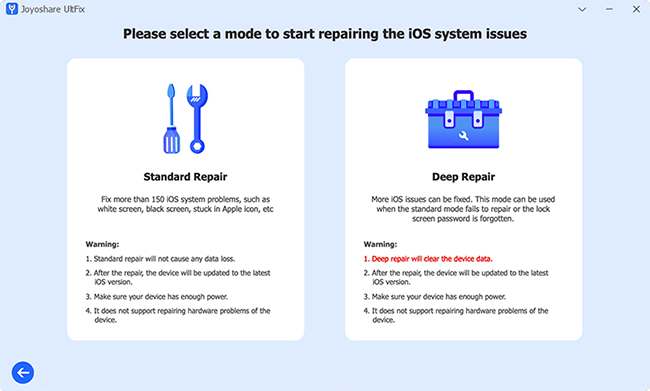
Step 2 Choose Standard Mode without Data Damage
The dual modes of Joyoshare UltFix will appear in the interface. The Standard Repair is an appropriate choice for fixing almost all fundamental iOS system problems without any risk of losing data, while the Deep Repair is suitable for fixing serious system problems and it would erase all data. Here, you should select the previous mode to start to fix the problem.
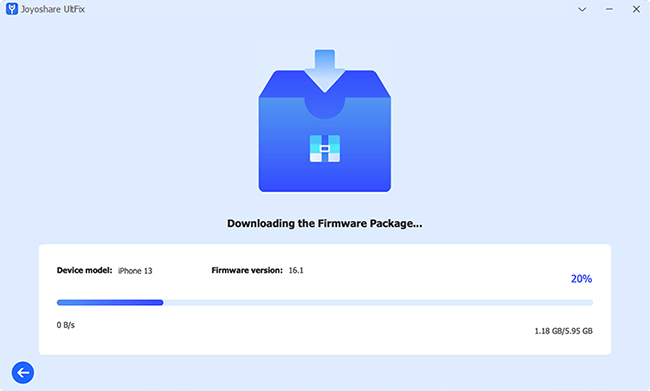
Step 3 Download the Compatible Firmware Package
The basic information would be detected by the software and displayed in the interface at first. Verify the information carefully and click on Download button. Then the firmware package will be downloaded automatically.
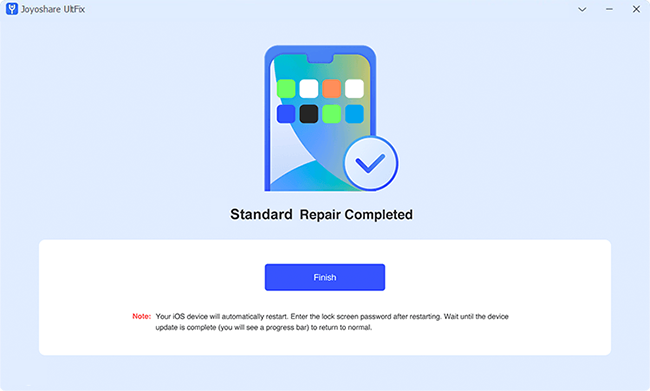
Step 4 Fix Greyed Out Photos on iPhone
Once the package has been downloaded, hit on Repair button to unzip it. The software will begin to repair the photo issue in a short time.
8. Recover Photos with iPhone Data Recovery
Recovering your damaged photos via a safe and quick third-party tool is also a wise choice. Sometimes the photo showing as the gray box is just a display problem. Joyoshare iPhone Data Recovery can bring those original photos back to you. It supports recovering more than 20 types of data files from iDevices. Its fast recovery speed, highest recovery rate and flexible features make it worthwhile to fix the issue. What's more, you are free to scan and preview all your data in advance, and you can select to recover the data you want.
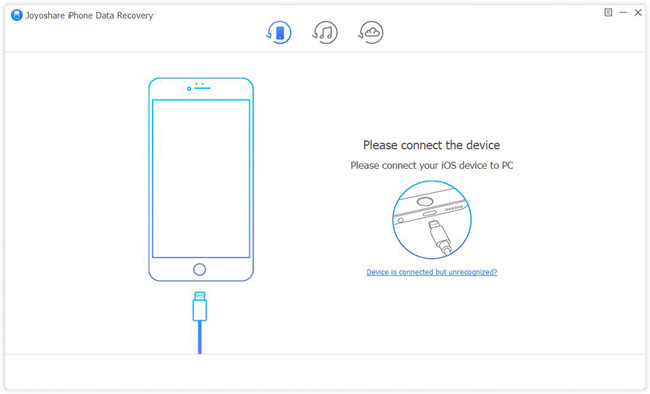
- Step 1: After installing the tool, you need to plug your iPhone into the computer. Then open Joyoshare iPhone Data Recovery up, and it will start to detect your iPhone automatically.
- Step 2: After detecting, you will be required to check the device information. Then you could choose the first "Recover form iDevice" mode and click on Scan button to scan all data on your iPhone.
- Step 3: When the scanning process is finished, you are allowed to preview all data and you can select the specific photos to recover with a simple click on Recover button.
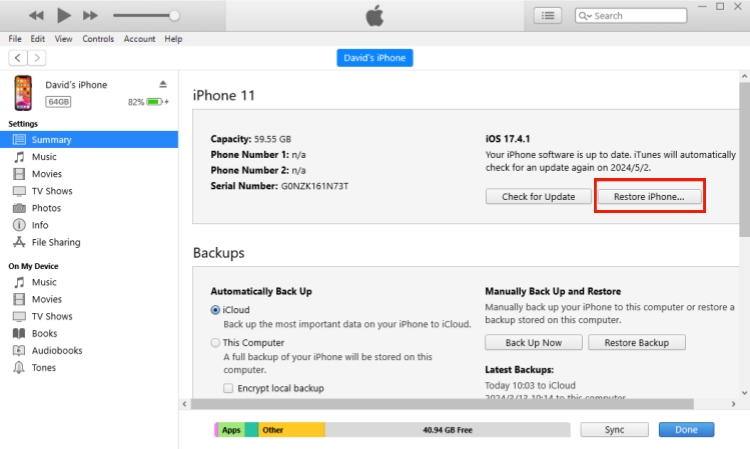
9. Restore iPhone via iTunes
It is also recommended to restore your iPhone via iTunes to fix the photo issue. But this method will cause losing all your data. Remember to back up before starting this way.
- Step 1: After installing the tool, you need to plug your iPhone into the computer. Then open Joyoshare up, and it will start to detect your iPhone automatically.
- Step 2: After detecting, you will be required to check the device information. Then you could choose the first recovery mode and click on Scan button to scan all data on your iPhone.
- Step 3: When the scanning process is finished, you are allowed to preview all data and you can select the specific photos to recover with a simple click on Recover button.
Part 3. Some FAQs of iPhone Disabled for Years
Q1. Are there good methods to prevent greyed out photos on iPhone?
A: You should make sure you have enough storage space all the time. And when you are downloading pictures from the right places, ensure you have a stable connection. If the problem still comes out, try the methods above can help you fix it.
Q2. What else can I do if iPhone photos still show as gray boxes?
A: After tying all methods above and the photo is still damaged, you'd better ask for help from Apple Support. You could give a detailed description to their professional teams to get further help.
Q3. Do I need to update my iOS version to fix greyed out photos on iPhone?
A: Updating your iOS version is also a good try since the latest version will fix some iPhone glitches, maybe the problem could be solved in this way.
Q4. What if other iPhone photo issues occur later? How do I get my photos back to normal on iPhone?
A: Many methods above are also suitable for other iPhone photo issues, you could give it a try. Still, I recommend Joyoshare UltFix to you since it could fix more than 150 iOS issues, which safeguards your system.
Part 4. Final Words
Now you won't be upset about the issue that iPhone photos greyed out since you have learned so many solutions to deal with it. If the photo issue is connected to iOS system problems, don't miss Joyoshare UltFix, which is a good helper no matter what your problem is. Hope this post could resolve your issue quickly.
