
Q:"Is anyone else running iOS 13 having problems with their autocorrect? I know it sounds weird but my keyboard is showing the word I type correctly but as soon as I hit space bar it changes it to either something different or just goes ahead and misspells it. Anyone else is experiencing this?" - From Reddit
iPhone autocorrect not working is one of the most frequently-asked questions by Apple users. Sometimes your phone will automatically change your words wrongly based on what it understands or without giving any hint of how to modify it. This makes your text editing very inconvenient. As a result, let's fix it as soon as possible so that you can use it normally again.
- Method 1: Open Auto-Correction Settings
- Method 2: Activate Predictive and Spelling Options
- Method 3: Reset Keyboard Dictionary
- Method 4: Create Text Replacement
- Method 5: Repair iOS System - No Data Damage
- Method 6: Train iPhone New Words
Part 1. Check Auto-Correction Settings
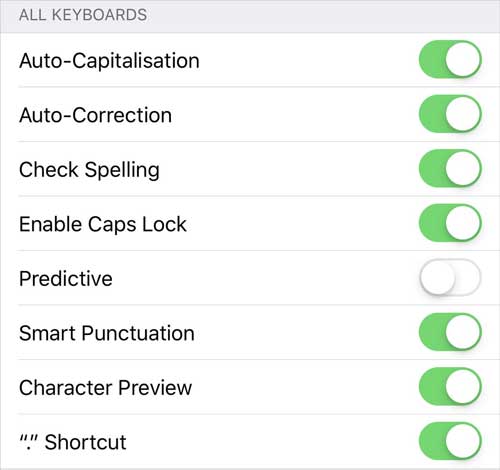
The most basic way is to check whether Auto-Correction option is enabled on your iPhone in case you ever turn it off by accident. To do it, just open "Settings" on iPhone, go to "General" and find "Keyboards". Under this section, confirm that you have switched "Auto-Correction" on.

Part 2. Enable Predictive and Spelling Options
In order to write the right word, both "Predictive" and "Spelling" settings are essential. The former allows your iPhone to learn what your vocabulary is and give some suggestions to help while the latter can guarantee that your iPhone's autocorrect ability functions well. So, you'd better go to "Settings" - "General" - "Keyboards" to toggle "Predictive" and "Check Spelling" on.
Part 3. Reset Dictionary
After setting all options related to autocorrect properly, you may still have question like "my autocorrect isn't working on iPhone, what can I do?". In this case, you are supposed to reset keyboard dictionary so that the pesky misspelled words can be completely erased. Now, follow our steps to delete all custom words and return dictionary back to factory defaults.
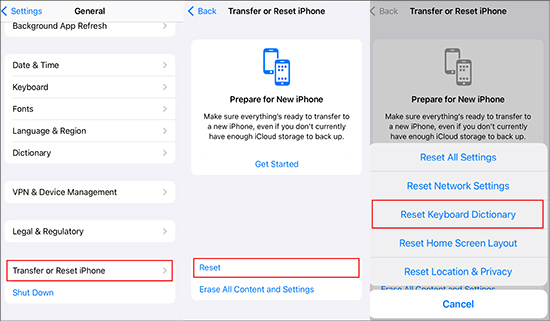
Step 1: Click on "Settings" icon to open it on iPhone;
Step 2: Head to "General" > "Reset";
Step 3: Touch on "Reset Keyboard Dictionary" to reset it.
Part 4. Use Text Replacement
Text Replacement is an alternative solution that you can use. It utilizes shortcuts or abbreviations to effectively replace your own common phrases. Therefore, you might as well apply this cunning trick to create text replacements for those words that always auto-correct in a wrong way by your iPhone.
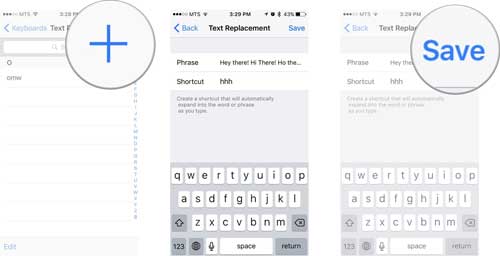
Step 1: Go for "Settings" - "General" - "Keyboard" on iPhone;
Step 2: Find "Text Replacement" and press on the "+" option to create desired text replacement;
Step 3: Type in right word into "Phrase" box and "Save".
5. Losslessly Fix iPhone Autocorrect Not Working
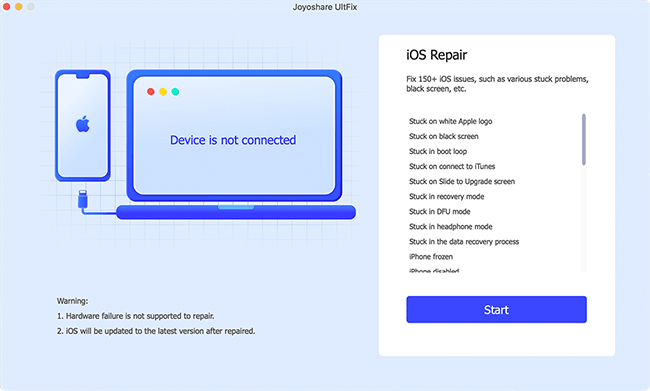
To fully fix the iPhone's own iOS bug or crash, Joyoshare UltFix iOS System Recovery is a good choice to consider. It works to freely exit and enter recovery mode using one click. Aside from iPhone Auto-Correction not working, it's capable of repairing iPhone glitchy auto-lock, Spotlight Search, Vibration, proximity sensor, flashlight, GPS, hotspot and more without data loss.
Fix autocorrect errors on iPhone/iPad/iPod/Apple TV
Free access to fast exit and enter recovery mode
Repair various possible iOS/tvOS problems with no data loss at all
Support iOS devices and versions, even the newest one (iOS 13)
Step 1: Get the prepared program of Joyoshare UltFix launched on your PC or Mac. As it indicates on the screen, connect your iPhone device to the computer. Then click on the "Start" button once it's successfully detected.
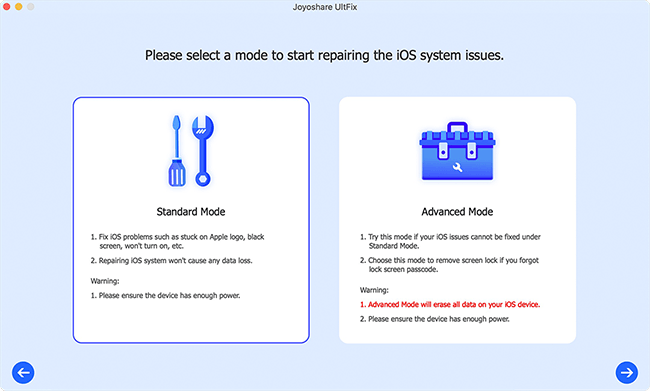
Step 2: Two available repairing modes will be provided by this program. To keep all data intact without losing, you're able to select the first "Standard Mode" and simply press on "Next" to continue.
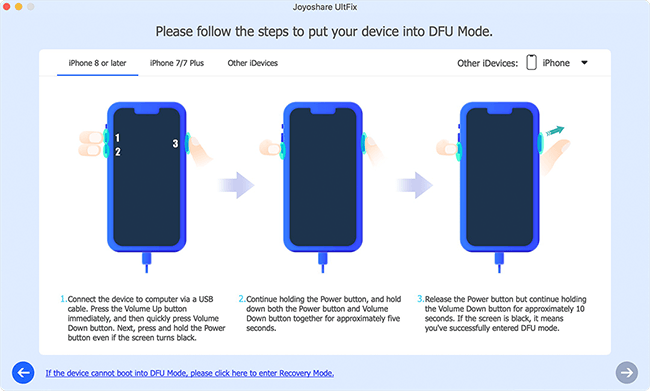
Step 3: You're required to confirm the device model of your iPhone and begin to boot it to either DFU or recovery mode by following the onscreen steps. When complete entering mode, hit the blue "Next" button.
Step 4: Check all device info that comes from your connected iPhone. If there is something incorrect, change it by yourself. Then, "Download" a matchable firmware package and finish verification.

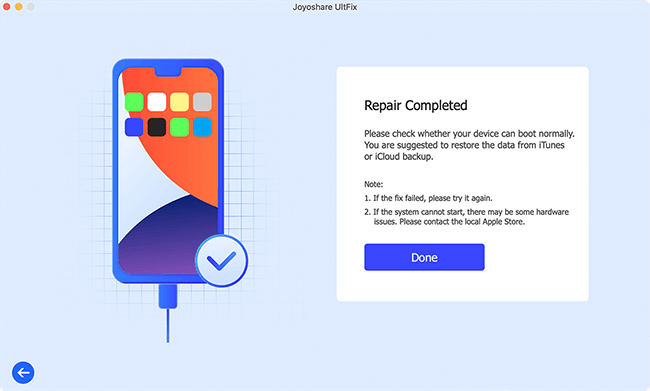
Step 5: Initiate fixing iOS process by tapping on the "Repair" option at the right bottom. Wait until the fix is completely over and your phone is rebooted. The troublesome Auto-Correction erros will be removed.
Part 6. Train iPhone New Words
It's useful to have your iPhone add new words you often use to its dictionary, but it may take a while for it to remember them. To do it, you have to turn off the auto-correction prompt when it appears. Next, train the phone by repeatedly typing in the words it needs to remember. After a certain number of repetitions, your phone will add it to the lexicon and will show it next time you type in it.
