Since the Live Photo feature was added to iPhone and Android camera app, taking photos has become even cooler than before. You only need to make a 3D touch on these created Live Photos; the captured moments and the accompanying sounds will play simultaneously. Now, what's more interesting is that you can freely edit Live photos to make them look better, such as making a new key photo, adding Live Photo effect, disabling Live Photo sound, extracting desired frames, etc. Let's do it together by referring to following guide here.
- Part 1. Extract Frames from Live Photo
- Part 2. Set Key Photo for Live Photo
- Part 3. Add Cool Effect to Live Photo
- Part 4. Turn Off Sound of Live Photo
- Part 5. Edit Live Photos with Various Tools
Part 1. How to Extract Frames from Live Photo
As a matter of fact, your Live Photos are made up of a series of frames, which consequently combine together to generate one Live Photo file. In case you feel like extracting frame from Live Photo, Joyoshare LivePhoto Converter for Windows (or Joyoshare LivePhoto Converter for Mac) comes to rescue here.
Step 1: Launch Joyoshare LivePhoto Converter and add files;
Step 2: Press on the "Edit" button behind required Live Photo;
Step 3: Preview all frames one after another and tick wanted ones;
Step 4: Tap on "OK" and go to "Format" panel to choose output format;
Step 5: Simply click on the "Convert" button to export all selected frames.
Key Features of Joyoshare LivePhoto Converter:
Extract frame from Live Photo handily
Play, edit and preview Live Photos in the way you like
Support multiple output formats: JPG, PNG, GIF, BMP, etc.
Have ability to conduct both individual and batch conversion modes

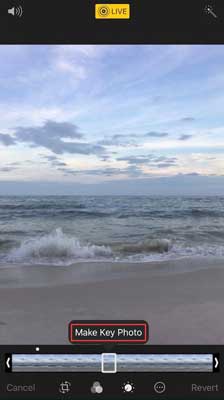
Part 2. How to Change Key Photo for Live Photo
Want to change a key photo according to your preference rather than use the systematic one? It's downright hassle-free in any iOS 11 and later version devices. What you have to do is just select one favored picture from the range of frames and set it as key photo. Here's how.
Step 1: Open "Photos" app and go to your albums to choose one Live Photo that you'd like to edit;
Step 2: Tap on "Edit" option in the top right corner of this ready image;
Step 3: Move the slider at the bottom of the Live Photo to choose one frame;
Step 4: Click on "Make Key Photo" and press "Done".
Part 3. How to Apply Effect to Live Photo
In iOS 11 and later, you are also allowed to add different Live Photo effects based on your own requirements. To make your Live Photos more vivid and expressive, you can do as below:
Step 1: Confirm one Live Photo on "Photos" to edit later;
Step 2: Swipe up from the center of the Live Photo until you can see effects;
Step 3: Select Loop, Bounce or Long Exposure at your own will.
Loop: Make a Live Photo into a video loop. You can pick up one image by yourself or directly use the suggested one to get a great cycle.
Bounce: Play your Live Photo forward and then quickly play it in reverse.
Long Exposure: Capture all elements of movements and time of required Live Photo to create a charming effect.

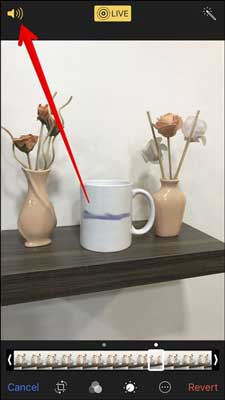
Part 4. How to Mute Live Photo Sound
As you know, Live Photo can shoot short video and grab related sound at the same time. If you are going to turn off sound for your photo file, just have a close look at following step-by-step guide:
Step 1: Head to "Photos" > "Live Photo" > "Edit";
Step 2: At the top left corner to the image, press on the sound button to get it disabled;
Step 3: Click "Done" button at the right bottom to confirm what you change.
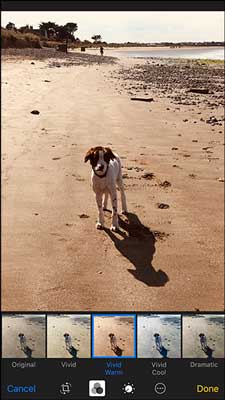
Part 5. How to Edit Live Photo with Editing Tools
Just like what you do for other common pictures, you can also get access to edit your Live Photos by cropping it, adding filters, adjusting light and more. Check out as follows:
Step 1: Go to "Photos" app on your iOS device;
Step 2: Choose one specific Live Photo and click "Edit" on its top right corner;
Step 3: Tap on the "Filter" tool at the bottom of the screen;
Step 4: Look through all filters from left to right to choose the one you best like and press "Done".
Note: You can as well make the most use of available editing tools at the bottom of the screen as per your own actual needs.