Q:"How to import Live Photos in full resolution JPG form from an iPhone to a Windows computer? My wife took many pictures that are apparently 'Live Photos'. I tried importing them to Windows, but some have the .mov extension while others are .jpg or .heic. Is there a way to export all of the Live Photos she wants into JPGs?" - Raskolnikov from StackExchange
As Raskolnikov described, an Apple Live Photo is essentially a hybrid file. It combines an animated MOV video and a static image. However, when you transfer these files to a PC or Mac, they often split into separate files or stay in Apple's native HEIC format, leaving many users wondering how to convert Live Photo to JPG easily without losing image quality.
- On Mac: Use the native Photos app. Select your Live Photo, click File > Export > Export 1 Photo, and choose JPEG.
- On Windows PC: Connect your iPhone via USB. Open File Explorer, go to the DCIM folder, and locate the JPG file that shares the exact same name as the MOV file.
- Best for Batch Conversion: Use a dedicated tool like Joyoshare LivePhoto Converter to process hundreds of photos at once smoothly.
- Part 1. Free & Native Ways to Get JPGs on PC/Mac
- Part 2. Best Tool to Batch Convert Live Photos to JPGs
- Part 3. Step-by-Step Guide to Convert Live Photos
- Part 4. FAQs About Live Photos
Part 1. Free & Native Ways to Get JPGs on PC/Mac
If you only have a few Live Photos to deal with, you can completely rely on the built-in tools on your computer. Here are the two most practical methods:
Method 1: Export via Mac Photos App
If you use a Mac and iCloud, your iPhone's Live Photos are already synced. You can export the still image directly from the native Photos app.
- Open the Photos app on your Mac.
- Select the Live Photo(s) you want to convert.
- In the top menu bar, click File > Export > Export X Photos.
- In the popup menu, set the Photo Kind to JPEG. Click Export and choose your destination folder.
Method 2: Extract via Windows File Explorer
Windows doesn't natively "play" Live Photos. When you connect your iPhone to a PC, Windows separates the Live Photo into two distinct files.
- Connect your iPhone to your Windows PC using a USB cable. Allow access to photos if prompted on your phone.
- Open File Explorer and navigate to This PC > Apple iPhone > Internal Storage > DCIM.
- Locate your photo. You will see two files with the same name: one .MOV (the video component) and one .JPG or .HEIC (the still image).
- Simply copy the .JPG file to your desktop. You can safely ignore or delete the .MOV file.
Part 1. Free Live Photo to JPG Converter - Joyoshare LivePhoto Converter
While native methods work fine for a handful of pictures, doing this for hundreds of photos is incredibly tedious. Furthermore, if your iPhone is set to "High Efficiency", Windows File Explorer will only give you HEIC files instead of JPGs.
This is where Joyoshare LivePhoto Converter shines. This brilliant program is specifically designed to convert Live Photos to popular still formats like JPG, BMP, PNG, TIFF, and WEBP in bulk. You can even use it to turn your Live Photos into animated GIFs.
Beyond simple conversion, Joyoshare allows you to preview the animated frames and extract your preferred frame as the main JPG. You have full control over output quality, resolution, and aspect ratio.
Key Features of Joyoshare LivePhoto Converter:
Turn Live Photo to JPG singly or in bulk
Support more output formats: GIF, PNG, BMP, etc.
Applicable for both iOS and Android Live Photos
Offer real-time preview and quality adjustment
Part 3. Quick Guide to Convert Live Photos to JPEG in High Efficiency
The one who has thousands of Live Photos had better refer to following steps to instantly conduct Live Photo to JPG batch conversion. Sure, if there are only several files to be converted, it's practical to change them one after another. Next we will take Joyoshare LivePhoto Converter for Windows as an example to guide you step by step (Joyoshare LivePhoto Converter is downloadable and installable on not only Windows but also Mac).
Step 1 Sync and Transfer Live Photos to Windows
At first, keep all your Live Photos (iDevice/Android) synced and transferred to your Windows by using an USB cable to connect device with computer. Then go direct to launch LivePhoto Converter in Joyoshare VidiKit.
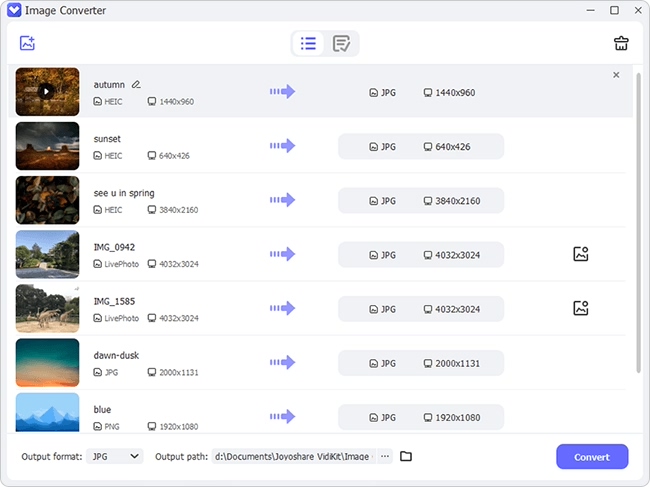
Step 2 Import ready Live Photos
To save time, you can straightly get the whole Live Photo folder or all Live Photo files chosen and drag & drop them to the main interface. Alternatively, you can only add specific Live Photo to the conversion list if you want to convert to different format.
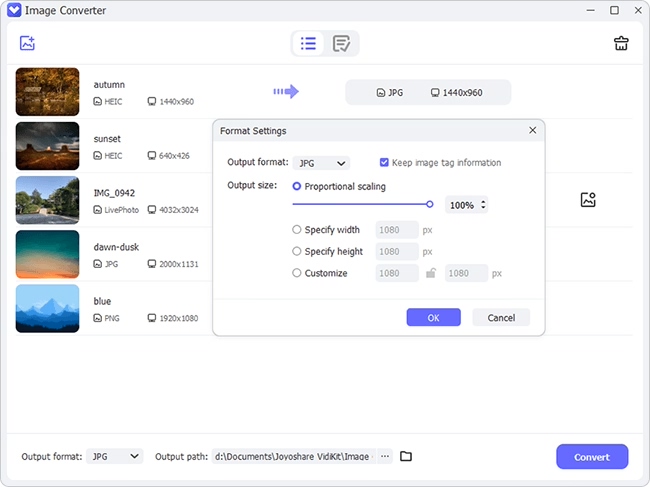
Step 3 Select JPG and confirm settings
To turn Live Photos to JPGs, you just have to select "JPG" by entering "Format" panel. At the same time, you can move the slider to adjust quality and set definite value for resolution flexibly. Tick the box of "Keep aspect ratio" if necessary.
Note: If you would like to preview and edit Live Photos before conversion, you can get down to clicking corresponding button behind the selected file. Play it in real time or pick up given frames after preview.
Step 4 Begin to convert Live Photo to JPG
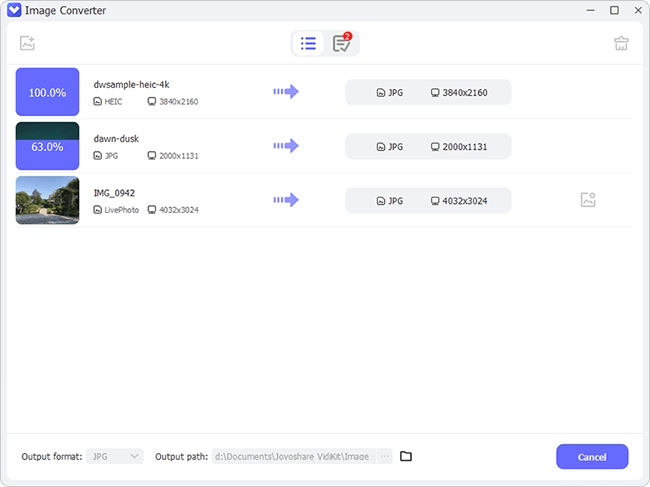
Since everything is prepared well, you can go ahead to tap on the "Convert" button at the right bottom. It will take you a while to complete conversion. Afterwards, all finished files will be saved at "Converted" section. Go there to have a check.
Part 4. FAQs About Live Photos
1. Does converting a Live Photo to JPG delete the video part?
Yes. JPG is a static image format. When you convert a Live Photo to JPG, you are extracting the main still frame. The animation (MOV part) will be left behind or discarded depending on the tool you use.
2. Can I convert a Live Photo to JPG directly on my iPhone?
Yes. Open the Photos app on your iPhone, select the Live Photo, tap the Share icon, and choose Duplicate. Then, select Duplicate as Still Photo. This will create a static JPG/HEIC copy in your camera roll.
3. Why are my Live Photos saving as HEIC instead of JPG?
This happens because Apple devices default to "High Efficiency" formats to save storage space. If you want your iPhone to always transfer JPGs to your PC, go to Settings > Photos > Transfer to Mac or PC, and select Automatic instead of Keep Originals.
Conclusion
Converting Live Photos to JPG format on your PC or Mac doesn't have to be a complicated process. If you only have a few files, taking advantage of the native Mac Photos app or Windows File Explorer is both quick and free. However, if you are dealing with a large collection of Live Photos and want to save time while ensuring the highest output quality, a dedicated tool like Joyoshare LivePhoto Converter is your best choice. It simplifies bulk conversions and gives you total control over the final images. Pick the method that best suits your needs and start managing your photo library with ease!
