Have you wondered how you can cut an interesting plot from a large video on Mac? Though majority of video players include full supports to save small clips as GIF and allow you to share it to other social platforms, it seems hard to keep desirable segments left with accuracy to each second. Without doubt, you may get into trouble in processing your large video, not just confined to this case. How to make it intelligently? Take it easy and you will release yourself from depression. Here a wonderful solution provided for you to trim video on Mac. If you are fond of the local support from Mac, you can directly ask QuickTime for help. However, if you pursue a dedicated video cutter for Mac, you can get excellent tool as well. Don't hesitate. Follow me!
- Method 1. Trim Video Clips on Mac with QuickTime
- Method 2. Cut Video Clips on Mac with Joyoshare Video Trimmer
- Method 3. Trim Video Clips Free on Mac with VLC
Method 1. How to Trim a Video on Mac - Built-in QuickTime Software
Considering there is no installation requirement, QuickTime Application can be regarded as the optimal choice for you to trim video clips on Mac. Here you can have a look at how to operate at every step.
Note: QuickTime is a built-in tool that is developed with different functions. However, it can only have basic process for your video clips to be trimmed. If you want to look for more professional one, you can choose other available method that will be mentioned at a later time.
Step 1 Open the video clips with QuickTime
By default, most video will be opened with QuickTime on Mac. If not, you can select the video clip and right-click Open With to choose "QuickTime Player".

Note: It is also workable to launch "QuickTime" app in the menu bar firstly and go for "File" > "Open File" to choose the video clip you want.
Step 2 Navigate to Trim option
Head to "Edit" in the menu bar and hit the "Trim" button. Or you can utilize the shortcut "Command+T" manually.

Step 3 Set cutting segment
After importing the video clip to QuickTime, you can prepare to shorten its length. With a special red playhead, it is convenient for you to narrow down your split point. Then move the small handles to decide an exact area.

Step 4 Begin to trim the video clip on Mac
Now, it's time to press the "Trim" button so that you can keep the pleasing parts left.
Method 2. Trim Video on Mac - Joyoshare Video Trimmer
To keep your video clips organized, you'd better take advantage of a more brilliant video cutting program, with which you can get an access to trim not only video but also audio on Mac without damaging the original quality.
Here you cannot miss Joyoshare Video Trimmer, a decent tool to get rid of needless fragments from the original video file. It comes with all-round options to save the completed video cuttings to any widely-used format as well as popular device, for instance, M4V, MP4, AVI, MPG, MPEG, 3GP, 3G2, MKV, WMV, iPhone, Android, smart TVs, game consoles, etc.
Moreover, it has a powerful capability to work at up to 60X faster speed to trim videos in no time possibly.
Key Features of Joyoshare Video Trimmer:
Trim any video clips in 1:1 original quality
Available to different Mac operating systems
With up to 60X faster speed to cut and trim
Built-in video editor to crop, subtitle, rotate, effect, etc.
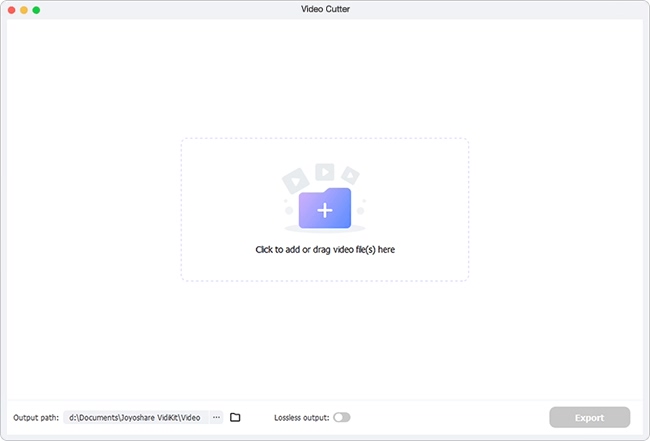
Step 1 Import a video file to Joyoshare Video Trimmer for Mac
Once you have launched Joyoshare Video Trimmer for Mac, you will see "Drag media files here to start" area displayed on the main interface. Do as what it guides or simply hit the "Open" button located at the bottom right corner. Having added video clip that you would like to trim, you can head to the next step.
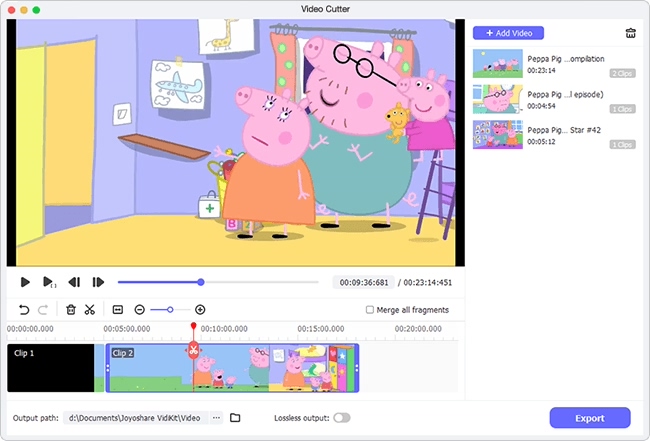
Step 2 Choose clips and trim video in Mac
It is flexible to leave out the unwanted portions by making use of Joyoshare Video Trimmer. You can move the beginning and end handles to the desired position. Additionally, you can also input the accurate start time and end time to set the temporal interval. No matter which method you prefer, the precision will be guaranteed.

Note: The same video file can be cut and edited into multiple segments at a time. What you need to do is just press the "+" button at the bottom left corner. By the way, to combine them into one, you can tick the "Merge segments" option.
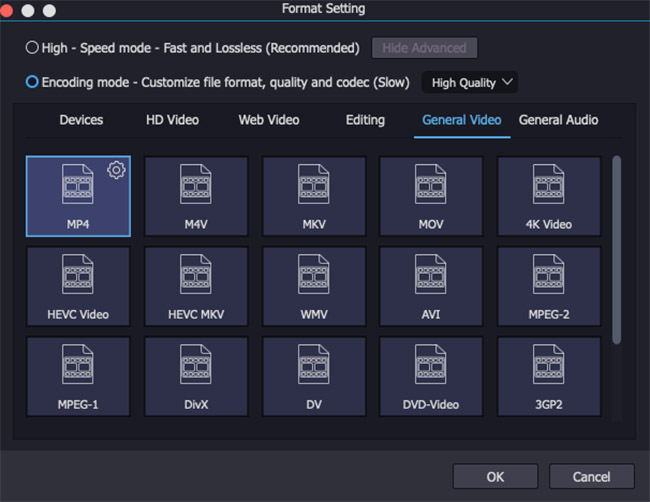
Step 3 Confirm format settings
As long as the video clip to be trimmed is ready, you can select the output format as well as favorite device based on your own requirements. Right here, 'High-Speed mode' allows lossless video trimming while "Encoding mode" lets you customize the file quality, video size and codec. Just pick up one as per your needs.
Step 4 Output and save video clips on Mac
It is high time that you should click the "Start" button to conduct a video trimming progress. Upon it finishes, there will pop up a window to let you check your trimmed video clips.
Method 3. How Does VLC Trim Video Mac
Frankly, a large number of users wonder how to trim videos on Mac using the popular multimedia tool - VLC. It's indeed able to trim but has some limitations, such as cannot cut out multiple clips from one video, cannot trim video to several segments at once, cannot support batch video trimming and cannot delete the middle of a video. If you know all of these and still desire to try it, you can look at the guide below:

Guide:
Step 1: Open the downloaded VLC on your Mac;
Step 2: Go to "VLC" > "Preferences" > "Input/Codecs" > "Record directory or filename" to select a location for your trimmed video and "Save";
Step 3: Now drag and drop your target video to VLC's playlist and double click it to play the file;
Step 4: Move and make the video playhead pause wherever you want to trim as a start;
Step 5: Head to "Playback" > "Record" to decide the start point;
Step 6: Hit your spacebar to resume the video playback, similarly pause, and press "Record" to choose a end point;
Step 7: You cut video clips with VLC after confirming both start and end points. Then go to the previous location you set to check it.
