Q:"Can Avidemux cut video file without re-encoding? I need a detailed guide. Thanks." - from How-To Geek Forum
In editing, cutting or trimming is the most basic means of optimizing a video. More often than that, you need to cut off the beginning, remove the end, or delete anything undesired off your video to leave the wonderful content alone. On this occasion, are you prepared to use a free and popular video editor - Avidemux to perform the cutting task but have no idea how to operate without a tutorial? As luck would have it, this article expounds the stepwise guide on how to cut video in Avidemux, and incidentally introduces an alternative to do video cutting or trimming with zero loss.
Part 1: How Does Avidemux Trim Video - No Re-encoding
Known as an open-source and gratuitous video editor, Avidemux is naturally sought after by numerous Windows, Mac, Linux, or BSD users. With it, you are able to do simple cutting, cropping, rotating, filtering, and transcoding tasks. Those who are experienced have the skill to quickly and simply operate Avidemux for their own use. However, some with zero experience in Avidemux might not finish the cutting task without instructions. To give a hand, the following presents a step-by-step guide on how to use Avidemux to cut video without re-encoding.
Step 1 Load video to Avidemux
To cut and trim video in Avidemux, you must firstly equip the program with your computer. Run it and go to "File" > "Open..." or click on "Open Video" icon to upload your video to it. Also simply, drag the video to the main interface.
Step 2 Make Avidemux trim video
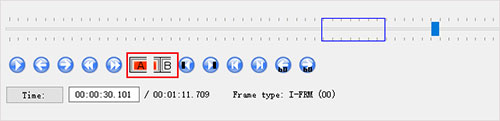
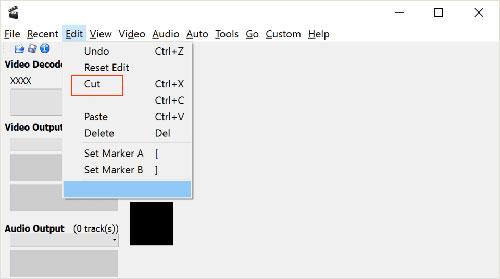
As soon as the video has been loaded up, prepare it for cutting. Now, the first thing you shoud do is previewing the video. Then, drag the timeline controller to the point where is the start of the video segment that you want to cut out and head to "Edit" > "Set Marker A" or use the "Set start marker" button below the timeline. This marked time point is where you would like to start cutting from. Whereafter, click its keyframe buttons to accurately move the timeline bar or quickly drag the timeline to where you want to end the cutting task and go for "Edit" > "Set Marker B" or touch "Set end marker" to indicate the end point. Once both start time and end time have been set, choose "Cut" from "Edit" option and your marked video segment will be cut off.
Step 3 Output video from Avidemux
Having completed cutting operation, specify an output format in the left side bar of the main screen. To cut video in Avidemux without re-encoding mode, you are suggested to select the same format as your source video as the export format. Lastly, press on "File" > "Save" to output the cut video after identifying the destination file.
You May Also Like:
Part 2: How Does Alternative to Avidemux Cut Video - No Quality Loss
Ever have some reported that Avidemux cut video is sometimes not working properly. To prevent you from suffering this, here is the introduction of an easy and effective alternative to Avidemux - Joyoshare Video Cutter to cut and trim video without trouble and quality loss. Joyoshare Video Cutter is a professional yet easy-to-handle video editing tool. Developed with the advanced cutting technology and a high-end acceleration processor, it provides high-precision method to flexibly cut any video at 60X amazing speed. Its strong compatibility makes it support almost all mainstreaming media formats and portable devices, including, MP4, MOV, MPEG, AVI, WMV, TS, OGG, MP3, VOB, MKV, FLV, WebM, iPhone, Apple TV, Xbox, etc.
Key Features of Joyoshare Video Cutter:
- One of best video cutter software to cut/split/trim audio & video
- The advantage of cutting at 60X quick speed without quality loss
- Designed with key frames and temporal interval to ensure cutting precision
- Cut video to other formats like web videos, HD, devices, mainstreaming, etc.
- Also crop, rotate, flip, adjust, watermark, subtitle, effect, etc.
Step 1 Drag video to Joyoshare Video Cutter
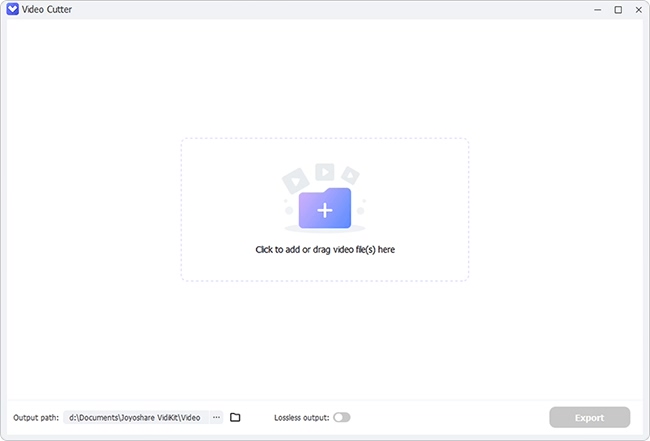
Once you have downloaded and installed Joyoshare Video Cutter on your computer, double-click to open it and find the "Open" button on the main screen to import the video. And also, you can drag and drop the target video as the screen instructs.
Step 2 Perform the format settings
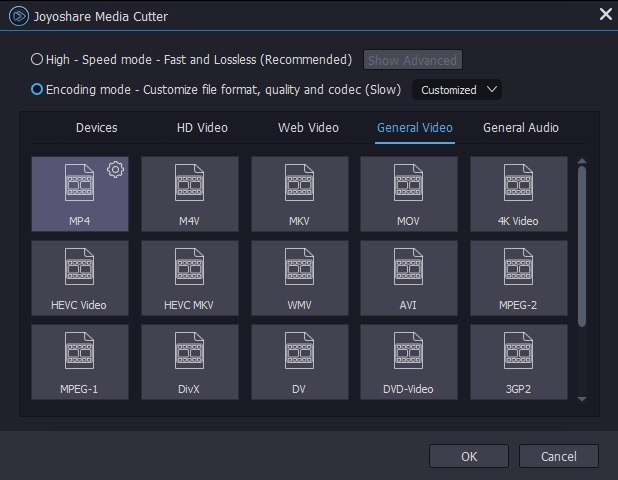
Next, start setting cutting mode and output format by the click of "Format". There are two modes available for cutting your video. If you need to do video cutting in lossless quality, it is recommended that you work with the "High-speed mode". The other one - "Encoding mode" allows customizing file format, quality, and codec as well as editing your video, besides cutting. Though, it can't promise 100% original quality due to the encoding process.
Step 3 Start the cutting task
After the setting of cutting mode and format, go back to the first window and set about cutting your video. Firstly, play and preview your video and decide the start & end points of the video segment you want to keep on the timeline. Then drag the timeline handles to the time points you set or use "Set Segment Start/End Time" shortcut buttons to simply cut the redundant sections off your video. To cut with more precision, you can apply the "Key Frame" buttons to identify the cutting parts, or directly enter the start time and end time to cut. Under encoding mode, In addition to the above, you also go to "Edit" > "Trim" to cut and trim.

If what you need is cutting off the middle parts of your video, you have to click "+" icon to produce the same video clip, and then do the same to remove the unwanted segment. Joyoshare Video Cutter offers an option of "Merge Segments". Before output, you just check this option, and your trimmed video segments will be saved into a whole one file.
Step 4 Export the video after cutting
Now, touch "Start" to export the final video. When the progress bar comes to be 100%, tap on "Open The Output Folder" icon, which would be marked by an orange number sign once the video has been saved, to locate your trimmed video.
