For users who are just starting to experiment with screen recording, it is necessary to find free tools that meet their basic needs. Among all the options, ShareX is relatively attractive. As an open-source program, it's excellent to record video, take screenshots and capture animated GIFs. It besides lets us to add annotations, edit images, upload and share conveniently. However, as a free tool, it inevitably has some problems. Since waiting for the program update is long and uncertain, you may wish to try some of the solutions that we have specially compiled here.

- Solution 1. Add ffmpeg.exe to Allowed Apps List
- Solution 2. Change FFmpeg Path
- Solution 3. Change Video Codec
- Solution 4. Install Recorder
- Solution 5. Try Screen Recording Alternative
Solution 1. Add ffmpeg.exe to Antivirus Exception List
Fail to record your screen or GIF due to ShareX FFmpeg error or ShareX permission denied? It's likely that the built-in ffmpeg.exe program in ShareX has been blocked by an anti-virus software. To fix it, you can complete authorization by going for "Settings" > "Update and Security" > "Windows Security" > "Firewall & network protection" > "Allow an app through firewall" > "Change settings" in the pop-up window > "Allow another app..." to browse and add the path where your installed ffmpeg.exe locates. Or you can use AVG Antivirus, head to "Menu" - "Settings" - "General" - "Block and Allowed Apps", and add ffmpeg.exe tool to "Allow App".
Solution 2. Change FFmpeg Path
Another possible workaround to ShareX not recording screen issue is to change the location of your FFmpeg path. If you are not familiar with ShareX's settings, you can follow the following steps to make it.
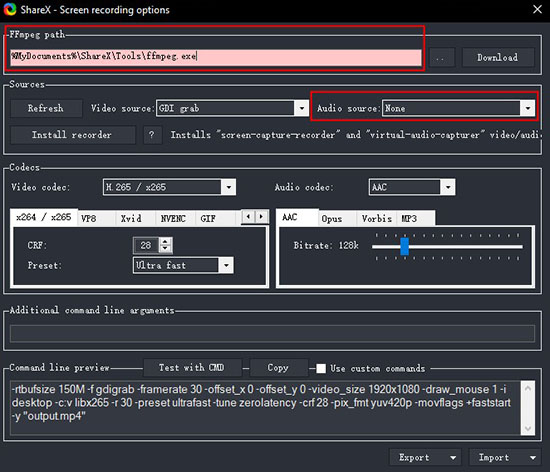
- Step 1: Visit the official website to download and install ShareX;
- Step 2: Right-click the program icon of ShareX on your Windows and open it with "Run as Administrator";
- Step 3: In the Task settings, find and click "Capture" > "Screen Recorder" > "Screen recording options...";
- Step 4: Now change FFmpeg path to "C:\Program Files (x86)\Screen Capturer Recorder\configuration_setup_utility\vendor\ffmpeg\bin\ffmpeg.exe";
- Step 5: Check and guarantee that your audio source is set to "Stereo Mix". You can now relaunch ShareX to record your screen activities.
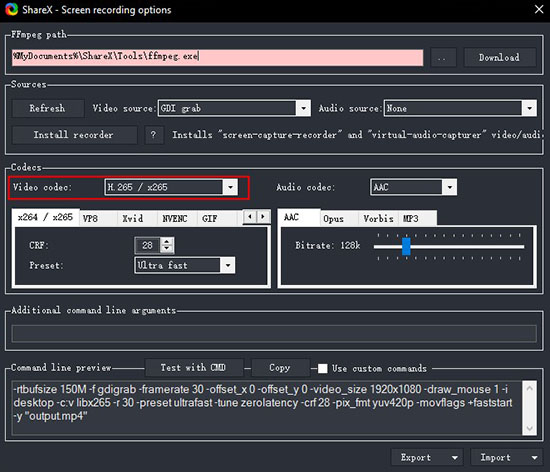
Solution 3. Change Video Codec
If ShareX not recording problem continues and the program gets crashed halfway through recording screen, you are able to change the video codec. To do it, simply go ahead to "Task settings" > "Capture" > "Screen Recorder" > "Screen recording options...". Under "Codecs" section, it's available to change the default "H.264/x264" to "H.265/x265". After your confirmation, restart ShareX and try to record desktop screen again.
Solution 4. Install Recorder
Have you ever met an error where ShareX not recording audio issue occurred? If so, you're suggested to install recorder in ShareX. Just check out the full steps below to learn the whole operation:
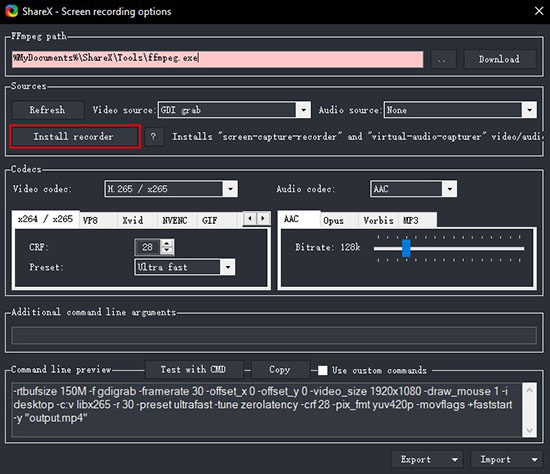
- Step 1: Run ShareX on your computer and go to "Task Settings" in the left column;
- Step 2: Then press "Capture" > "Screen Recorder" and click on "Screen recording options...";
- Step 3: There is a "Install recorder" option under "Sources" that helps you install "screen-capture-recorder" and "virtual-audio-capturer" to fix ShareX audio recording error.
Solution 5. Use ShareX Alternative to Record - Joyoshare VidiKit
If all above-mentioned solutions to ShareX screen recording not working don't function, you can turn to its alternative for help. Here Joyoshare VidiKit - Screen Recorder is sufficient to record screen video and audio with optimal quality output. It has a good performance no matter what you record and where to capture on your computer. The sounds from both microphone and system can be supported to grab, making dubbing a simple thing. What's better, you can schedule, effect, trim, watermark, etc. easily.

- Record screen video and audio without recording length limit
- Allow parameter-presetting, like resolution, codec, frame rate, etc.
- Different methods to record, such as full screen, customized area and systematic ratio
- Work as independent audio recorder to capture sounds from various sources
- Tools to cut, skip content, show clicks, schedule task, set shortcuts and more
Step 1 Open VidiKit screen recorder
After launch your installed Joyoshare VidiKit > Screen Recorder on the desktop, you can see different modes out there, including "Record video and audio" and "Record audio". You can click on
 to record your screen and audio.
Step 2 Configure screen recording settings
If you'd like to get audio captured at the same time during screen recording, you can turn on system and microphone sounds. Next, head to the gear "Options" and finish all settings on "Basic record options", "Record time options" and "Cursor options".

Step 3 Set capture area
Based on what you are going to record, choose a suitable region under "Capture Area". You can make it an entire screen, a partial area, or a standard ratio in the drop-down list.
Step 4 Start to record screen
When everything that you need is set well in Joyoshare VidiKit, you can press on the "REC" button to begin screen recording. If you're busy in doing other thing, you are able to manually start it and let it stop after a specific time. There are tools you can use to cut, pause and stop.

Step 5 Save recorded screen video(s)
Once the screen recording assignment ends, a "History" window will appear shortly. It allows you to trim, preview and rename files.


