Apple TV+ is Apple's television service and contains abundant original series, movies, and more. There are quite a number of famous directors and actors participated in its original TV shows, which is a big standout for users. Apple TV enables you to watch a mass of wonderful content with its huge libraries and you can enjoy them at your convenience. Yet you may probably miss the live programs because of a demanding schedule. Or you want to watch a show that has been on your list for a long time, only to be informed it has been removed from the platform. To avoid that, you can record shows you like and watch them anytime. This post will guide on how to record Apple TV for whoever is in need.
- Part 1. Record Apple TV on Mac: QuickTime Player
- Part 2. Record a Program on Apple TV on PC: Joyoshare VidiKit
- Part 3. FAQs on Screen Recording Apple TV
- Part 4. Conclusion
Part 1. How to Record on Apple TV with QuickTime Player
There is no DVR for Apple TV, which means it doesn't offer the recording feature by saving programs to cloud. However, it is still possible to record on Apple TV with a Mac. That's where QuickTime Player comes in. It is a built-in media software on Mac and you could use it to capture TV shows as well. Yet you are not allowed to record DRM-protected content. Here is what you need to do.
- Step 1: You need to connect your Apple TV with Mac via a USB-C cable first. Then press Cmd + Space and search QuickTime Player to open the software.
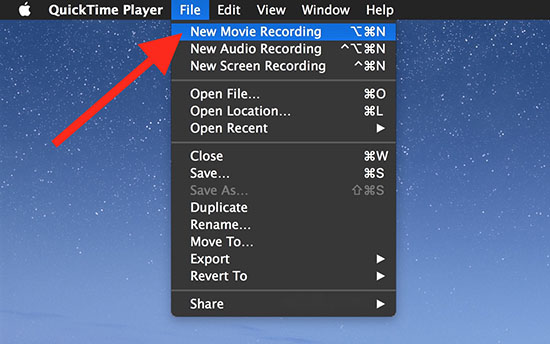
- Step 2: In the interface of QuickTime Player, choose File from its top. Select New Movie Recording.
- Step 3: You'll see a drop-down menu by clicking the arrow beside the recording button and click your Apple TV. And the Apple TV screen will present in QuickTime Player's interface.
- Step 4: When you click Record button, it will start to capture screen from Apple TV. You can click Stop button if the program is over. After recording, you could choose the file location by heading to File → Save.
Part 2. How to Record a Program on Apple TV with Joyoshare VidiKit
The one fly in the ointment of QuickTime Player is that it can only be used on Mac with limited recording features. If you want to record on both Windows and Mac, compatible recording software is what you're sorely in need of. Joyoshare VidiKit is one such mighty recording tool. You can apply it to record any screen activities on your computer in 4K quality. It is one of the best screen captures to record live TV on PC. What's more, it provides multiple recording modes to customize your videos. You can choose the capture area and preset the ratio based on your need. Another strength of Joyoshare VidiKit is the versatility feature, such as grabbing both system audio and microphone sound, supporting various output formats, highlighting cursor, and much more.

- Record Apple TV in 1080p/4K in any format
- No time limit for capturing video and audio
- Simple to set schedule recording tasks to improve efficiency
- Support selecting the sound resource with an internal audio recorder
Step 1 Launch Joyoshare VidiKit and Apple TV
To get Apple screen on your computer, you are required to connect Apple TV with your computer using a HDMI cable. After running both the recording software and Apple TV screen on your computer, you can open Joyoshare VidiKit first. Hit the Record button and then click the Screen Recorder option to open a new panel.

Step 2 Adjust Recording Area and Recording Audio
In the new recording window, you can choose the recording area first. Just click + in Capture Area section, and drag the edge with your mouse to scope its size. Then, you can freely adjust the audio. With a simple click on System Audio or Microphone, you can choose to open or close them. It is suggested to turn on System Audio while keeping the Microphone off while recording. The volume could be tested before recording as well.

Step 3 Setup Recording
Click Options at the right corner, and a drop-down menu will come out. You can configure recording settings according to your situation. If you want to change video and audio parameters, such as resolution, frame rate, etc., you can hit Format. Then choose whatever format you like and click the small icon attached to the top right corner. You can also create scheduled tasks by setting start time and stop time in Record time options.

Step 4 Start Recording on Apple TV
Now back to Apple TV and prepare the program you want to record. After that, you can hit the REC button and Joyoshare VidiKit will capture the content on Apple TV in high quality.

Step 5 Stop and Save Recording
To stop recording on Apple TV, you can click Stop button. The videos will be saved to History list and you can preview them easily without opening other media players. You could also trim the video or take screenshots with this tool's internal editing tool.

Part 3. FAQs on How to Screen Record Apple TV
Q1. Why can't I screen record on Apple TV?
A: It is because Apple TV doesn't offer a DVR option. If you want to record the content on Apple TV, you can use either QuickTime Player or Joyoshare VidiKit with ease.
Q2. Can I save shows on Apple TV?
A: Yes, you can download shows on Apple TV for offline watching. Just open the app up on your device and search for what you'd prefer to save. Then hit the Download button. You can go to Library → Downloaded to find and play those downloaded videos.
Q3. Can I share Apple TV with my friends and family members?
A: Yes, you are allowed to share your subscription with five members. They can enjoy the same content as you. What's more, each member could only set their own preferences and the recommendation won't be shared.
Q4. What is the best option for recording streaming service?
A: The best recording software to record streaming service requires high resolution as well as quality output. What we have illustrated above are suitable for capturing streaming service. If you want to own a highly compatible and multifunctional screen recorder, Joyoshare VidiKit is an optimum choice.
Part 4. Conclusion
Though Apple TV doesn't support the recording feature, we still find ways to cope. In this post, we talk about how to record Apple TV in two ways. QuickTime Player is a solid choice to complete recording tasks for Mac users. Joyoshare VidiKit is suitable for Windows and Mac with more surprising features. You can have a try and see if it works for you.
