Adobe Connect is an outstanding platform that enables you to create or attend online meetings, virtual classes, web conferences, etc. With full supports of both video and audio meetings, it becomes more and more popular all over the world. Nevertheless, when it comes to have an online session on Adobe Connect, there is a growing demand to record the whole process with all details involved for later reviewing. If you still have no idea to record Adobe Connect on your own, stop fooling around. We share three feasible ways to assist you in this article.
- Part 1. Joyoshare VidiKit [Hot]
- Part 2. Adobe Connect Native Recorder
- Part 3. Apowersoft Free Online Screen Recorder
Part 1. Ultimate Solution for Adobe Connect Recording - Joyoshare VidiKit
Joyoshare VidiKit - Screen Recorder is a trustworthy yet dedicated tool to help record Adobe Connect activities, like presentation, online meeting, web conference and more. It perfectly functions to capture kind of desktop videos and audios, such as live chats, Skype calls, streaming movies, gameplay, etc. It allows you to define the capture region as per your preference and exports file to AVI, FLV, SWF, WMV, MKV, MOV, MP4, MP3, etc.
Excellent as Joyoshare VidiKit is, it empowers you to preset a scheduled task ahead of time, add different effects to cursor, take screenshots at any time, cut video to distinct segments, manage captured Adobe Connect videos, etc. Furthermore, it carries out any recording assignment without time limit.

- Capture any ongoing activity from Adobe Connect
- Record webinar, like Zoom, Microsoft Teams, BlueJeans, etc.
- Offer unlimited recording length and export high-quality files
- Get audio from microphone and computer system in the session
- With task scheduler, screenshots-taking and video-trimming options
Step 1 Get screen recorder started in VidiKit
Go straight to launch Joyoshare VidiKit as long as you have already installed it on your PC. Next, go for "Record" and open "Screen Recorder". You'll be placed in "Record video and audio" mode by default.

Step 2 Customize capturing area
To match with different users' preferences, Joyoshare VidiKit comes with three accessible methods to choose a capturing area. It allows you to directly hit "+" button to customize screen size by zooming in or zooming out the pop-up window, enter specific width and height number to frame and select a systematic fixed ratio through drop-down menu.

Step 3 Set up recording parameter for Adobe Connect
Click the gear "Options" icon on the right corner and then all recording options will be presented in your sight, which facilitates you to grab system voice or microphone sound, adjust volume, choose common format, preset shortcuts, create scheduled task, highlight clicks, add image watermark, etc.

Note: When Joyoshare VidiKit performs as an audio capture alone, it is capable of recording any audio tracks on your desktop screen, like online radio, streaming music and more.
Step 4 Initiate Adobe Connect recording
Run Adobe Connect and directly start a meeting. Simply click "REC" button. Joyoshare VidiKit will begin to record video with audio from Adobe Connect. During the period of 3 seconds countdown, you can adjust capture window to a proper position. Then, trim video according to your conference content, take snapshots and pause to skip needless sections.

Step 5 Manage captured Adobe Connect video
Press "Stop" button to end the recording. In the "History" list, you can find all recorded Adobe Connect video, like Adobe Connect meeting, training, presentation and so on. Joyoshare VidiKit permits you to preview, rename and trim handily.

Part 2. Time-saving Way to Record Adobe Connect Using Built-in Recorder
The fastest way to record Adobe Connect meetings and conferences is to get help from its local support, given that it's equipped with a built-in recording tool. Apparently, this method is efficient as you don't have to install 3rd-party recording software. However, it comes with downsides as well. The finished Adobe Connect recording is not satisfying enough owing to its output quality is not as high as other dedicated recorders. Additionally, there are no more available recording functions provided. But if you just meet basic capturing requirements, you can come here and see how it works.
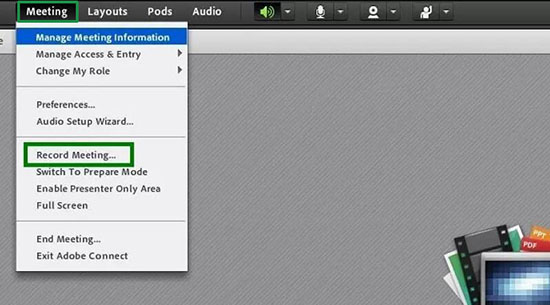
Step 1 Launch Adobe Connect and start recording a meeting
After opening Adobe Connect, you can click "Record Meeting" under "Meeting" in the top menu. A new window will pop up, asking you to define a meeting name as well as description. Then a message displaying "This meeting session is being recorded" will be shown to indicate you have started a meeting already, during which both video and audio will be recorded.
Step 2 End Adobe Connect meeting recording process
Once the meeting finishes, press the red button to stop recording. The recorded Adobe Connect file will be saved in the Recordings page automatically.
Step 3 Share a recorded meeting
Access your "Adobe Connect Central" page, from which you can find all required information. Hit "Meetings" tab and choose recorded meeting you want to share. Go for Meeting information > Recordings > URL for Viewing. This link can be used to send to other participates or users to see the whole process of Adobe Connect meeting. You can share it so that others can enter it without any times limitation.
Part 3. Online Way to Record Adobe Connect Sessions
A web-based tool, such as Apowersoft Free Online Screen Recorder, can be a good option to record meetings and sessions in Adobe Connect. It has the ability to capture entire desktop, regional screen, audio and webcam. Other than that, you're able to freely make annotations to your Adobe Connect meetings. The operation to create a recorded video using this online program is quite simple. You can take a look here:
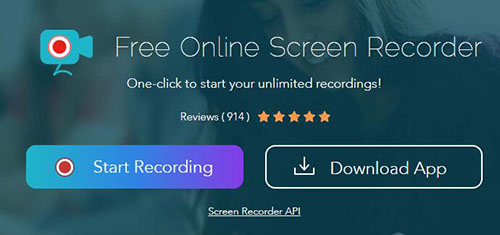
Step 1 Visit online recorder and start recording
Go ahead to the official website of Apowersoft Free Online Screen Recorder and simply hit "Start Recording" button. You'll be required with a launcher.
Step 2 Set recording options
You can see a pop-up interface, from where you can set hotkeys, system sound, microphone voice, capture area and more.
Step 3 Record Adobe Connect online
Open your Adobe Connect and start a meeting. You can now click "REC" on Apowersoft Free Online Screen Recorder to begin your session recording. When it's over, stop to save the video for later playback.
Conclusion
The above-mentioned solutions are easy to use if you'd like to record Adobe Connect meetings or sessions. To straightly apply a quick solution, Adobe Connect's built-in recording tool can be a top choice. If you prefer a free online screen recorder with basic features, Apowersoft Online Free Screen Recorder can be taken into consideration. However, to record meetings and types of other desktop activities in high resolution without lag in unlimited recording length, Joyoshare VidiKit is highly recommended. Sure, you can try more and share the one you like best with us.
