We have discussed how to record browser with OBS using the Interact feature of the Browser source in the previous article. But the powerful source of OBS is much more than this one. The reason why so many YouTubers are looking for tutorials on how to record gameplay with OBS is that OBS has another amazing source called Game Capture, which allows you to record games in full screen or any specific window. It even gives you the hotkey mode to release you from the troubles of switching game windows during your live stream. OBS is a powerful and professional video recording and streaming tool. If you are looking for such a tutorial as well, then you are in the right place. Today we will show you how to record games using OBS studio in 3 simple steps. Read on and find out more tips and tricks about OBS now.
- Part 1. What Is Game Capture in OBS?
- Part 2. Guide to Record Games with OBS (3 Steps)
- Part 3. How to Set up OBS to Record Games
- Part 4. How to Solve Common Game Capture Issues
- Part 5. Best OBS Alternative to Record Games in High Quality - Joyoshare VidiKit
Part 1. What Is Game Capture in OBS?
Scenes and Sources are important parts of OBS. With them, you will be able to customize your stream layout, add your webcams, games, or any other media or devices you like in the output. Game Capture is one of the Sources. You can get access to all sources by clicking in the Sources box or using the "+" button at the bottom. Whether it is a capture card, a specific window or game, text, images, or even the entire display, you can always use the different sources provided in OBS to capture what you at any time.

Game Capture lets you record the game you are playing directly. You can add your games to OBS with ease. A majority of games can work with Game Capture. This Source features several modes, including "Capture foreground window with hotkey", "Capture specific window", and "Capture any fullscreen application". The first mode "Capture foreground window with hotkey" allows you to designate a particular key to tell the Game Capture source which game you want to show up. It will bring you a lot of convenience especially when you need to change games often during a stream. The second mode enables you to select the active game you want to record, and the third mode "capture any fullscreen application" is able to detect any fullscreen game you are running on your primary monitor.
Game Capture has many other options as well that can enhance your game recording experience. Examples are but not limited to Force Scaling, Capture Cursor, Limit capture framerate, and Multi-adapter Compatibility. These default options are sufficient for most applications so there is no need to change them unless you understand what they mean and know how to do. Generally speaking, Game Capture is probably the most efficient way for you to record gameplay with obs.
Part 2. How to Use OBS Studio to Record Games
Step 1 Launch OBS and Use Game Capture Source
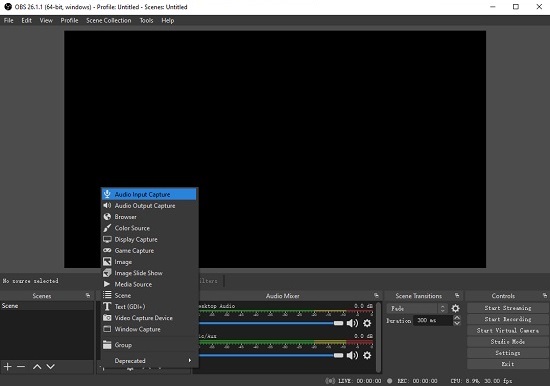
You can easily download OBS for free. After a successful installation, run OBS on your computer. A scene will be created automatically when you launch OBS smoothly. Next, go to the Sources box and press the "+" button at the bottom to select Game Capture and add a new source named after your game. You are suggested to use one game capture per scene.
Step 2 Choose Game Capture Mode
Once the properties window is opened, you can start to decide which game capture mode you would like to use. As we mentioned above, there are three modes, including "Capture any fullscreen application", "Capture specific window", and "Capture foreground window with hotkey".

Remember that the fullscreen mode will record any fullscreen game and the specific window mode allows you to specify the exact game you want to record. However, if you need to change games often, give the hotkey mode a try. Moreover, it will be a wise choice to leave the options on the default as shown. Normally, your game capture will show up in the OBS preview once you have your game active and apply the settings.
Note: Be aware that if you prefer to use the "Capture specific window" mode, you need to open your game in advance, then select its name in the Window dropdown. You can also adjust the volume in the "Audio Mixer" box.
Step 3 Start to Record Games with OBS Studio
When you are done with other kinds of settings like adding scene transitions, setting up the audio mixer, applying fantastic filters, etc., you can tap the "Start Recording" button and let OBS record gameplay in the way you like.
Part 3. How to Set up OBS to Record Games
The "Settings" button of OBS can be easily found in the lower right corner of the main screen. After clicking it, you will be led to the "Settings" window and can gain access to a variety of configuration options that can make your game videos professional. You are free to tap on "General", "Output", "Audio", "Video", etc. on the left side of the window and you will be able to enhance your game recording in the way you like. To set up OBS for better performance in recording games, you can consider the following ways.
- Select resolution and frame rate: You need to select the right resolution and frame rate for "Video" settings. The standard resolution for a web monitor is 1920×1080 and the common FPS values is 30fps. But 60fps is better for fast-paced gameplay.
- Use hotkeys: You can use hotkeys to do various things like starting/stopping recording, switching to a specific scene, saving replay buffer, showing Sources, and more. Using hotkeys can enable you to have a more enjoyable game recording experience.
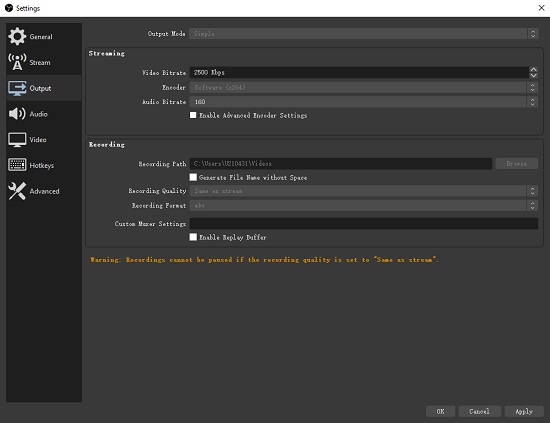
- Adjust output settings: To do so, you need to tap on the "Output" tab at first. The Simple output mode is covered automatically and the default options are recommended unless you know how to make use of the Advanced output mode correctly. Here you will be able to change your recording path, format, quality, as well.
- Select audio bitrate: You can select an audio bitrate level of between 192 and 320, which represents medium through the highest quality audio. This can be done on the "Output" settings, too.
Part 4. Common Resolutions for Game Capture Issues
If you are encountering many problems such as the inability to get the game capture source to show up correctly, then you may need to check a few things shown as follows.
- Check for overlays, Anti-virus programs, FPS counters, etc. and consider disabling or removing them. Several third-party applications you installed can interfere with the correct operation of OBS.
- Run OBS as administrator, which may be necessary for certain situations. When you play games like Call of Duty, Valorant, or others, this may help with performance.
- If your games like CS:GO and Destiny 2 do not allow OBS to hook in with game capture, then you are suggested to run games on a partial screen and use a Window Capture source instead.
- Check whether OBS and the game you are playing use the High-performance GPU if you are using a laptop to record games on OBS. If not, you can change games to the High-performance GPU, then restart OBS and your gameplay.
- Certain DX12 games may cause your game to crash if run with OBS, and due to the graphics API, it may have weird frame issues as well. You can try Game Capture again if your game has DX11 API.
- If you are recording League of Legends, you have better create two scenes. The first scene uses a Window Capture of the LoL launcher/lobby and then the second scene can use a Game Capture of the game itself. Next, you can use the Scene Switcher to swap between them.
Part 5. Best OBS Alternative to Record Games - Joyoshare VidiKit
Though OBS can do a fantastic job of recording high-quality gameplay, it is less user-friendly and will take you a large amount of time before you can get the hang of it. So if you are having trouble using OBS and want to have a professional yet much easier-to-use alternative, Joyoshare VidiKit (originated from Joyoshare Screen Recorder) is here to rescue. This software is able to record fast-paced gameplay in up to 4K quality. No watermark, no time limit, no latency. Designed with a unique and elegant interface, it will let you record all onscreen activities in a hassle-free way.
Before recording, you can customize your settings freely. You can select your output format like HEVC Video, DV, DivX, MPEG-2, MP4, MOV, AVI, MKV, WMV, M4V, SWF, FLV, etc. and configure the codec, bitrate, frame rate, and more. You can also choose to set the start/end time of your recording, show and highlight cursor and clicks, insert your own watermark, and more. This app allows you to skip unwanted content during recording as well. After recording, you can manage and edit your game clips with ease.

- Record gameplay in full screen or a customize region of any size
- Capture game videos with sound from computer and microphone
- Record gameplay on PC and Mac in up to 4K quality at 60 FPS
- Customize codec, quality, resolution, bitrate, frame rate, and more
- Compatible with a large number of output formats and devices
- Enhance and edit recorded game clips by trimming, cutting, etc.
Step 1 Run Screen Recorder
Joyoshare VidiKit is an all-in-one video toolbox. So after running it on your PC or Mac, you need to tap the "Record" tab to open the screen recorder. To record game videos with sound, you need to make sure that the
 button is on.
Step 2 Get More Settings Options
A gear icon near the "REC" button when you need to use more custom settings to customize your gameplay recording. On the unfolded window, you can press the "Format" button to select the format you want to have. You can also adjust the bitrate, quality, and frame rate. If you prefer to protect your game videos from unauthorized distribution, you can click the "Watermark" button to add your own logo. Setting up the recording duration and highlighting clicks are doable as well.

Step 3 Grab Any Screen Size
Joyoshare VidiKit allows you to record fullscreen gameplay or grab any specific window. To do so, you are able to click the "+" icon on the left side of the main screen and then drag to select your recording area using the pop-up capture frame. If you hit on the triangle icon nearby, you will also able to select many standard ratios. The "Full Screen" option can be seen as well.

Step 4 Begin to Record Games on PC or Mac
After setting up your recording area and opening your system audio and/or microphone, you are free to tap the "REC" button to let Joyoshare VidiKit record your gameplay. A three-second countdown will begin so that you can prepare well before recording. On the minimized toolbar, you will be able to split recordings, cut out unnecessary gaming moments, and quit the recording process at any time.

Step 5 Edit and Play Game Clips
The "History" window will display all your recorded games and audio tracks. You can rename your files and tap the "Edit" icon to cut out unwanted portions. For audio files, you can adjust their ID3 tag information as well.

