How to record browser with OBS may confuse you when you are a beginner, considering its multiple sources, scenes, and other features. Most users use sources like Window Capture or Display Capture to record a website. However, pulling a Browser source is definitely much more powerful because of the Interact feature. You can interact with the browser source straightforwardly in OBS without having to open a browser on your computer. Browser source allows for unlimited flexibility. And today, we are going to show you the simplest step-by-step guide ever on how to use the Browser source to record with OBS easily.
- Part 1. What is Browser Source in OBS and Why to Use It
- Part 2. Guide to Record Browser with OBS
- Part 3. Guide to Record Browser with OBS Alternative - Joyoshare VidiKit (Easier-to-use)
- Help: How to Fix OBS Capture Black Screen
- FAQs: All You Need to Know about OBS
Part 1. What is Browser Source in OBS and Why Will You Need It
Browser source is one of the most versatile sources that you can gain access to in OBS. Quite Literally, it means you can add a web browser directly to OBS. A browser source is often used for alerts and widgets and can be added to the scenes of your streaming software. At that time, you will be able to display a web page from a local file or the Internet. You can also use web-based content such as websites, JavaScript applications, etc., and even customize them. Anything that you are able to program to run in a normal browser can be added to OBS directly.
Part 2. How to Record Your Browser with OBS
Step 1Download and Install OBS
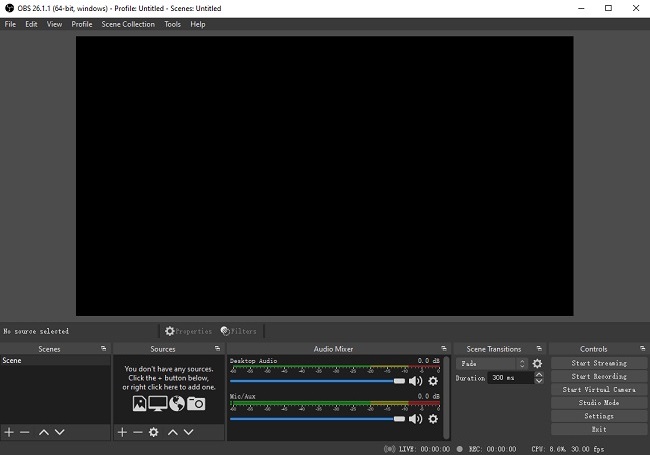
Download OBS from its official site and install it according to the instructions for your operating system. After that, double-click the shortcut icon to run it. You will see there are many sections at the bottom of the screen, such as "Scenes", "Sources", "Mixer", "Scene Transitions", "Controls", etc.
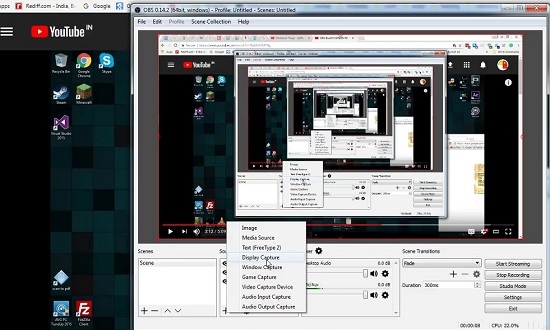
Step 2Add Browser Source
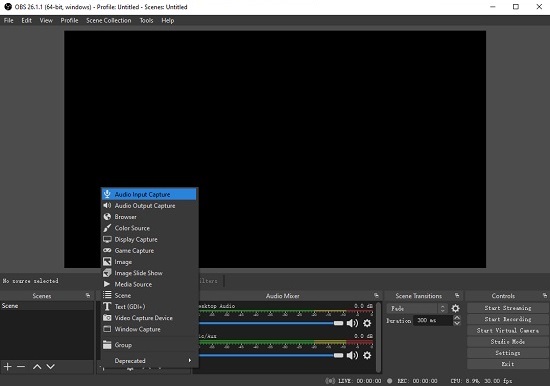
When you first launch OBS, there is a scene added in by default. Be aware that you cannot drag a browser source like Google Chrome, Firefox, Safari, etc. into OBS. So here you will need to add a source. Go down to the "Sources" box and press the "+" button to select the "Browser" option. Name it whatever you want to name. Now you can copy the URL whatever that browser source is and paste it into the "Properties for 'Browser'" resulting window. You can input the width and height below the "URL" box.
Note: You are suggested to input whatever the base resolution is on your desktop, such as 1920*1080, which will allow you to pull in the full resolution and all of the content of that website.
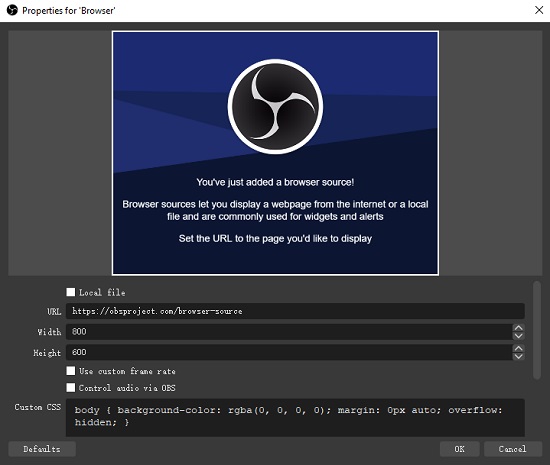
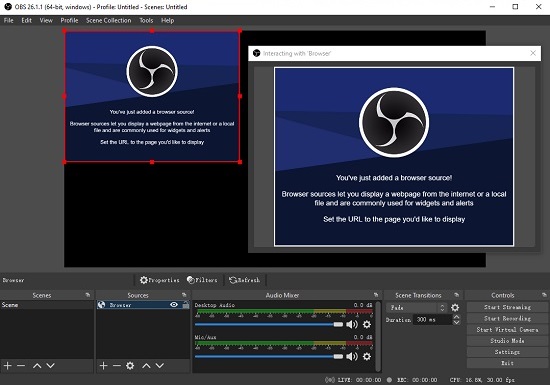
Once you click on the "OK" button, OBS pulls in your browser just as a browser source. More amazingly, you can press the "Alt" key to drag and resize the website handily in the bounding box if there is a bunch of extra content you might not want to show. Or alternatively, you can also right-click your browser sources to transform them by going down to "Transform" > "Edit Transform...", and you are able to crop and position it in any way you want.
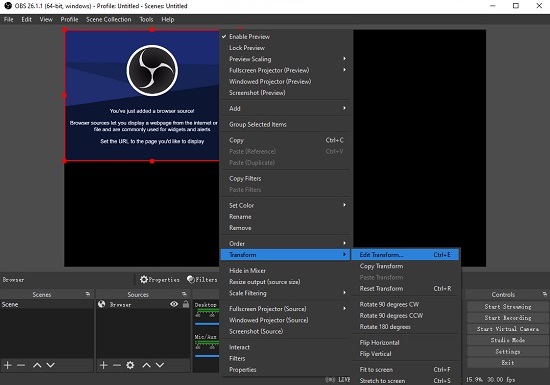
Here comes the coolest thing. Go down and right-click your browser source in the list and then select "Interact" from the pop-up menu. Now you can interact with the actual website itself in OBS. All things you do with your website in the "Interacting with Browser" window will interact with the browser live right here within OBS.
Step 3Let OBS Record Browser
Now you are able to press the "Start Recording" button on the right side of the main screen to begin to use OBS to record web browser without any hassle.
Part 3. Record Browser with Best OBS Alternative - Joyoshare VidiKit
Joyoshare VidiKit (originated from Joyoshare Screen Recorder) can help record web browsers in a much easier way. Simply start this program and everything that happens on your computer can be recorded in extremely high quality. You will be able to use it to record gameplay, streaming movies, live shows, virtual meetings, video chats, and a whole lot more with no watermark and no time limit.
Supporting a variety of output formats such as 4K video, DivX, M4V, DVD-Video, 3GP2, MPEG-1, ASF, DV, MOV, MKV, AVI, MP4, FLV, WebM, etc. you can save your recordings in any way you like. Using many editing tools that come with Joyoshare VidiKit, you will be able to control your browser record flexibly, such as cutting, inserting a watermark, highlighting clicks and cursor, scheduling tasks, and more. All of them can be done perfectly with a few simple clicks.

- Have intuitive and beginner-friendly user interface
- Record browser in full screen or any selected region
- Capture screen with audio in up to 4K quality with no lag
- Adjust codec, quality, resolution, bitrate, frame rate, etc.
- Download video from website without time limitations
- Support many editing tools and a built-in media player
Step 1 Start Joyoshare VidiKit on PC/Mac
After installing Joyoshare VidiKit on your computer, you can run it and then open the screen recorder on the "Record" panel. Click on the
 icon to turn on the "Record video and audio" mode.
Step 2 Gain Access to More Settings Options
More related settings can be viewed after clicking the gear icon in the lower right corner of the main screen. You will be able to customize your output format, add a self-made watermark to screen recording, let Joyoshare VidiKit start and stop recording automatically, etc.

Step 3 Select a Recording Region
Once you press the "+" icon on the "Capture Area" section of the main screen, you can use the pop-up frame to select any screen size to record your browser freely. Preset standard resolutions are available by clicking on the little triangle button nearby. Please remember to turn on/off system audio and microphone.

Step 4 Begin to Record Browser
Now you are free to open your browser such as Firefox, Edge, Google Chrome, etc. Press the "REC" button of Joyoshare VidiKit now and after a three-second countdown, what you perform on your browser will be recorded smoothly and perfectly. Tap the "Stop" button on the minimized toolbar outside the capturing frame to stop recording browser at any time.

Step 5 Manage Recordings
On the "History" window, you can rename your recordings and use the inbuilt media player to check your videos and audios freely. You can also click on the "Edit" icon to cut and trim unwanted parts of your recordings.

Help: How to Fix OBS Window Capture Black Issue
It is not unusual for OBS users to confront black screen issue after web browser screen recording. Several reasons account for why OBS is unable to function properly. For example, sometimes they may be related to hardware conditions on your computer system. This section will focus on how to solve this problem in three possible ways.
Solution A Turn off hardware acceleration on Google Chrome
Step 1: Open Google Chrome and Click the "Customize and control Google Chrome" icon at the upper right corner to open the menu;
Step 2: Tab Settings and choose Advanced at the left side of the screen and select the System category;
Step 3: Uncheck "Use hardware acceleration when available", then restart OBS and Google Chrome.
Solution B Turn off hardware acceleration on Firefox
Step 1: Open Firefox and click the Menu button and choose Options;
Step 2: Press Advanced and select the General panel;
Step 3: Turn off "Use hardware acceleration when available" under Performance, then restart OBS and Firefox.
Solution C Run OBS as administrator
Step 1: Right-click the OBS software icon and choose "run as administrator";
Step 2: Follow prompts from your computer to complete the process.
If all these three methods don't work for you, you are supposed to reinstall OBS and check whether it can work right lately.
FAQs about OBS
Q1 How to download browser plugin?
The browser plugin will enable you to add many web pages as sources in OBS. This plugin is bundled in the OBS studio, so there is no need to download it manually. The plugin will support Windows and Mac OS X.
Q2 What are Sources and Scenes in OBS?
Scenes and Sources are where you add your games and webcams, set up your stream layout, and any other media and devices that you want in the output. You are free to create as many Scenes as you want. After creating a Scene, you can use the "+" button at the bottom of the "Sources" to add what you want to capture, like a capture card, image, text, gameplay, etc. Many commonly-used Sources are as follows.
Audio Input/Output Capture: This source will enable you to add an audio input or output device to a particular scene. You can select the device you want to capture, then the audio from the selected device will be captured.
Blackmagic Device: This source allows you to add various Blackmagic Design capture cards, providing such options as "Device", "Mode", "Format", and "Use Buffering (Checkbox)".
Browser: As we mentioned before, this source will allow you to add anything you program to run in a normal browser directly to OBS, such as custom layout, video, image, etc.
Color Source: You can use this source to add background colors to your scene.
Display Capture: You can use it to capture your monitor, with a selection for the display you want to capture and a checkbox to show or hide your cursor.
Game Capture: This source enables you to capture the game you are playing directly. A number of custom options are available such as "Capture Cursor", "Limit capture framerate", "Capture specific window", and so forth.
Window Capture: This source lets you capture the content of a specific window. Using this source, only the selected window will be shown.
Q3 Where are my recordings saved?
Once you finish recording your browser with OBS, you can find your recordings by navigating to File > Show Recordings. You can also adjust the save path in File > Settings > Output > Recording.
Conclusion:
To sum up, you can learn how to record browser with OBS with clear steps mentioned above. However, you may realize that free as OBS is, it is a little bit difficult and inconvenient to operate it. So if you are a beginner to capture your web browser, perhaps you could consider using Joyoshare VidiKit, a feature-packed screen recorder to record any desktop activities. The operation is easy and fast, the output format is customizable, and the quality is high.
