








 VidiKit (21-in-1 Toolkit) >





You have just finished recording an important online meeting, a complex software tutorial, or a highlight reel of your favorite gameplay. You open the file to review it, only to discover absolute silence. Experiencing a screen recording with no sound is an incredibly frustrating scenario that can waste hours of your hard work.
Fortunately, this common issue is rarely permanent. Whether you are using a smartphone or a computer, the root cause is usually a simple misconfigured setting, a permission restriction, or an outdated driver. In this comprehensive guide, we will walk you through exactly how to fix a screen recording with no sound across all major devices, ensuring your future videos capture crystal-clear audio.
- Why Does My Screen Recording Have No Audio?
- Tip 1. The Best Tool to Screen Record on Windows/Mac: Joyoshare VidiKit[Hot]
- Tip 2. Fix Screen Recording No Sound on Windows
- Tip 3. Fix Screen Recording No Sound on Mac
- Tip 3. Fix Screen Recording No Sound on iPhone and iPad
- Tip 3. Fix Screen Recording No Sound on Android Devices
Part 1. Why Does My Screen Recording Have No Audio?
Before diving into device-specific fixes, it is helpful to understand why your screen recording has no sound. By identifying the root cause, you can troubleshoot the problem much faster. Here are the most common culprits:
- Microphone Permissions are Disabled: For privacy reasons, modern operating systems block applications from accessing your microphone unless you explicitly grant them permission.
- Incorrect Audio Input Settings: Your recording software might be trying to pull audio from a disconnected headset or a virtual input rather than your actual microphone or system audio.
- Copyright Protection (DRM): If you are trying to record content from streaming apps like Netflix, Spotify, or Apple Music, the application will intentionally mute the audio to prevent copyright infringement.
- Outdated Audio Drivers: On computers, faulty or outdated sound drivers can prevent audio from being captured during a recording session.
Now, let us explore how to fix screen recording no sound issues on your specific device.
Tip 1. The Best Tool to Screen Record on Windows/Mac: Joyoshare VidiKit
If you are tired of constantly battling with Windows Game Bar glitches, or struggling with Mac's strict limitations on recording internal system audio, the most efficient fix is often to upgrade your recording software. Built-in tools are convenient, but they lack the advanced audio routing capabilities needed for reliable recording.
This is where Joyoshare VidiKit - Screen Recorder stands out as the ultimate troubleshooter. As an all-in-one multimedia toolbox, its screen recording feature is specifically designed to bypass common audio capture issues on both Windows and Mac.
- Record screen on Win/Mac in high quality without watermark and lag
- Save recordings in any popular formats like MP4, AVI, MPEG and more
- Capture all activities on the screen with customizable recording region
- Grab voice from system and microphone at the same time or separately
- With inbuilt editing features like trim video, set shortcut key, highlight cursor, etc.
Step 1 Download and Install Joyoshare VidiKit
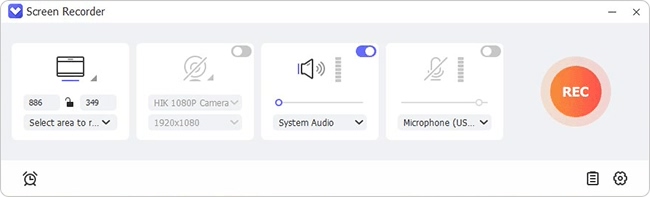
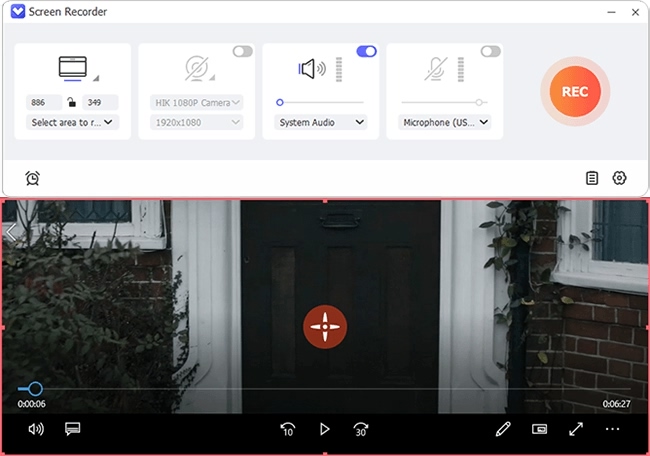
Begin by downloading and installing the correct OS version of Joyoshare Vidikit for your PC or Mac. Once launched, you'll be greeted by a compact dashboard featuring Capture Area, System Audio, and Microphone Audio. Choose the Record video and audio to proceed. If your goal is to capture only internal system sounds, simply click the microphone icon to mute any external background noise.
Step 2Confirm Other Settings
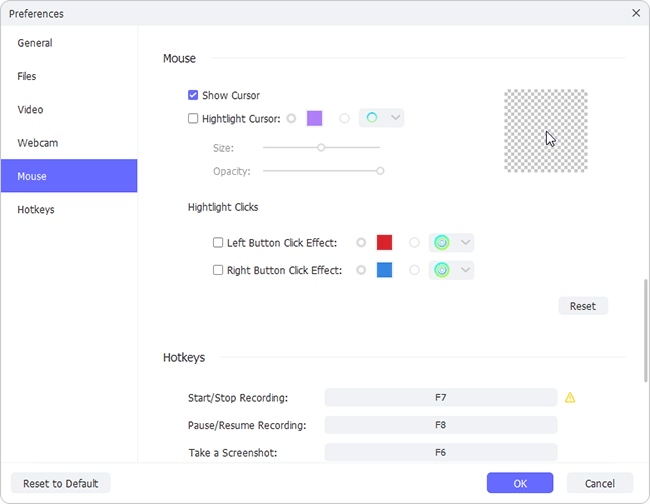
Locate the gear icon in the bottom-right corner to access your main settings. From here, you can update your output folder, choose a file format, apply an image watermark, configure "Record time options," and toggle your mouse cursor's visibility. For advanced video settings—such as codec, resolution, and overall quality—navigate to the Format section and click the corresponding gear button there.
Step 3Select Recording Area
Once your settings are configured, click the plus icon in the Capture Area. You can then resize the recording window by dragging the blue frame. Alternatively, you can define the capture region by entering specific dimensions or selecting a preset aspect ratio.
Step 4Screen Record Instagram Story and Manage the Recordings
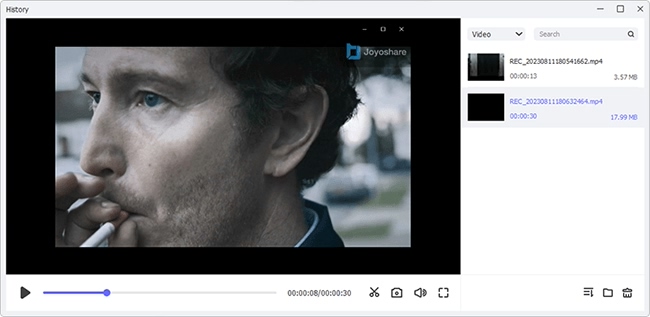
Once your setup is complete, simply hit the REC button to begin capturing. While recording, you can use the handy on-screen toolbar to skip sections or trim your footage on the fly. When you're finished, head over to the History panel to locate all your saved Instagram Stories, where you can easily rename and refine your files.
Tip 2. How to Fix Screen Recording No Sound on Windows
Windows 10 and Windows 11 offer built-in recording tools like the Xbox Game Bar, but audio issues are a frequent complaint. If you are facing a Windows screen recording audio issue, follow these steps.
1. Enable Microphone Privacy Access
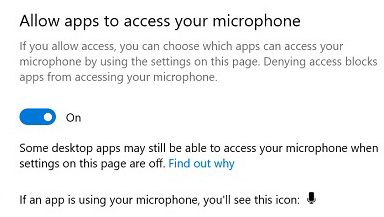
If your screen recorder does not have permission to use your microphone, your voice will not be recorded. You need to verify your privacy settings.
- Step 1: Open the Start menu and go to Settings.
- Step 2: Navigate to Privacy and select Microphone from the left sidebar.
- Step 3: Ensure the toggle for Allow apps to access your microphone is turned on.
- Step 4: Scroll down the list of apps and make sure your specific screen recording software has permission enabled.
2. Update Your Windows Audio Drivers
Outdated or corrupted drivers cannot process sound correctly, leading to silent recordings. Updating them can quickly fix screen recording without sound.
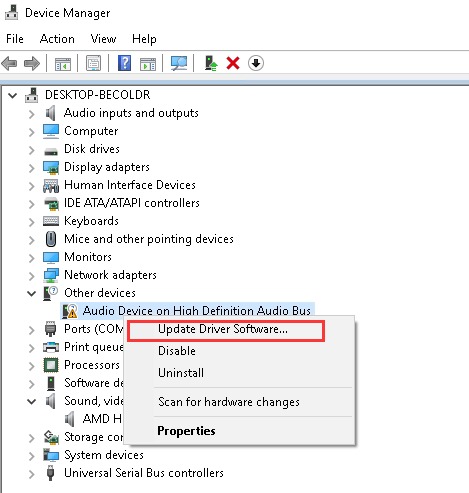
- Step 1: Right-click the Start button and open Device Manager.
- Step 2: Expand the category labeled Sound, video and game controllers.
- Step 3: Right-click on your primary audio device (e.g., Realtek High Definition Audio) and select Update Driver Software.
- Step 4: Choose Search automatically for drivers and let Windows install the latest version. Restart your PC afterward.
3. Run the Windows Audio Troubleshooter
If you are still experiencing screen recording no sound on Windows, the built-in troubleshooter can automatically detect and fix hidden bugs.
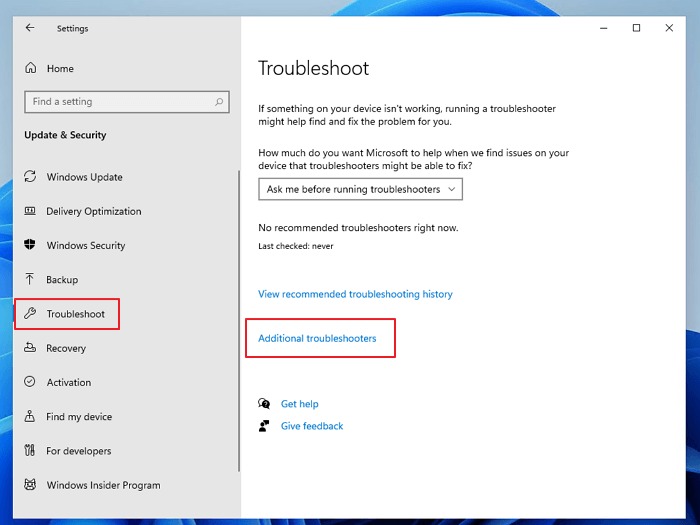
- Step 1: Go to Settings > Update & Security > Troubleshoot.
- Step 2: Click on Additional troubleshooters.
- Step 3: Select Recording Audio and click Run the troubleshooter. Follow the on-screen prompts to resolve any detected issues.
Tip 3. How to Fix Screen Recording No Sound on Mac
Mac users often rely on the built-in QuickTime Player for screen capturing. However, Apple's strict privacy policies and system architecture can make audio recording tricky.
1. Check Microphone Permissions in System Preferences
Just like Windows, macOS requires you to manually approve microphone access for recording applications.
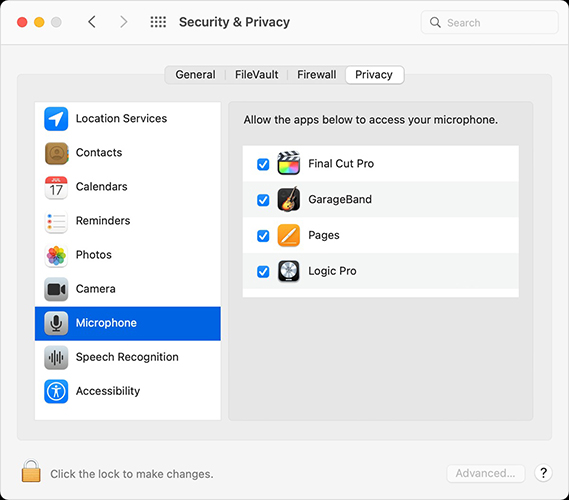
- Step 1: Click the Apple logo in the top-left corner and open System Preferences.
- Step 2: Navigate to Security & Privacy and click on the Privacy tab.
- Step 3: Select Microphone from the left-hand menu.
- Step 4: Check the box next to QuickTime Player or your third-party screen recorder to grant it access.
2. Select the Correct Audio Input in QuickTime Player
A very common mistake is forgetting to select the microphone before hitting the record button in QuickTime.
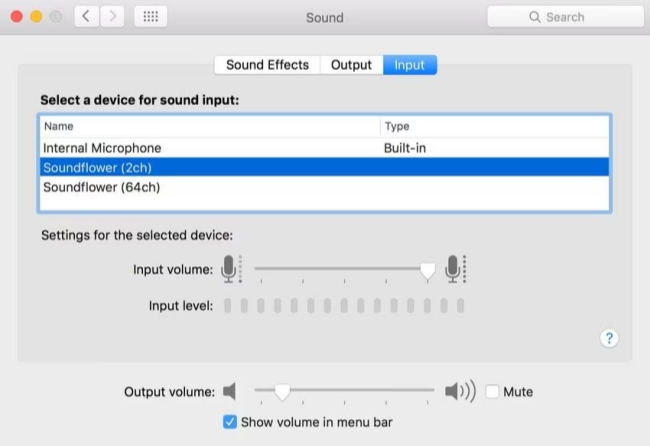
- Step 1: Open QuickTime Player and click File > New Screen Recording.
- Step 2: In the recording control bar that appears, click the small Options arrow next to the Record button.
- Step 3: Under the Microphone section, ensure your Built-in Microphone (or external mic) is selected instead of None.
3. Overcoming Mac's Internal Audio Limitations
As mentioned earlier, macOS does not natively allow you to record internal system audio using QuickTime. If you do not want to use a premium tool like Joyoshare VidiKit, you will need to install a free, open-source virtual audio driver like Soundflower or BlackHole. Once installed, you must route your Mac's output to this virtual driver, and then select the virtual driver as your input in QuickTime. This process can be complicated, but it is the only free workaround.
Tip 4. How to Fix Screen Recording No Sound on iPhone and iPad
The iOS built-in screen recorder is incredibly convenient, but many users are baffled when their iPhone screen recording has no sound. Here is how to restore your audio.
1. Turn On the Microphone Audio Toggle
By default, the iOS screen recorder only captures internal app sounds. If you want to record your voice while navigating your phone, you must manually activate the microphone.
A very common mistake is forgetting to select the microphone before hitting the record button in QuickTime.
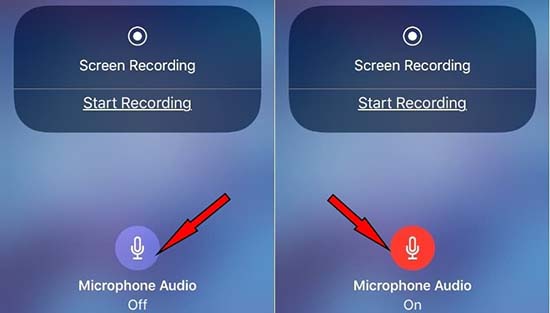
- Step 1: Swipe down from the top-right corner of your screen to open the Control Center.
- Step 2: Press and hold the Screen Recording icon.
- Step 3: A new menu will pop up. Tap the Microphone icon at the bottom. It will turn red and say Microphone Audio On.
- Step 4: Tap Start Recording.
2. Restart Your Device and Update iOS
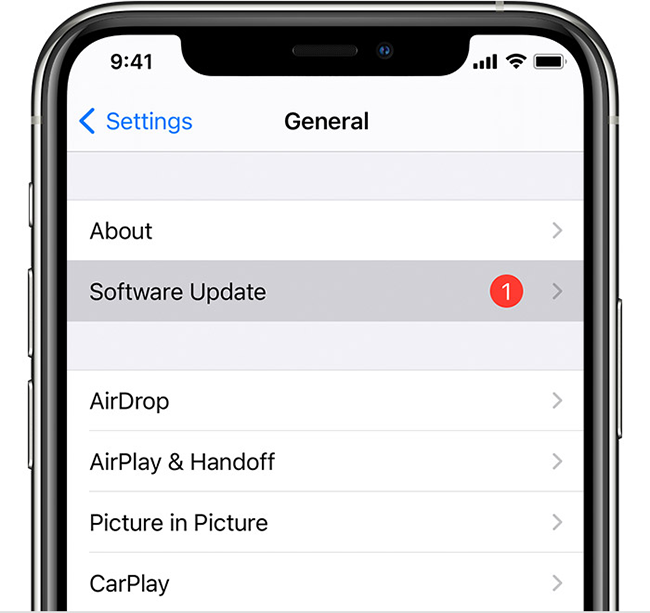
Temporary software glitches can cause the audio framework to crash. A simple device restart can refresh the system and fix the disappearing audio problem. If the issue persists, go to Settings > General > Software Update to ensure you are running the latest version of iOS, as Apple frequently patches recording bugs in new updates.
Tip 5. How to Fix Screen Recording No Sound on Android Devices
Android devices from manufacturers like Samsung, Google, and OnePlus usually feature excellent built-in screen recorders. If your Android screen recording has no sound, the fix is usually found in the quick settings.
1. Turn On the Microphone Audio Toggle
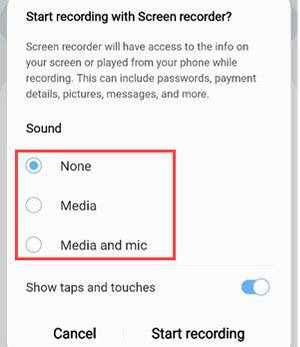
Android allows you to choose exactly what type of audio you want to capture. If it is set to "No Sound," your video will be silent.
- Step 1: Swipe down twice from the top of your screen to access the Quick Settings Panel.
- Step 2: Tap the Screen Recorder icon to initiate a recording.
- Step 3: Before the countdown begins, a settings prompt will appear asking for your Sound settings.
- Step 4: Choose Media (to record internal app audio) or Media and mic (to record both internal audio and your voice).
- Step 5: Tap Start recording.
2. Clear Cache or Use Alternative Recording Apps
If the built-in recorder is malfunctioning due to a system glitch, restarting your phone is the best first step. If that fails, the built-in app might be incompatible with the specific game or software you are trying to capture. In this case, visiting the Google Play Store and downloading a highly-rated third-party screen recording application can easily bypass the system-level audio bug.
Conclusion
Discovering a screen recording with no sound can be a major setback, but it is almost always a solvable problem. By checking your microphone permissions, updating your audio drivers, selecting the correct audio inputs, and being aware of DRM copyright restrictions, you can ensure your recordings are always captured perfectly.
If you frequently record on a computer and want to avoid these troubleshooting steps altogether, investing in a robust tool like Joyoshare VidiKit can save you time and guarantee professional-quality audio every time. Before starting any long or important recording session, always remember to do a quick 10-second test recording to verify that both the video and audio are working seamlessly.