Q:"How do I merge multiple MP3s into one?" - From Audacity Forum
Audacity is a robust and powerful open-source audio editor. The easiest way to use Audacity is to import an audio file and make small changes such as merging and cutting. So how does Audacity combine tracks like MP3 into a large one? Considering its not-so-beginner-friendly interface, it could be a consuming problem for many new users. To help you, we figure out the simplest way ever to let Audacity combine MP3 files. Additionally, in the last part, we will focus on discussing four ways you might never know to make the most of this all-powerful tool. If you've never used Audacity before, this is a good place to start.
- Part 1. Merge MP3 in Audacity
- Part 2. Combine MP3 in Best Joyoshare Audio Joiner
- Tips. 4 Ways to Use Audacity
Part 1. How to Merge MP3 Files in Audacity
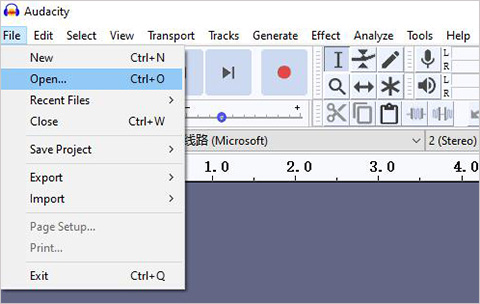
Step 1 Open Audacity on Computer and Add MP3 Files
Having installed Audacity, double click to open it on your computer. Navigate to File > Open to add the MP3 file you want to merge. Repeat the step to add another MP3 file, which will be shown in a new Audacity Window.
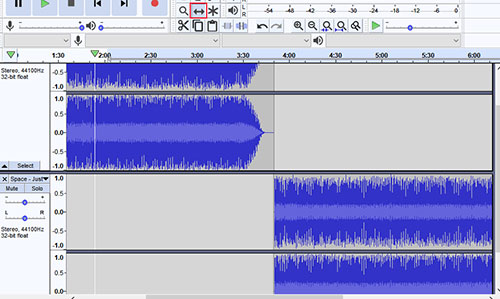
Step 2 Audacity Merge MP3
After deciding the merging order, you can press Ctrl + A and then Ctrl + C to select and copy one of the MP3 track. Next, move to the other window. Hover your mouse on the track and single-click to position the exact place where you would like to put your MP3. Then press Ctrl + V to paste the audio track you copied just now.
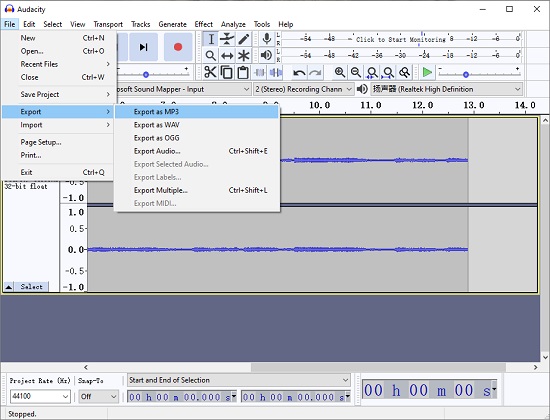
Step 3 Export MP3 Files
Now you can go to File > Export > Export as MP3. You will be able to not only designate save path and rename the file, but also customize the "Bit Rate Mode", "Quality", "Variable Speed" as well as the "Channel Mode". After clicking the "Save" button, you will see a pop-up "Edit Metadata Tags" window. Here you are capable of edit ID3 tags and make adjustments under the "Genres" and "Template" options.
Part 2. Merge MP3 in Joyoshare Audio Joiner
Joyoshare Audio Joiner has an edge over Audacity in that both cutting and merging files can be completed in the same window in a much easier fashion. Moreover, it supports a wide range of audio and video format. Examples are but not limited to MP3, M4A, AAC, AC3, OGG, CAF, AIFF, FLAC, WAV, M4R, AU, ALAC, MKA, and APE. With a clean and beautiful interface, you can merge an unlimited number of MP3 or other files at 60X faster speed without damaging the quality.
Joyoshare Audio Joiner is able to do much better than you can imagine. With an inbuilt editor, you are allowed to stylize your files by clicking the "Edit" icon. For instance, you are capable of cutting and trimming unwanted audio clips, apply audio and video special effects, cropping and rotating videos, inserting watermark, adding subtitles and more.

- Merge MP3 files on Mac and Windows losslessly
- A one-stop tool to cut, trim, convert and edit files handily
- Support combining videos and audios as many as you want
- Join audio and video in different formats at 60X amazing speed
- Offer 2 smart merging modes and real-time preview feature
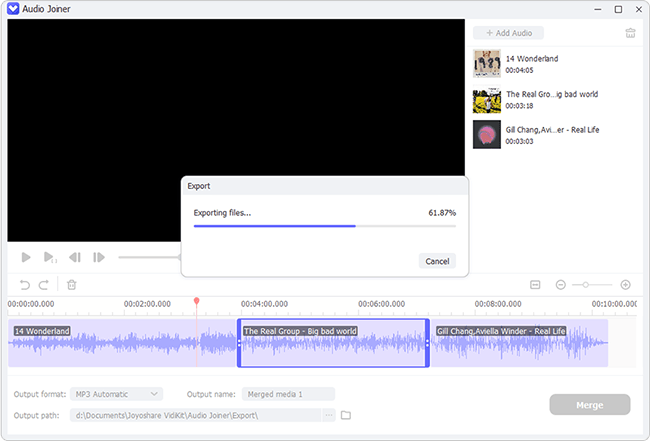
Step 1: Drag and drop or press the "Open File" button at the lower-left corner of the screen to add MP3 files;
Step 2: Press the "Format" button at the lower-right corner of the screen to select merging mode and set output format as MP3;
Step 3: Play and preview MP3 files, and you can drag the yellow slider to cut the unwanted content;
Step 4: Rename and rearrange the order of your MP3 files if necessary; after that, click the "Convert" button at the lower-right corner of the screen to start combining MP3 files.
Tips. How to Use Audacity
1 Import files from iTunes/Apple Music
Generally, you can import audio files in Apple Music/iTunes into Audacity either by dragging them in or using Audacity's File > Import >Audio command. However, audios purchased from Apple Music or iTunes may be protected by DRM. Before using it in Audacity, you need to extract it or record it to an unprotected format. To do so, you can burn the files to an audio CD in iTunes or Apple Music and then rip the CD or choose to play the audio files and use Audacity to record them.
You are able to navigate to File > Import > Audio to browse and add your wanted audio files like MP3, WAV, AAC and AIFF. Or alternatively, you can drag them from iTunes or Apple Music into Audacity straightforwardly. MP4 and M4A (AAC) files can be added into Audacity as shipped. But on Windows and GNU/Linux, you need to download and install the optional FFmpeg library.
2 Edit audio files
If you have just made a recording, you are strongly recommendeded to immediately export your audio file as a safety copy before you start editing the project in case anything goes wrong.
Step 1: Run Audacity on your computer and navigate to File > Open to import an audio file;
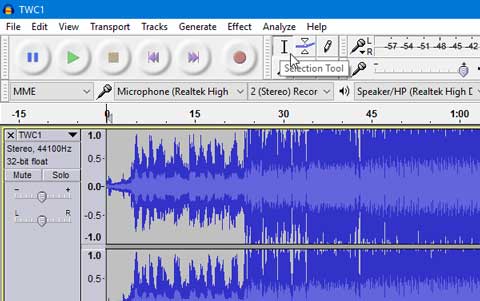
Step 2: To cut the beginning and the end separately, you need to activate the "Selection Tool" (or press F1) in the top bar and then use the left cursor to drag to select a certain file length; after that, navigate to Edit > Remove Special > Split Delete to get rid of it;
Step 3: To cut the beginning and the end synchronously, you need to apply the Selection Tool to highlight the part you want, and then go to Edit > Remove Special > Trim Audio;
Step 4: Now you can move to File > Export > Audio to save it.
b. Apply effects in Audacity
Step 1: Use the Selection Tool to select part of or all your audio track;
Step 2: Choose the effect you desired from the Effect menu and set parameters if necessary.
c. Increase volume in Audacity
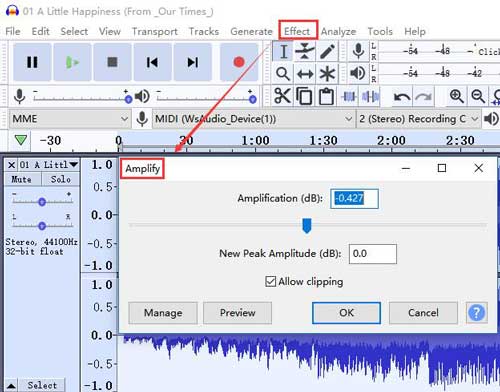
Step 1: Import your audio file into Audacity;
Step 2: Navigate to Effect > Amplify and then you can begin to customize the settings according to your requirements.
3 Record audio
Step 1: Set the output destination of your instrument in your instrument preferences, and then set the input of Audacity to match the output from your instrument;
Step 2: Click the "Recording Level" button to select the "Start Monitoring" and then play your instrument to make sure your outputs and inputs are properly routed; the LR input meters should respond;
Step 3: Press the "Record" and "Stop" button to start and stop recording;
Step 4: Export and save your recordings.
Related article: Record Computer Audio in Audacity
4 Burn audio CDs
It is worth mentioning that Audacity does not burn CDs directly. But audio files created with Audacity can be used with a CD burner to create an audio CD.
Step 1: Set the "Project Rate" to 44100 Hz at the bottom left of the Audacity window;
Step 2: If you need to create a stereo track for your project, click Tracks > Add New > Stereo Track;
Step 3: Now navigate to File > Export > Export as WAV.
As for CD burning software, you can use Windows Media Player, iTunes or Apple Music. On Window Media Player, you need to take advantage of the "Burn" tab. Next, drag the files you want to burn to an audio CD onto its "Burn list". After that, you can click on "Start burn" to begin.
On iTunes or Apple Music, you need to first create a playlist. Then drag the files you want to burn into it. Right-click on the playlist in the panel on the left and hit on "Burn Playlist to Disc" in the dropdown menu (click the "Burn Disc" button at the bottom right of the window in iTunes version 9 or earlier). Finally, click "Burn" to get started.